Dual E3D-V6 hot end mount for Solidoodle Workbench or Apprentice
thingiverse
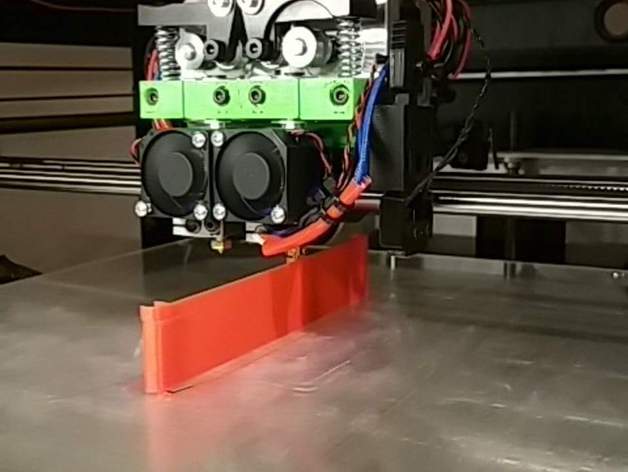
This mount is designed specifically for the Solidoodle workbench, although it may also be compatible with other setups. I created this design in an effort to retain as much of the existing hardware as possible. The project is ongoing and subject to modification, but many users have been waiting eagerly for a reliable solution to get them started. As additional details become available, they will be posted along with a comprehensive instructional video when all aspects are fully implemented. For now, a fan mount remains one of several essential features yet to be developed; any user ideas and suggestions are not only welcome but also greatly appreciated. Thanks in advance for your interest and participation! Post Edit: If you're interested in following the project's development progress, please visit the dedicated forum at http://www.soliforum.com/topic/10064/e3d-v6/page/4/ Regarding this setup's configuration, please note that it preserves the 31.5mm spacing between the nozzles while sacrificing some Z-axis height. As a result, users who require this specific alignment will need to wait for an updated design incorporating a customizable spacer. Important Update (May 7, 2015): To enhance overall build stability and accommodate increased Z-axis clearance, I have incorporated an adjustable riser pad into the design. This feature is dependent on installing four M3x12 socket head cap screws; their placement will determine the total height of 301mm. Moreover, version 2 of the mount now includes slotted screw holes for greater flexibility in adjustability. For instance, users can position the center slot anywhere between +2mm to -2mm without experiencing difficulties during installation. The Peek fans used initially may be swapped with E3D-compatible fan components. When switching from an existing setup using an M3x30 socket head cap screw for an IDler arm attachment. A detailed inspection this weekend confirms that the parts should all fit in place seamlessly upon completion. Following this, comprehensive final assembly photos will be shared shortly. Critical Update (May 11, 2015): Further revisions to the riser's dimensions allow for improved compatibility and better integration into your current build setup. You may want to visit the provided YouTube video for reference: https://www.youtube.com/watch?v=HeAxYT4VRls&feature=youtu.be Latest Additions (Updated on February 17, 2017): A new firmware file is available under the 'thing files' directory; this should enable all necessary updates without causing any inconvenience during operation. Step-by-Step Instructions: Begin by printing dual_e3d-v6_workbench or dual_e3d-v6_workbench_v2 using an appropriate FDM setting such as ABS, PLA, or HIPS at a solid 100% infill. Note that no thermal compensation is necessary due to limited heating capacity at higher print speeds. Additionally, if required by specific configuration preferences, consider opting for version v2, suitable for applications with E3D-based systems that significantly vary in length. Once these parts are fully integrated and securely fastened in place using the provided M3x12 cap head socket screws, re-check your assembly to ensure accurate alignment of each print element and adequate structural integrity is achieved. Tips on Mounting: Don't overlook adding these firmware configurations from Thing Files when integrating with a newly installed 2-3 dual e3d-V6 workbench setup: define TEMP_SENSOR_0 5 since E3D hotends demand an adjusted thermistor definition define TEMP_SENSOR_1 5 define HEATER_0_MAXTEMP 310 for compatible compatibility of E3D heated temperature sensors with your overall build environment Note: Make sure you select and utilize the right kind of Arduino based hardware as a pre-set, otherwise some sort of interference issues could come up; this can simply be dealt with through use of one specific, self contained stand alone execution method. As part of finishing my print experience I set Z offset at 4.55 but in general the final quality still needs improvement, which could be reached via slight tweaking within each of our respective settings options
With this file you will be able to print Dual E3D-V6 hot end mount for Solidoodle Workbench or Apprentice with your 3D printer. Click on the button and save the file on your computer to work, edit or customize your design. You can also find more 3D designs for printers on Dual E3D-V6 hot end mount for Solidoodle Workbench or Apprentice.