Dual E3D Mount for Mono Mendel
thingiverse
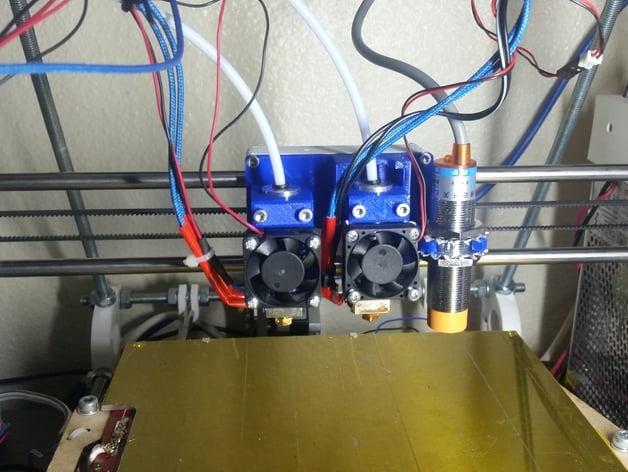
Printer no longer supported as of February 2017. I have created a dual E3D v6 mount that attaches to the Mono Mendel carriage from RepRapPro, which can be adapted to your mounting carriage using my CAD files. This new mount has a prox sensor, allowing me to use the spring normally used for Z axis calibration adjustments on the E2 height. The difference between v2 and v3 is which hotend is adjustable - in v2 it's the right one, and in v3 it's the left one. BOM: x9 M3x25mm x9 M3 Hex Nuts x1 Spring x2 E3D v6-Bowden: http://amzn.com/B00NAK9L6Q x1 18mm Prox Sensor: http://amzn.com/B005HKXKOG x1 Dual E3D Mendel Mount with Prox Sensor v2 or v3 x1 ADJ Collar Mount x2 Collar Mount Assembly: Complete post-processing Add hex nuts Assemble ADJ collar mount Mount to carriage Mount E1 in fixed collar Mount E2 in adj collar Mount 18mm prox sensor Assembly instructions follow. Software: I use Marlin with auto bed leveling. The nozzles are 37.9mm apart in v2 and 34.9mm apart in v3. My actual offsets were about 1mm off from the CAD values, so they will require some tweaking to get right. The prox sensor is offset by X:30 Y:11 in v2 and by X:28 Y:11 in v3. Adjust your Z offset on the fixed hotend before leveling the nozzles. I have my switch retraction amount at 14, which has been working well for me. This amount should be just enough to get the least amount of oozing, but anything too much can cause clogging. Actual offset may vary. Nozzle offset calibration: When calibrating the nozzle offset, I used this thing: http://www.thingiverse.com/thing:401570 as well as this thing: http://www.thingiverse.com/thing:124450. The first file was used to calibrate the offset in the X and Y directions. These settings are put into your slicer (I use Cura). See featured picture above of my test results. When plating in Cura, the outer wall was the part printed with E2. Therefore adjustments were made to its placement relative to the center square. The adjustments are made based on the center square location relative to the walls. Follow these rules when calibrating: Square is too far right -> make your offset value more negative Square is too far left -> make your offset value more positive Square is too far down -> make your offset value more positive Square is too far up -> make your offset value more negative My offset values started at X:-37.9 Y:0, and my first print had the square down and to the right. As I dialed in my calibration, my values eventually settled at X:-38.93 Y:0.82. I have not tested these rules with v3, but I imagine they will work similarly. Build material is PLA; however, all other materials should work just as well. Post-Printing: After printing, you will need to remove supports and add in the M3 hex nuts before assembling. Remove support tabs from ADJ collar. Assembly: Hex nut installation The first part of assembly is to add in all the hex nuts. Follow the placements shown below as well as the installation instructions for the fixed collar mount hex nuts. Hex nuts go in on either side of the ADJ collar mount. Use pliers to install these hex nuts. Keep in mind that some hex nut holes that were bridged will need to be cleared out or widened to fit the nut. ADJ Collar Mount Installation: Insert your leveling bolt and sprint. My spring was in use, so it is not in the picture, but it goes between the top of the ADJ collar mount housing and the ADJ collar mount as seen in the featured photo at the top. After insuring the glides and rails are clear of material, slide the ADJ collar mount onto the rails. Use the leveling bolt to raise the ADJ collar mount to above the fixed collar mount. Hex nut installation ADJ collar mount installation Mounting to Mendel: Use four M3x25mm bolts and M3 hex nuts to mount the assembly to the Mendel carriage.
With this file you will be able to print Dual E3D Mount for Mono Mendel with your 3D printer. Click on the button and save the file on your computer to work, edit or customize your design. You can also find more 3D designs for printers on Dual E3D Mount for Mono Mendel.