Dual bearing X-idler seat extension for the German RepRap x400
prusaprinters
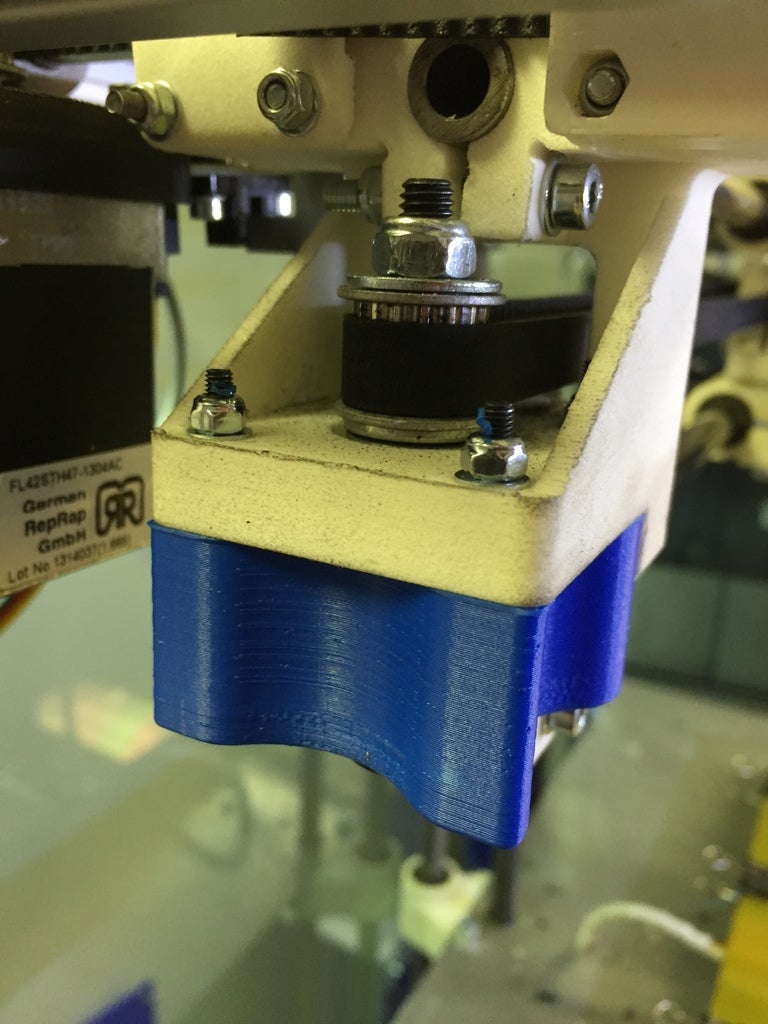
<p>The original German RepRap x400 comes with 3D printed sintered plastic X and Y carriages. The X direction idler pulley sits in the Y-carriage in a cantilever fashion attached to a 608zz bearing using a shoulder bolt. The tension on the X-belt causes a deflection of the idler's axis, therefore grinding into the belt. This must be an oversight in the original otherwise good overall design of this 3D printer. There is also nothing stopping the bearing from sliding out of the 10mm thick seat other than mild friction and the X-belt tension.</p> <p>This seat extension solves all the above problems by including a second 608zz bearing, keeping the axis straight under loading with proper constraint of the whole assembly.</p> <h3>Print instructions</h3><h3>Category: 3D Printer Parts Summary</h3> <p>The original German RepRap x400 comes with 3D printed sintered plastic X and Y carriages. The X direction idler pulley sits in the Y-carriage in a cantilever fashion attached to a 608zz bearing using a shoulder bolt. The tension on the X-belt causes a deflection of the idler's axis, therefore grinding into the belt. This must be an oversight in the original otherwise good overall design of this 3D printer. There is also nothing stopping the bearing from sliding out of the 10mm thick seat other than mild friction and the X-belt tension.</p> <p>This seat extension solves all the above problems by including a second 608zz bearing, keeping the axis straight under loading with proper constraint of the whole assembly.</p> <h3> Post-Printing</h3> <p><strong>Instructions and extra components</strong></p> <p>4x M3x40mm Socket Head Screws<br/> 8x M3 washers (optional)<br/> 4x M3 Nylock Nuts<br/> 1x M6x61 Socket Head Shoulder Screw<br/> 1x 608ZZ ball bearing</p> <p>Print the part and ream the bolt holes to size using a 3mm drill bit.<br/> Before going further, you might want to consider adding a belt tightening solution, as it is not easy to put back the belts in place tight enough after removing the belt caps from the back of the extruder motor mount. You can download my belt tightening caps for the X and Y carriages (links here).</p> <p>Untighten the X-belt and disassemble the idler/bearing/shoulder screw.<br/> Press the new 608ZZ bearing inside the printed seat and assemble the whole thing as shown in the picture, with the same washers in place. Bolt the assembly in place using the M3 bolts, washers and Nylocks. Don't tighten the idler's M6 Nylock too much as this will cause the sides of the bearings to lock up. To get rid of the slack, gently tighten first, then unscrew 1/4 turn or until the bearing rotate freely.</p> <p>Even though this configuration is also cantilever, now the bending moment is properly supported by two distant bearings, keeping the idler's axis straight.</p> <p>Enjoy!</p>
With this file you will be able to print Dual bearing X-idler seat extension for the German RepRap x400 with your 3D printer. Click on the button and save the file on your computer to work, edit or customize your design. You can also find more 3D designs for printers on Dual bearing X-idler seat extension for the German RepRap x400.