DRV8825 compatible servo control for CNC shield with Digispark Arduino
thingiverse
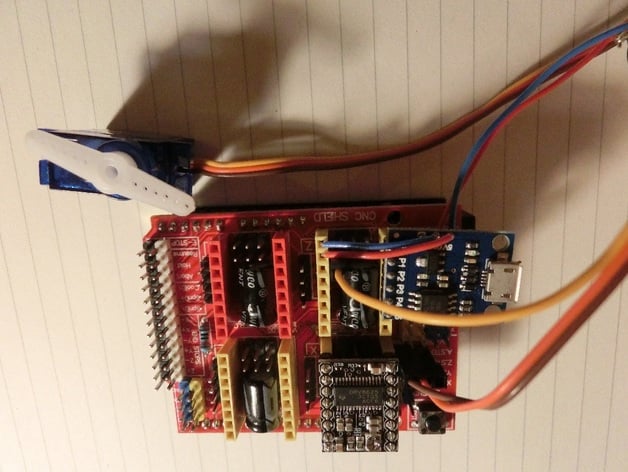
This project provides a straightforward solution for using servos with CNC and plotter projects based on GRBL Arduino firmware (and CNC shield). Of course, it's also possible to use a modified GRBL firmware to drive the servo directly from the main Arduino. However, this requires specialized firmware and often specific Gcode instructions. The goal of this project is to utilize a Digispark (Attiny85) to mimic the DRV8825 stepper drivers in controlling the servo. This way, generic Gcode can be used and the Digispark handles converting Z axis commands into servo movement. The aim was to make this as simple as possible so anyone can accomplish it. It would also work on other axes, but placement of the module might become less straightforward and my main focus was the Z axis (as for 2.5D plotter like movement). Custom Section Step 1: Required Components Needed: One Digispark module, the included pin header, and two pieces of hard wire. For software needs, one requires the Arduino IDE, the Digispark drivers, and a micro USB cable. Step 2: Soldering Solder the pin header on the bottom and the wires on the 5V and GND pin. Step 3: Flash the Firmware Use the Arduino environment to upload the included ino file to the Digispark. Instructions on how to set up the Arduino IDE for Digispark can be found online with some searching. Once the firmware is flashed, the USB cable is no longer needed. Step 4: Assemble Everything The Digispark module can be inserted as shown in the photo. The 5V and GND wires can be inserted into the FAULT and GND pins of the DRV socket (as shown in the picture). P0 of the Digispark module aligns with the DRV8825 DIR pin. The servo PWM pin should be removed from the three-pin dupont socket and connected to the pin used for microstepping jumper (M2) because that way it is connected to P4, which handles PWM. If unsure which pin on the shield it is, you can try all six of them without causing any damage. Power for the servo can be taken from the CNC shield as shown in the picture. Now you can control the servo with generic Gcode Z commands! Certainly, the movement of the servo is limited to 180 degrees, but it remembers the absolute position, so it's possible to return to zero position. If necessary, the startup position (initial value = 90) and sensitivity (MICROSTEP) can be adjusted in the code. For heavier servos, an external power supply might be a good idea since the 5V on the CNC shield is powered from the USB port of the computer. For simple servos, it should suffice.
With this file you will be able to print DRV8825 compatible servo control for CNC shield with Digispark Arduino with your 3D printer. Click on the button and save the file on your computer to work, edit or customize your design. You can also find more 3D designs for printers on DRV8825 compatible servo control for CNC shield with Digispark Arduino.
