Driveuino 1.0
pinshape
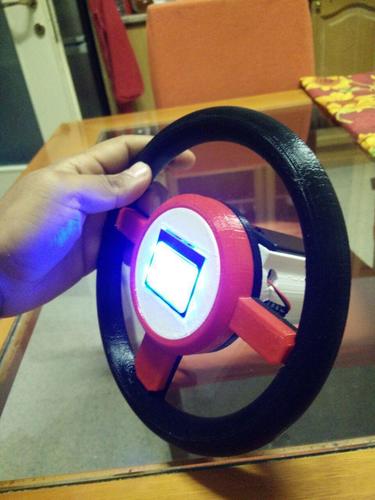
I want to share my project using a display from a Nokia and an accelerometer thanks to Arduino Mini Pro, so I decided to build an old-style game. You have just got to drive on the road without crashing your car. I made the game (still improving it, if you want to help, just write me). It's really easy to print; I use 25% infill, changing the colors of the parts lets you make it look as you want. You can find the code for Arduino here. I'll update the design with schematics for electronics and information about the parts soon. IF YOU LIKE THE PROJECT, PLEASE PRESS LIKE! Everything is ready now! You can find the video of the final result here. Stuff and Electronics: Arduino Atmel 328 5V Power adapter Accelerometer LCD 5110 Battery cover for 9V Connections: The most important thing to know is that LCD needs 3.3V of power supply, everything else 5V; that's the main focus of the power adapter. For LCD: VCC to 3.3V BL to 5V (the backlight works better with 5V; if you don't want the light connect it to ground) GRN to GRN CLK to pin 3 of Arduino Mini Pro RST to pin 6 of Arduino Mini Pro DIN to pin 4 of Arduino Mini Pro CE to pin 7 of Arduino Mini Pro DC to pin 5 of Arduino Mini Pro For accelerometer: VCC to 5V (some models work with 3.3V) GRN to GRN CS/CD to pin 10 of Arduino Mini Pro SDA to pin 11 of Arduino Mini Pro SDO to pin 12 of Arduino Mini Pro SCL to pin 13 of Arduino Mini Pro In the schematics I used a breadboard; it's just to make it more clear. Any answers? I am here!
With this file you will be able to print Driveuino 1.0 with your 3D printer. Click on the button and save the file on your computer to work, edit or customize your design. You can also find more 3D designs for printers on Driveuino 1.0.