Drippy Bucket Bag
prusaprinters
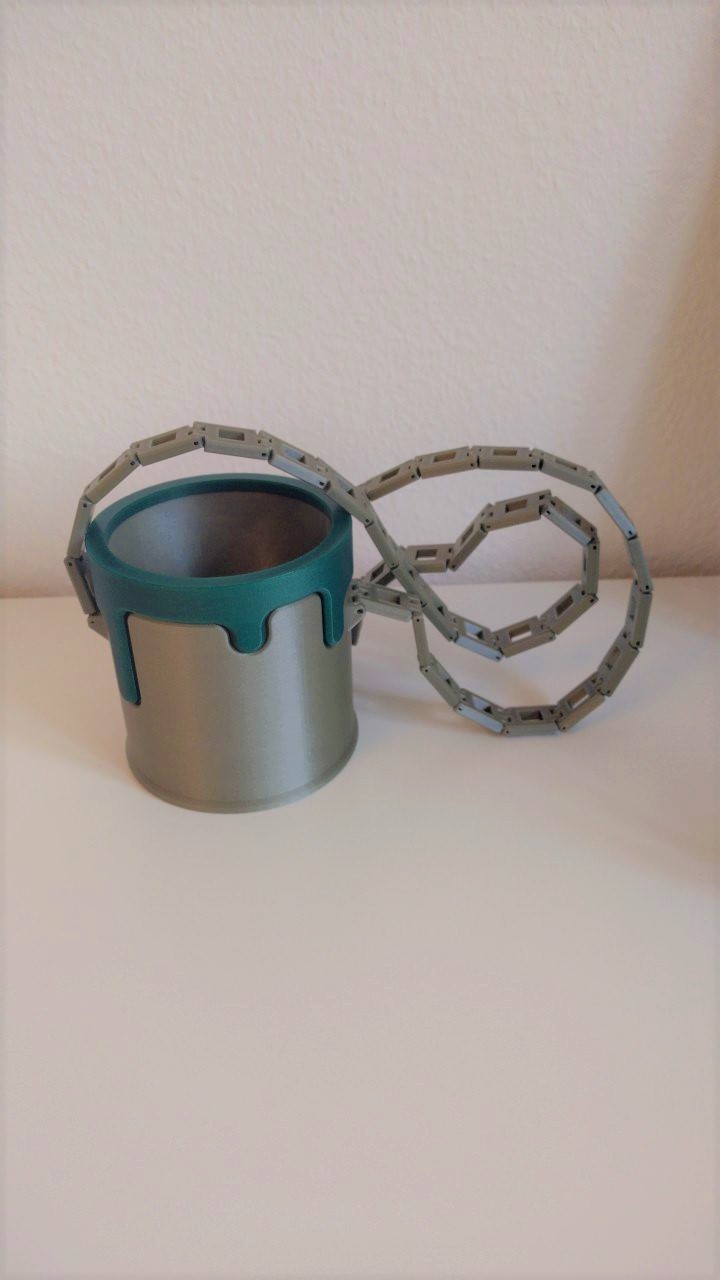
<h3>Its a fun little bucket turned into a handbag</h3><p>This remix was created with FreeCad and prusaslicer. Pleas check out <a href="https://www.printables.com/model/73118-drippy-bucket">Drippy Bucket</a> for the Original.</p><p>Other than the printed parts, about 1 meter of 1.75 mm Filament is needed for assembly. Assembly should take less than 10 minutes. The assembly guide can be found down below. </p><p>This bag is customizeable. Parts can be changed out easily for a new pop of color, or if something breaks. However <strong>do not resize</strong> as it is later impossible to assemble.</p><h3><strong>Assembly:</strong></h3><p>If anything is unclear to you, feel free to ask questions and I will try to help you :) </p><p><strong>Tools required: </strong></p><p>For assembly you will need the before mentioned meter of 1.75 mm Filament, Pliers for cutting filament, a ruler and a needle if you want to undo a connection. </p><p><strong>Print instruction:</strong></p><blockquote><p>All parts print and fit together well in PLA at .3 mm layer height, I cannot speak for other materials such as PETG which typically shrinks a bit more than PLA.</p></blockquote><p><a href="https://www.printables.com/social/39930-davemoneysign"><strong>davemoneysign</strong></a><strong> - </strong>the creator of<strong> Drippy Bucket</strong></p><p>The Link part is also printed with .3 mm layer height and works well in PLA and PETG. You will need at least 30 Links for the body strap. Every Link adds about 2.5 cm or 1 inch to the length of the body strap. Adding links or removing links is easily done, even after you have completed assembly. </p><p>I have used <strong>Prusament PLA Pearl Mouse </strong>and <strong>Prusament PLA Opal Green.</strong></p><p><strong>Main Body: </strong></p><p>This should be very clear, but in case you are wondering: Just push piece <strong>B drippy </strong>onto piece <strong>A drippy bucket bag. </strong>It is a friction fit. </p><p><strong>Body Strap:</strong></p><p>The Body strap is a repetition of the following steps: First cut filament to 1,8cm and then insert it in <strong>C link</strong>, to connect the pieces.</p><p>You will have noticed that there is one side with a smaller hole which the filament does not fit. This is for undoing purposes. Just inset a needle (or anything small and pointy) and then grab the filament on the other side and pull it out.</p><figure class="image image-style-align-center image_resized" style="width:30.25%;"><img src="https://media.printables.com/media/prints/275017/rich_content/a921e6d0-81fb-404e-b587-124a94ee9793/20220912_222051.jpg#%7B%22uuid%22%3A%22f4ba1a60-7608-424f-8fba-f3b0a4d28021%22%2C%22w%22%3A720%2C%22h%22%3A1134%7D"></figure><p> </p><p>This is how every connection can be undone. Make sure that all pieces are correctly orientated. This means that there is on one side a small and on one side a big hole, when you push the filament in. </p><figure class="image image-style-align-center image_resized" style="width:477.725px;"><img src="https://media.printables.com/media/prints/269659/rich_content/c44b773a-2c96-4843-81d6-9332485a2ba8/thumbs/cover/800x450/png/image.webp"></figure><p>The length of the strap is on you. Connect as many pieces as you like. Every link piece adds roughly 2.5 cm or 1 inch. </p><p>Now cut two pieces of filament to 2.3 cm and attach the Body strap to the Drippy bucket. This is a little bit harder to push in. If you cant do it, open up the holes on the link piece with an exacto knife. </p><figure class="image image-style-align-center image_resized" style="width:59.48%;"><img src="https://media.printables.com/media/prints/275017/rich_content/9269a3ae-0c0a-4add-9a97-7fe975f16fb1/image.png#%7B%22uuid%22%3A%223a7baf4d-d9c3-4ce6-ad4c-edbda688d442%22%2C%22w%22%3A957%2C%22h%22%3A1280%7D"></figure><p>Enjoy your finished bag!</p><h3>Final thoughts</h3><p>Please let me know how your experience with this bag is. I hope you enjoyed it. If there is anything you would like to see changed, please comment and I will reply. </p><p>Here is a link to my other Handbags, if you would like to make other 3D printed handbags: <br><a href="https://www.printables.com/social/29398-magda-j/collections/254916">https://www.printables.com/social/29398-magda-j/collections/254916</a></p><p>At last, I would like to see your bags, so please post a make and earn some prusameters :)</p>
With this file you will be able to print Drippy Bucket Bag with your 3D printer. Click on the button and save the file on your computer to work, edit or customize your design. You can also find more 3D designs for printers on Drippy Bucket Bag.