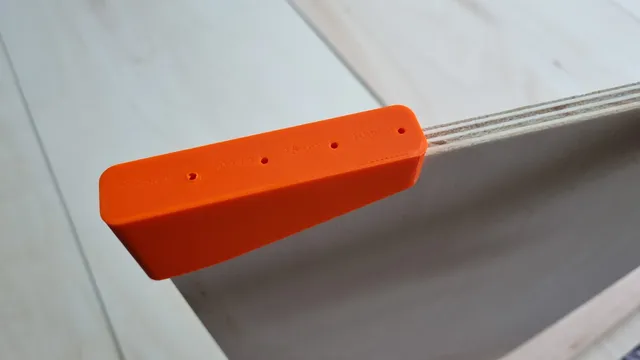
Drill guide for edge of plank
prusaprinters
Simple but effective drill guide to drill or mark holes in the edge of a plank. I've drilled just over 100 holes with the tool, which has been fast and accurate. Due to wear on the plastic hole I don't imagine that it would remain accurate for 1000's of holes, but for small to medium projects this should be just fine. Use your most durable and heat resistant filament to print this guide. Scaling model widthThis model was designed for 12mm (1/2") but can be scaled. To get the percentage to scale this models WIDTH by for your size plank:1200 / YOUR_PLANK_THICKNESS_IN_MM = xxx% for scaling the width of the model Scaling model lengthThis model has holes on 4 location measured from the edge: 25mm, 50mm, 75mm, and 100mm. If you require a hole on a different location then choose the hole location closest to your value and calculate the percentage to scale the models LENGTH:CURRENT_CLOSEST_HOLE_(ex. 25) * 100 / DESIRED HOLE LOCATION = yyy% for scaling the length of the model Drill guide and hole sizeScaling model height should not be required. The drill guide is now 10mm long. If you require a different length drill guide then scale as such.The holes themselves are for a 3mm drill bit, but will likely get smaller due to how 3D printing handles these tiny holes.Note: don't scale this model any smaller than 50% or larger than 200% in any direction because the holes will be warped too much to be useful. Design tipsWant to design your own models, and are already a bit familiar with 3D CAD software? Here's some guidelines/tips I can offer that helped me with this model / hindsight:If the plank thickness is X, then only the corner of the guide should be width X. The rest of the guide should have a small slope such that close to the opening there's some extra space in the order of a few tenths of millimeters. For this model I used 0.3mm extra slope near the opening. This allows the guide to slide onto the would easily and only lock itself in place tightly once the entire guide is in place.At the ‘mouth’ of the guide and some big chamfers to help with ‘seeking’. This will greatly speed up the process of placing the guide on a new corner.Use ‘engraved’ text on your 3D model, that way you'll always know in the future what both the 3D model and the print is for.Even though you might not need multiple holes; printing multiple holes could make this model more multifunctional if you ever decide to change hole placement or use this guide for a different project.Have fun 3D modelling!
With this file you will be able to print Drill guide for edge of plank with your 3D printer. Click on the button and save the file on your computer to work, edit or customize your design. You can also find more 3D designs for printers on Drill guide for edge of plank.
