Dreamcast GDEMU Mount w/SD Extender
prusaprinters
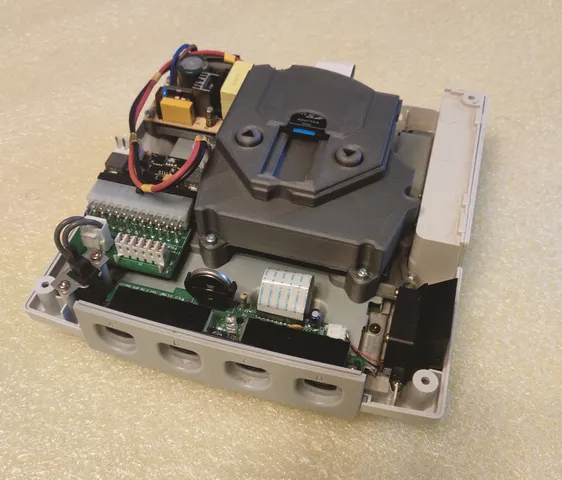
This is modular Dreamcast GDEMU (optical drive emulator) mounting system. It's designed to fit several criteria:Rigidity and sturdiness;Restoration of original airflow;Simple to print (minimal support and overhang);Compatibility with other mods;Expandabilityand a couple of my personal aesthetic choices - SD card loading by sliding it into the slot horizontally (imgur video) and an option to get rid of external power brick for PicoPSU/DreamPSU by installing AC/DC power supply board internally.Here's what complete build with dual buttons and internal 12V PSU looks like:(and also album with much more photos and commentary on this build, as a supplementary material to instructions provided below)This build requires several extra items:*SD Card extender (20 or 40 cm ribbon reccommended). You can buy them from AliExpress/eBay, there are two main options available (see picture above) - sold without shell (right one) and with shell (left one, shell removed). Ones without shell usually have two "ears" with mounting holes. Ultimately it doesn't matter which one you pick, as this design is compatible with either option, but version without shell might require to twist the ribbon, not just fold it; *M3 threaded brass inserts (4 mm outer diameter) (16+) (As for length - I've used 5mm ones, but you can use 3 and 4 mm ones too. Anything over 5 mm won't fit in some parts);*M3x6 (8+), M3x10 (8+) screws (DIN7985 or similar), optionally some M3x8. Just get 20 of each, honestly.Optional parts:For internal AC-DC PSU build:12V3A Power Supply (linked is the one I've used);IEC 320 C8 PCB mounted plug (just look at the one on stock PSU, you need exactly the same one).For dual button build:12x12mm tactile switches with a square peg (like this one);about 1m of electric wire;2.54 pitch pin header male (3 pins) and either DuPont connector with 2.54 pitch (3 pins)(if you have proper tools for crimping them), or female pin header for soldering.For single button build:spring (30 mm uncompressed length, 5 mm outer diameter). Springs like this are very common in cheap ballpoint pens (that's exactly where I got mine, from 10-pack of ballpoint pens from dollar store). Button will work just fine without the spring, spring only adds more travel to the press.Regarding dual button setupI'm providing the files, because I already spent time making those, but I don't recommend doing this build - for all extra effort it takes, that setup is pretty much useless. If you're using GD Menu (like 99.9% GDEMU users, including me), both buttons will force console to boot back into GD Menu. Switching between disc images on SD card only works when you don't have GD Menu.Compatibilty:This mod should be compatible with most PicoPSU mods, stock PSU (only with [NO REAR EXT] Support), GDEMU (obviously), Noctua mod - I've tested it with this bracket. I haven't tested it with DreamPSU and DCHDMI, but I don't think there would be issues with those.Which files to print:All files with [ALL] - those files are universal for all buildsAll files with [1B] OR [2B] for single button or dual button builds respectively.If you plan to have an internal AC-DC PSU, print BOTH [REAR EXT] (Support and 12V3A PSU mount) files. Otherwise print only [NO REAR EXT] Support.Here's build instructions (I've also uploaded them as "Assembly instructions.zip", in case something happens to imgur versions):Here are extra/different steps for other options:And finally some last minute addition that is not in the photos:These 4 holes are intended for mounting extra modifications. I've provided three files with [EXT] in titles as examples - those are mounts for 20x80 protoboard.Though in the end I've ended up with a bit more refined holder (and shortened the board to 60 mm)I'm using the board to break out 5V and 12V lines from PicoPSU (mostly for planned extra fans and this mod ).Print SettingsPrinter Brand:CrealityPrinter:Ender 3Rafts:NoSupports:YesResolution:0.2Infill:25%Filament: FDPlast PLATerminator GreyNotes:There's very few parts that actually require supports - that's both [NO REAR EXT] and [REAR EXT] Support, [1B] Button Guide and [REAR EXT] 12V3A PSU Mount. I recommend using default Cura supports, not the tree supports for this. Printing orientation should be obvious for all parts - lay it down on flattest side with least features and you'll get it right. Oh, and print buttons in 0.1 layers, for better resulting surface.Materials - I've printed whole thing in PLA and after 16 hour long test (running Soul Calibur, both playing and demo mode) all that happened was slight curling of some edges, no more than half millimeter , nothing drastic or affecting structure. You can print [ALL] Mount L and R out of PETG for peace of mind, but it's not really necessary.Category: Video Games
With this file you will be able to print Dreamcast GDEMU Mount w/SD Extender with your 3D printer. Click on the button and save the file on your computer to work, edit or customize your design. You can also find more 3D designs for printers on Dreamcast GDEMU Mount w/SD Extender.