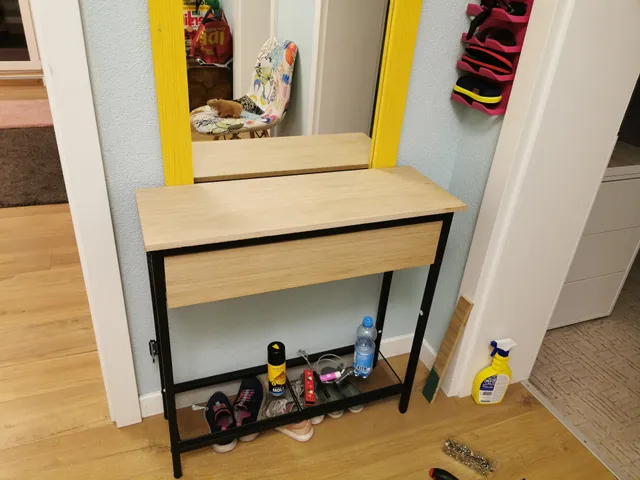
Drawer for Hoobro console
prusaprinters
I needed a not too deep console table for the hall. Unfortunately, I can't find much of this type of furniture on the market, and even if there were, they didn't match the decor. And if the appearance was appropriate - it was rare when the furniture was "deep" enough - I could only have it 25 cm from the wall so as not to catch it when walking. And if it's shallow, it's too wide (I only have room for 95 cm)...Finally - I found - the Hoobro brand on Amazon, there are perfect tables. There are different versions of the lower shelf, but the frame is the same. If it weren't for the fact that they don't have drawers. Drawers are very useful. So I designed the drawer mount for them, and the drawer itself.Hoobro B09NLJ28L1EBF75XG01EBF74XG01 https://amzn.eu/d/4PKyVgp etc.The frame of this furniture is metal, which makes it easier to securely screw the drawer. I planned to screw the "external" elements from the inside (so that the screws were invisible). I made a "drill guide" template to mark drilling locations, but even if the drill moves a little, there is no problem, because the holes in the "external" element are wide and allow you to adjust the position.If you can drill holes from the inside of the frame, thread them (M5), or install rivet nuts - great, the mounting will be practically invisible. If you have a problem with this - you can drill through the frame at the front and screw the element with longer (black) screws going through the frame - M5 x 30-35 should be approx.Drawer guides used Hettich KA1730 250mm (for drawers 185-260) - the holes are adapted to this guide, but I think you can try anything 10x17mm wide, for 10kg drawers… The smaller part of the guide, the one with many holes, is screwed to the "External" element - the holes are adapted to "computer fan" screws, the holes in the guide also fit them perfectly. There is no need to screw in all the holes - 3 are enough.The wider part of the guide is screwed to the "internal" part - one screw from the set with the guide (M4) from the inside of the drawer, screwed through the printed element, into the thread in the guide. To be sure, you can still screw it into the second hole (some M4-M5 with a nut), but this is not necessary - the guide lies perfectly in its groove.For this cabinet - the necessary wooden elements for the drawer - I made it from a 14 mm thick veneered board.1) drawer front - 130mm x 680-685mm (depending on what gap you expect on the sides)2) bottom - 195mm x 665mm (approx., better 3mm less than too much = too tight)3) rear - 113mm x 670mm (as above)4) If you would like to change the countertop (e.g. to the same size as the drawer front), the appropriate size will be 260mm x 750mm (the countertop extends slightly beyond the cabinet - the cabinet cannot be placed right next to the wall, because there is a skirting board, and the countertop - it can lean against the wall, so that things don't fall out of it "behind the cabinet"I printed the elements with ASA (because in black it is nicely matte), but I leave the choice of color and material to you. Printed on a profile "like parts for Voron", i.e. 5 outlines, 40% filling, 5 bottoms and tops - it gives a printed elements that are more solid than a guides and a wooden drawer.Of course - “external” and “internal” elements - you have to print them twice, for L and R side, as a mirror. The “internal” part looks best when printed vertically, if your printer is capable of it, but it is much faster when printed horizontally (possibly with support in place for the guide)Edit: I added “drawer divider” which is screwed to front, back, and bottom too, so make drawer more stable.
With this file you will be able to print Drawer for Hoobro console with your 3D printer. Click on the button and save the file on your computer to work, edit or customize your design. You can also find more 3D designs for printers on Drawer for Hoobro console.
