Dragonboard 410c Case
thingiverse
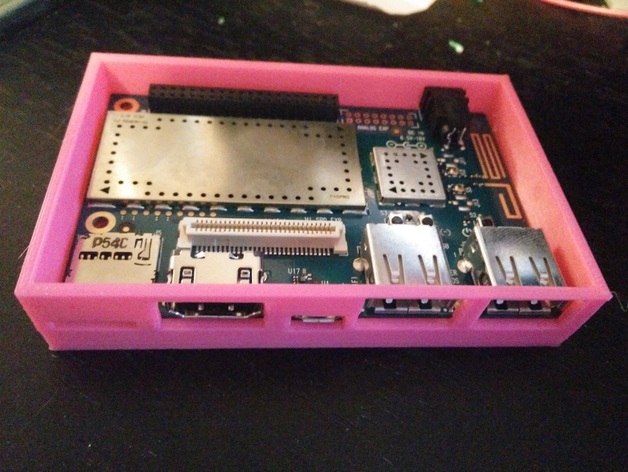
This is a custom build for the Dragonboard 410c. Access to power and all ports on the front is readily available, along with switches at the bottom and a gpio header. The mounting holes are specifically designed to accommodate M2.5x8 socket head screws I have and matching M2.5x.45 hex nuts. The tolerance is tight enough that the nuts remain securely held by the bottom of the case without slipping out, while the top of the case also holds the screws firmly in place without them falling off. Print Settings Rafts: Don't worry about using rafts. They're not necessary for any part of this build. Resolution: This is a print job with 0.3 resolution and an infill percentage of 100%. Notes: Supports weren't needed for the front of the case because my printer bridges those holes just fine. However, I did use supports to help me out with the inside parts of the screw holes – even though they might have been unnecessary. The support material still had to be carefully removed from those areas. Post-Printing Instructions Begin by removing any support material and leftover plastic strings from the print job. Ensure that the Dragonboard fits snugly within its custom casing before moving on to assembly. The process involves first inserting the OTG connector into its designated hole, followed by gently placing the back of the board into position. Remove it once you verify a secure fit. Secure four M2.5x0.45 hex nuts to the bottom of the case, using an M2.5x8 screw on the other side to pull them upward until they're as far in place as possible, then remove the screw. Repeat this procedure for each nut, working carefully to ensure proper seating. Next, reintroduce the Dragonboard, again starting with the OTG connector and then slipping it back into its correct spot. Lastly, fit four M2.5x8 screws through the top of the case before fully tightening them. To assist in guiding the process, insert a nut onto the opposite side of the top case, working carefully to seat all the screws evenly. Remove any temporary hardware as necessary. Carefully place the top portion of the case onto the bottom half, and tighten everything into its designated position once you're certain everything is aligned correctly
With this file you will be able to print Dragonboard 410c Case with your 3D printer. Click on the button and save the file on your computer to work, edit or customize your design. You can also find more 3D designs for printers on Dragonboard 410c Case.