Dragon Hotend Adapter (Phaetus/TriangleLab)
prusaprinters
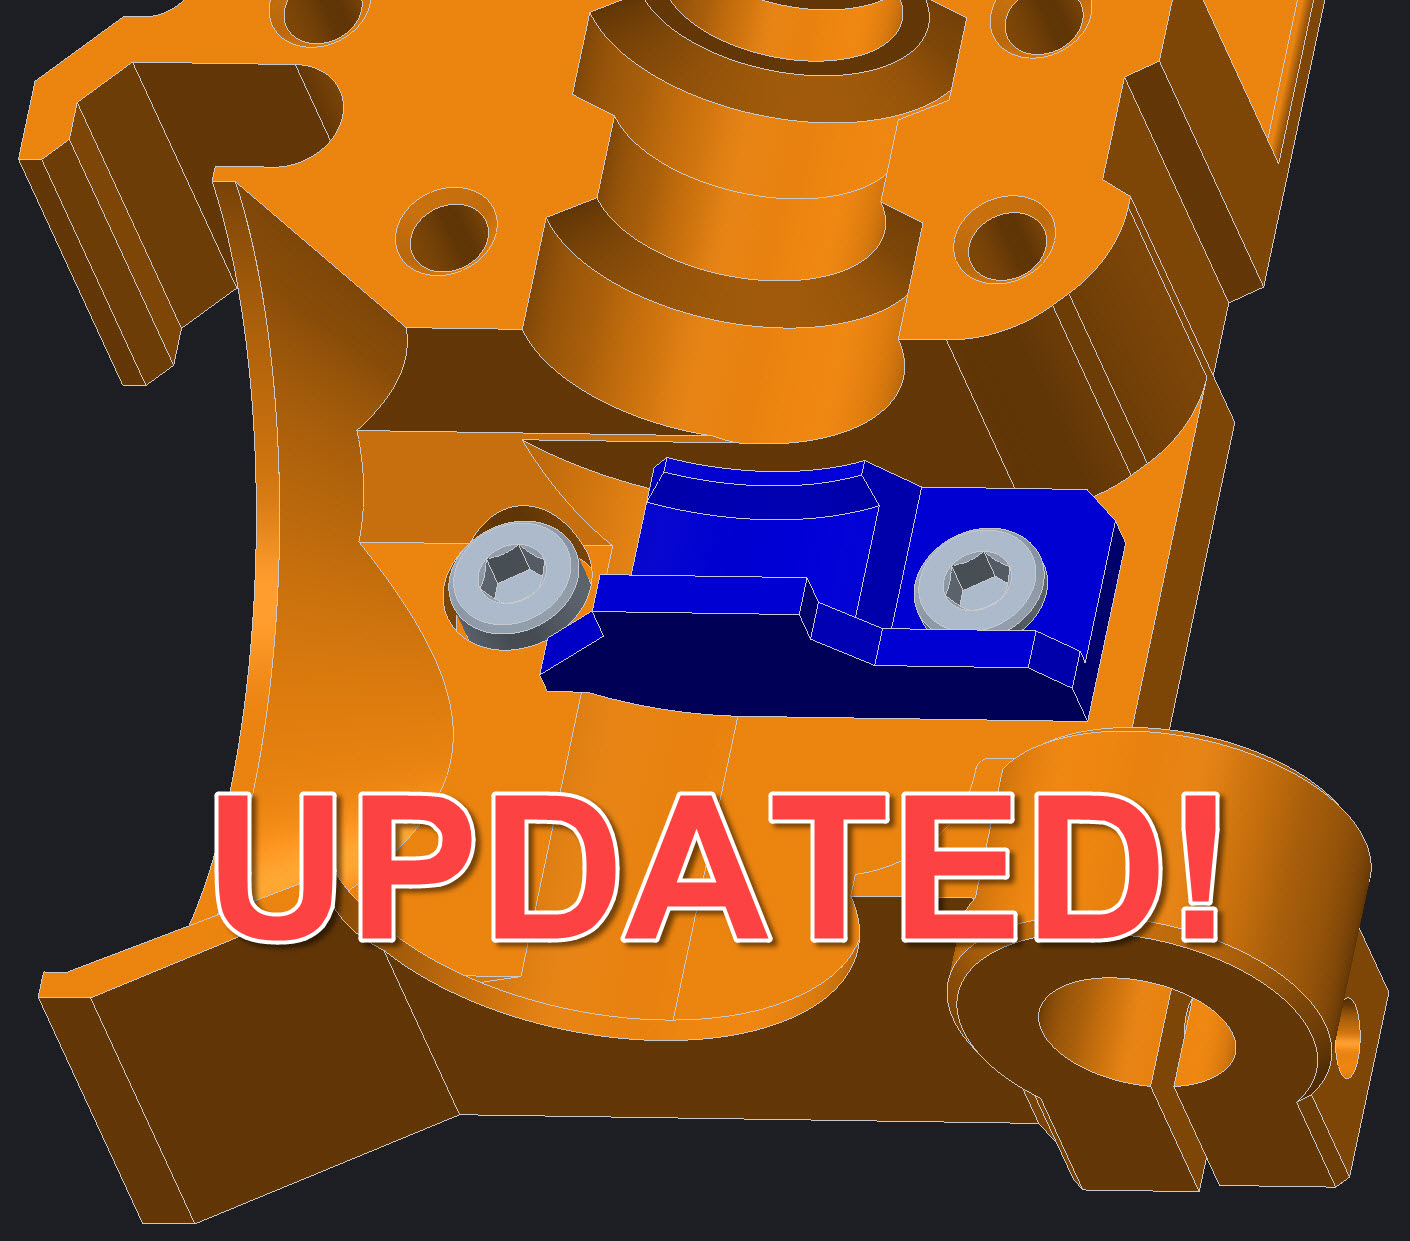
<p>I changed my hotends to <a href="https://www.phaetus.com/dragon-hotend-st/">Phaetus</a> and needed to lock rotation for easy nozzle change. The adapters are confirmed to work with TriangleLab as well. Compatible with both types, ST/HT.</p><p>Fits between extruder body and hotend and uses the adjacent bolt head to lock the hotend from rotating. It should fit snug around the head of the M3 socket cap screw. I have it installed on both my printers and it's really nize.</p><p>MK3S and (+) versions of the adapter are unique to each model and not interchangeable.</p><p>Both adapters drop in over the screw heads as shown and get trapped between the extruder body and hotend. The tab on the adapter engages with the heatsink to prevent rotation.</p><h3>Update (2/2/22)</h3><p>On the MK3S+ only, the M3x12mm screw option as suggested in the previous update below, works really well to stop the adapter.</p><figure class="image image_resized" style="width:50%;"><img src="https://media.prusaprinters.org/media/prints/67418/rich_content/f37d86b0-3495-4983-8854-6d53646fae9a/image.png#%7B%22uuid%22%3A%226b87bcf6-c17c-481e-9cb5-8c1f8ba2126c%22%2C%22w%22%3A1277%2C%22h%22%3A596%7D"></figure><p>I printed a 1.6mm spacer (included in the Files section) or you can stack four of <a href="https://smile.amazon.com/gp/product/B075GVHLQ4/ref=ppx_yo_dt_b_search_asin_title?ie=UTF8&psc=1">these</a> washers.</p><figure class="image image-style-align-center image_resized" style="width:50%;"><img src="https://media.prusaprinters.org/media/prints/67418/rich_content/a4ad8b64-1618-4490-9188-e4641286c22b/2022-03-24_10-09-53.jpg#%7B%22uuid%22%3A%223196c9e7-c782-42b7-b7f1-9f0395072141%22%2C%22w%22%3A1197%2C%22h%22%3A923%7D"></figure><figure class="image image-style-align-center image_resized" style="width:50%;"><img src="https://media.prusaprinters.org/media/prints/67418/rich_content/fbf4f240-1179-42b0-8f6d-42505c41c50f/image.png#%7B%22uuid%22%3A%22fddef22b-c2c7-4bf8-9f9e-b79dec64e89f%22%2C%22w%22%3A780%2C%22h%22%3A620%7D"></figure><h3>Update (1/31/22)</h3><p>I went to change my nozzle, and I heard a snap, crackle and a pop while tightening new nozzle into place. The hotend was a little twisted as well. My adapter broke but I was able to torque the nozzle properly and the hotend rotated back into place without issue. </p><h4>Failure Analysis</h4><p>Analyzing the failure, I made the following observations and was able to make some changes to improve the reliability. </p><ul><li>The adapter failed in a brittle fashion. Here's the failed part:<br><img class="image_resized" style="width:50%;" src="https://media.prusaprinters.org/media/prints/67418/rich_content/5bb40aa7-2c19-4ebf-baa3-dde644f45649/image.png#%7B%22uuid%22%3A%22bf3cfe28-34d5-4875-a510-4c88c0ce1dbb%22%2C%22w%22%3A772%2C%22h%22%3A526%7D"></li><li>Seam location and wall size was also a factor in causing the failure. Temperature cycling the adapter seems to make the PETG material a bit brittle. This really impacted layer adhesion strength. It was very poor. The curved wall to the right of the hole in the picture above broke off like a potato chip.</li><li>There was serious indentation from the heatsink into the edge of the tab<br><img class="image_resized" style="width:50%;" src="https://media.prusaprinters.org/media/prints/67418/rich_content/e778da58-6322-4fab-aeab-baa82d6913cf/image.png#%7B%22uuid%22%3A%2297a1ce5b-687e-4f32-a5fa-14896bb60cd2%22%2C%22w%22%3A1660%2C%22h%22%3A1030%7D"></li></ul><h4>Design Changes</h4><p>To improve reliability, I've made changes to both adapters but the critical one is the <strong>MK3S+</strong> version because the screw eyelet is in compression and tension during a nozzle swap. The <strong>MK3S</strong> is better off structurally as it braces against both screws and is in a state of compression during a nozzle swap.</p><p>The tab location was adjusted on both brackets and small bracing ribs were added to match two fins worth of height so as to prevent the heatsink from digging into the edge. </p><figure class="image image-style-align-center image_resized" style="width:75%;"><img src="https://media.prusaprinters.org/media/prints/67418/rich_content/f9c89722-c5e1-465b-84be-506d6992838f/image.png#%7B%22uuid%22%3A%22ee34eeda-adff-42fe-822f-ea121fd30a0c%22%2C%22w%22%3A942%2C%22h%22%3A613%7D"></figure><p>On the <strong>MK3S+</strong> bracket the wall around the single screw hole was extended. In addition I extended the left side wall to gain some support from the screw like the MK3S bracket.</p><figure class="image image-style-align-center image_resized" style="width:75%;"><img src="https://media.prusaprinters.org/media/prints/67418/rich_content/a4f42b42-00f3-438b-bc94-bfe9cfbf628c/image.png#%7B%22uuid%22%3A%22d1b460a6-ec5d-4023-8e2d-32607377aeab%22%2C%22w%22%3A1233%2C%22h%22%3A538%7D"></figure><p>Unfortunately, bearing on the <strong>left side screw</strong> leaves much to be desired. The edge of the screw head has a radius on it and doesn't sit very proud of the extruder body housing. I recommend the following tweaks for the <strong>MK3S+</strong>:</p><ul><li>For the <strong>left side screw</strong>, use an M3x10 socket cap screw with the sharpest edge you can find.</li><li>Add a <a href="https://smile.amazon.com/gp/product/B075GVHLQ4/ref=ppx_yo_dt_b_search_asin_title?ie=UTF8&psc=1">washer</a> to raise the head a bit from the housing. <img class="image_resized" style="width:50%;" src="https://media.prusaprinters.org/media/prints/67418/rich_content/07c53fef-8b9a-49e5-a086-dbf4a445a146/image.png#%7B%22uuid%22%3A%221a1d67df-ba09-4bc9-9c0e-98c5fc394ec7%22%2C%22w%22%3A509%2C%22h%22%3A352%7D"></li><li>Another thought is to get a longer screw to expose the screw head even higher. Note that the 10mm thread length needs to be maintained as the screw terminates in the belt channel in the back. I might suggest to use an M3x12 screw (11mm length isn't standard) and print a 1.5-2mm thick washer to clear the belt channel and solidly brace against the adapter. This will trap the MK3S+ adapter between both screw heads like in the MK3S version.</li><li>When printing, keep the seams away from the holes like below and use the random seam position.<br><img class="image_resized" style="width:50%;" src="https://media.prusaprinters.org/media/prints/67418/rich_content/b283a300-1e6c-4056-9712-bdc50d6def5b/image.png#%7B%22uuid%22%3A%22bed57726-c0fb-4f5f-9df3-0eab0143877f%22%2C%22w%22%3A1253%2C%22h%22%3A948%7D"></li></ul><p>Print the adapters out of <strong>PC</strong> material to prevent the material from getting brittle. The walls are set for a 0.4mm nozzle using <i>0.20mm Quality</i> layer height. If you make the screw adjustment above, printing the adapter out of <strong>PETG</strong> is workable but I'd have an extra around just in case. My hotends have been in service since March 2021 with the old adapters and I've changed nozzles a handful of times since then so their MTBF has been okay for me but it you do a lot of nozzle swaps, it won't hurt to have an extra, ready to go. Replacing it is pretty quick with the hotend already installed.</p><p>If you experience any failures, I'm always happy to make additional tweaks as needed.</p><p>Happy nozzle swapping. </p>
With this file you will be able to print Dragon Hotend Adapter (Phaetus/TriangleLab) with your 3D printer. Click on the button and save the file on your computer to work, edit or customize your design. You can also find more 3D designs for printers on Dragon Hotend Adapter (Phaetus/TriangleLab).
