Door Speaker Adapter for Toyota GT86/Scion FR-S/Subaru BRZ
thingiverse
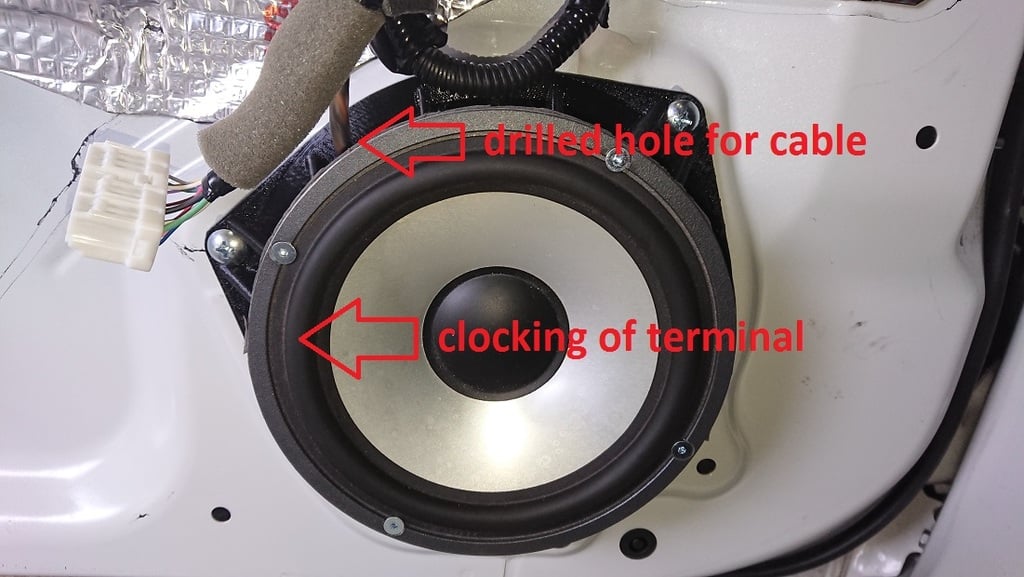
ATTENTION: Version 06 (V06) has been thoroughly tested and I discovered that the bolt pattern towards the front door was incorrect! I revised the model to a bolt pattern that is spot on now. This new Version 06.1 (V06.1) is also tested and works perfectly fine. Additional Information below. This is a Door Speaker Adapter designed specifically for Toyota GT86/Scion FR-S/Subaru BRZ. It's a full redesign of Schankenstein's Speaker Adapter, plus it features a rainshield, which is crucial to have to keep the interior dry. It's made for the Andrian Audio A165V and A165G speakers. Status: -V06 Printed and tested -> works fine, OEM speaker cover in doorboard needs to be cut back slightly (see pictures) -V06.1 Not Printed or tested, but should work perfectly without cutting anything. Therefore, height is reduced by 4mm. Note: -Even if the position of the door speaker isn't super critical for the FT86 compared to other cars, there's still a risk of guiding water, dripping down from the window slot, into the interior of the car when installing aftermarket speakers. Most OEM speakers come with a rainshield, but this is often erased when aftermarket speakers are installed. Instructions: -Use PETG or ABS. Materials like PLA won't withstand the heat and stress of this application. Furthermore, acoustics could be affected in a negative way. -Print with the speaker flange facing the print bed. -Use supports. Printbed touching, 70° overhang angle. -Print with 100% infill, but make sure to really use infill and not maximum bottom layer count. (in CURA) Set bottom layer / top layer count to 3. Otherwise you might get a slow and/or weak print. -Make sure to use a good overlap between infill and inner wall to get a strong print. -Use zig zac or lines as infill pattern to get a strong print. Don't use concentric pattern. -Take care that there is no concentric gap inside of the print in the area of the rainshield. You might need to play around with lines width of the inner walls. Installation: -drill hole(s) for speaker cable as necessary, drill in upper section to avoid water getting to the inside -install speaker in a position where terminal is NOT pointing downward! Best position is terminal pointing to rear end of car. -keep speaker cable long enough that it generates a downward pointing elbow inside of the door, this is important to make sure that any water drops flowing down the cable drip off at the lowest point of the elbow, so no water comes to the speaker/terminal and from there down the chassis and maybe to the interior -use butyl rope to seal the gap between adapter and door metal, usually this butyl rope is 10mm thick, that's too much, stretch it so that it has a diameter of about 5mm and apply it the backside of the adapter -heat up the door metal directly before application of the prepared adapter with a hot air gun, butyl has a much better adhesion and is easier to form when it's a little hot; just a little more than hand warm is enough -press down adapter firmly before tightening the screws until it touches the plastic threaded rivets which was also used for the OEM speaker -use the OEM screws for fixing the adapter finally, thru holes should be drilled manually to a diameter of 6.5 or 7mm (they are intentionally slightly too small in the model) -install the speaker, remember to form an elbow in the cable
With this file you will be able to print Door Speaker Adapter for Toyota GT86/Scion FR-S/Subaru BRZ with your 3D printer. Click on the button and save the file on your computer to work, edit or customize your design. You can also find more 3D designs for printers on Door Speaker Adapter for Toyota GT86/Scion FR-S/Subaru BRZ.