Dog Food Dispenser
thingiverse
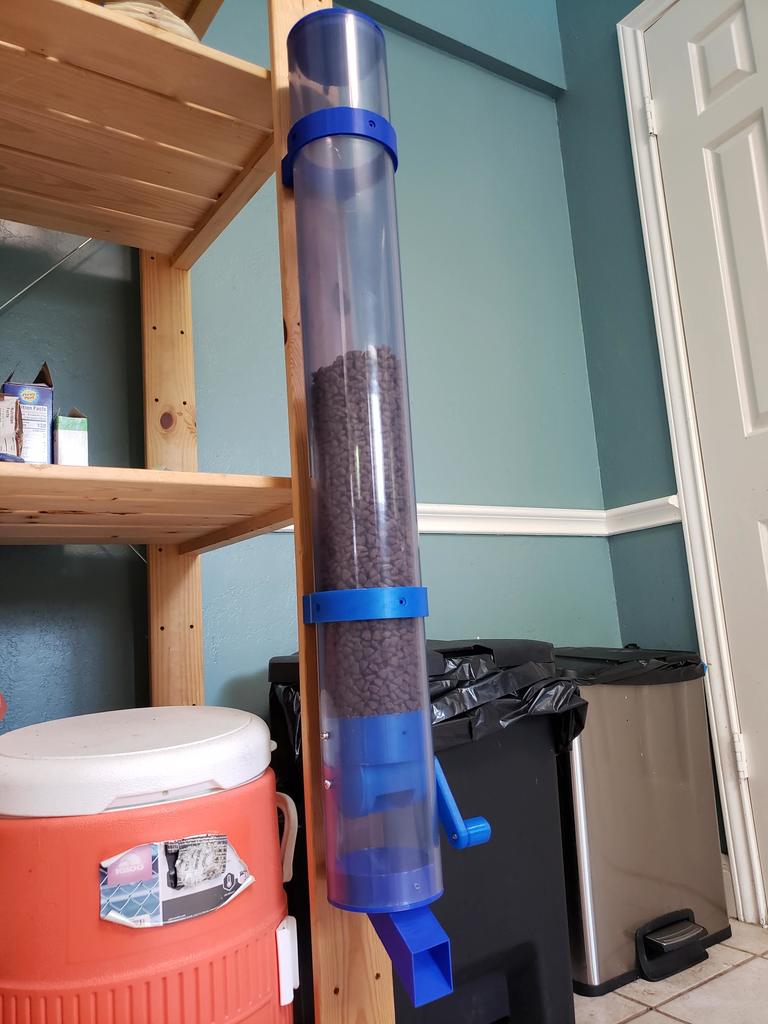
## Automatic Dog Food Dispenser! Crafted to fit snugly onto a 4-inch diameter (inner diameter) PVC pipe, this feeder was made using a 3ft tube, but can be longer or shorter depending on preference. ### Printing Details PLA filament was used with a 0.6mm nozzle, resulting in a strong and durable design that has withstood testing so far. ### Required Materials: PVC pipes were sourced from Etsy at https://www.etsy.com/listing/721456729/clear-pvc-pipe-choose-your-length-5. If a cheaper source for 4-inch PVC is found, please share it with others. This feeder requires 5-10 ~16mm M4 screws with washers, but there is flexibility in screw size and length, as M3.5 - M5 would also work. In addition to the screws, a ~53mm M4 bolt and nut are necessary for the cup axle. A properly notated picture of this bolt can be found below it has a 47mm "grip" length and 6mm thread length. #### My Part List: - 4-inch ID 4.5-inch OD PVC pipe - 5 M4 screws (with washers) - 53mm M4 bolt - M4 washer #### Tools Needed: - ~3.5mm drill bit (slightly smaller than a M4 bolt) - ~4.5mm drill bit (slightly bigger than an M4 bolt) - 1/2-inch drill bit - Drill / screwdriver ### Assembly Instructions Assembly is straightforward, given you have a drill and the required bolts. 1. Insert the middle funnel 4-6 inches from the bottom, drilling 3.5mm holes on at least two sides to hold it in place with M4 bolts. 2. Insert the Cup into the bottom and rotate it to determine the optimal placement, taking care not to scrape or allow kibble to fall through and get stuck. 1.75 inches was found to be the sweet spot for this design. 3. Drill a 4.5mm hole on one side of the pipe for the 53mm bolt and a 0.5-inch hole on the other side for the shaft. 4. Fix the knob to the handle with an M4 bolt. 5. Insert a M4 nut into the slot at the end of the shaft. 6. Hold the cup in place, inserting the shaft into one end and the bolt on the other end, tightening the 53mm bolt until there is minimal wiggle room but still free rotation. 7. Slide 1-2 brackets onto the tube, taking care not to overtighten. For this design, the fit was snug enough that screws were not necessary, but holes are provided for added security. 8. Attach the top cap and bottom funnel, optionally securing with a bolt. 9. Mount to a wall 10. Enjoy your new automatic dog food dispenser!
With this file you will be able to print Dog Food Dispenser with your 3D printer. Click on the button and save the file on your computer to work, edit or customize your design. You can also find more 3D designs for printers on Dog Food Dispenser.