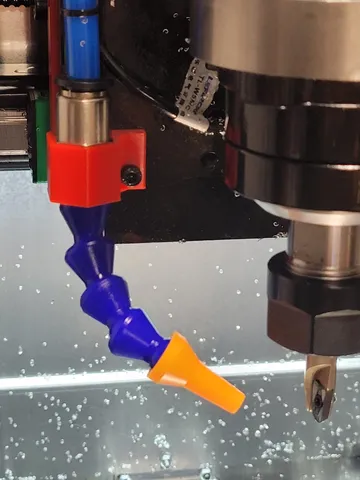
DMC2 CNC Flood Nozzle Mount
prusaprinters
The way the flood nozzle is mounted is too flexible, it is hard to adjust the nozzle with one hand and have it stay where you put it. This is a solid mount.Update : I added two more versions, a medium and long. They move the nozzle up the Z axis. I am using the long one, so I can point the nozzle more downwards instead of sideways.If you already mounted your nozzle, remove the bolt, remove the zip tie, remove the press fit adapter from the hose and unscrew the nozzle from the adapter. Press the adapter into the new mount (it should be snug) and then push the fitting back on the hose. Adjust the height of the mount to match the bolt hold and bolt it on. Screw the nozzle back on.If you haven't mounted your nozzle yet, basically fit the adapter into the mount first, bolt it in place, put the hose in place and screw on the nozzle. It uses the existing M4 bolt for mounting.Printing:Print the model as-is, no supports. I printed in ABS with a 0.4nozzle, 0.3mm line height and 120mm/s speed. If it is too loose, adjust your printing settings (i.e. extrusion %) or resize smaller by a couple of percent in x/y direction only.
With this file you will be able to print DMC2 CNC Flood Nozzle Mount with your 3D printer. Click on the button and save the file on your computer to work, edit or customize your design. You can also find more 3D designs for printers on DMC2 CNC Flood Nozzle Mount.
