DIY Schaltaugenlehre / Derailleur hanger adjuster
prusaprinters
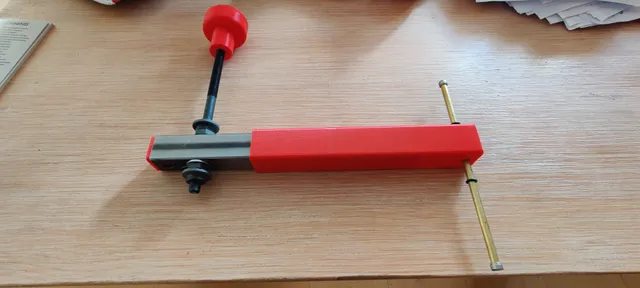
This is an easy to make adjuster to straighten bent derailleurhangers. Please refer to YT for explanation of the adjustment process. Please also make sure, your hanger is not bent too much already so that its possibly almost about to break. If in doubt, replace with a new one.My new Ebike tipped over on the street and fell on the derailleur. I had severe shifting issues. I checked for an adjuster and fell on my back, when I saw the prices! With this solution, all you need is:BOM1 fullmetall axle 10mm including the cones and the locknuts (9.5mm will work as well but might be a bit loose fit in the thread of the hanger. Make sure to screw it all the way in so it bottoms out against the locknut). 150mm brass tube 6mm2 M5 Screws 2 10mm ID washers2 O-Rings 5mm ID220mm (or what ever suits your maximum rim-size) square tubing 25x25mm, 1.5mm wallthickness (if you have different size like 1 inch or so, just change the parameters in OpenSCAD accordingly) Total cost: 10-15€ max (same in US$)Build it: Cut the squaretubing to your desired length.At one end, mark the middle line. Please make sure not to select the side with the weldingline.Mark the position of the hole for the axle with a centerpunch.Drill the hole preferably on a drillpress. Start with a 3mm drill. Drill all the way through so you get two nice, aligned holes. One on each side. Make sure, it is exactly 90 degrees to the profile! Use bigger drillsize in steps or if you have, use a stepdrill to largen the holes. Stop at 8mm! Use a reamer to ream the hole to a size, the axle fits through it. It should just go through with as little play as possible! Better ream again than have a too large hole! Guess, why I have made three holes….After deburring with a file, screw a cone (cone side first) and a locknut on the axle. Add a washer. Then push trough the reamed holes in the profile. Add another washer, a locknut and the second cone (coneside towards the end of the axle. You might have to grind away a good portion of the cone to have enough thread left to screw into the hanger. Leave everything loose. Screw into the hanger so that it is fully screwed in and about 1mm comes out at the end of the threaded hole of the hanger. Handtighten down the (ground?) cone against the hanger. It should not wobble anymore. Handtighten the locknut against the first cone to secure this position. Now use tools to tighten the locknut without shifting the cone! Unscrew the axle completely from the hanger. Now handtighten the second locknut against the washer. The tube should move freely between the two locknuts but with a bit of friction. There must not be any wobble!!! This would ruin the readings when measuring! When you have found the correct position of the locknut, tighten the cone against it without changing the position of the locknut. Use two thin wrenches! If it is getting too tight, losen it again, adjust the friction and tighten again.Now screw the knob onto the long end of the axle. It should cut it's own thread into the plastic. If it's too loose, use a different tolerance in the configuration or glue the knob in place with epoxy.Now slide the printed square tube over the profile. Make sure, the 6mm hole is parallel with the axle, not 90° to it!The tube should slide over the profile with a bit of resistance. Not too snug, but never loose! Too loose and the measurements are off again! You might do a testprint and play with the toleances in the configuration. To test clearance, it suffices to print 2-3cm from the end of the tube. Don't waste too much plastic! Now push the brasstube through the hole at the tip of the tube. Add an O-ring on each side. These prevent the brasstube from falling out and are used as measurement reference position.To finalise, put a M5 capscrew into each end of the brasstube. You can glue them in place or just pinch the tube with tweezers ever so slightly to prevent the screws from falling out. And you are done!I used mine and within 10 minutes, my bent derailleurhanger was straightend and the gears were shifting as if tipping over never happend! I have commented the OpenSCAD sourcefile so you can easily adjust the values to your likings. No need of beeing an OpenSCAD professional. Just install it, load the file. Make the adjustments, render the desired STLs and print it! The models are in the position, they should be printed. No support is needed. I suggest to use a 10mm brim for the tube to prevent it from detaching from the buildplate while printing this tall piece. Printed on an Ender 3 Have fun!CheersArmin
With this file you will be able to print DIY Schaltaugenlehre / Derailleur hanger adjuster with your 3D printer. Click on the button and save the file on your computer to work, edit or customize your design. You can also find more 3D designs for printers on DIY Schaltaugenlehre / Derailleur hanger adjuster.