DIY Printer Light Bar
prusaprinters
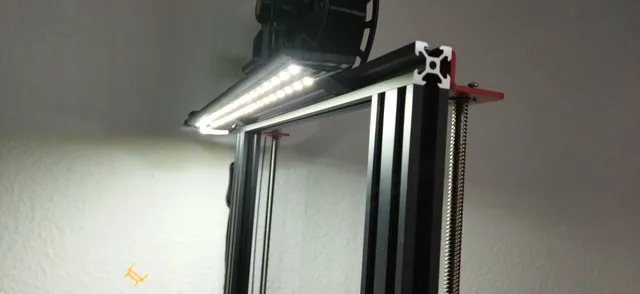
My 3D printer (Alfawise U20 One) sits in a gloomy corner, and when I'm looming over it to see if that part I'm printing is still OK, or suddenly spaghetti, I cast shadows over it. I've taken to peering owlishly at my workpieces with an LED torch… but not any more! Inspired by a thin offcut from the narrow side of a 2x3 from another project, I now have my own light bar - made from leftovers!You Will Need:Two copies of the 3D printed mountA thin bit of wood. I happened to have a strip roughly 40mm by 4.5mm left over from ripping down some 3x2 offcuts. The model is parametric, so adjust the OpenSCAD file to suit. I cut a length to match the 380mm width of my 3D printer's gantry.Some 12V LED tape. I had some of this stuff left over from my ongoing MPCNC Primo project. It's about £1 a metre - I doubled up (two strips) and used less than a metre. Mine still had the barrel jack on it, but if yours doesn't you can either solder on a barrel jack or solder it straight onto the DC wires from the transformer. I think the daylight colour temperature is by far the best for this kind of task-oriented purpose.A 12V transformer. I rummaged around in the Big Box of Wall Warts and found 12V 1A transformer left over (I think from a cordless phone we had about 15 years ago!) and it works perfectly.[Optionally] an inline switch - I used one of these. It works fine without, but if you have the switch you've got the deluxe version. I bought these for my cheapo filament dryer boxes and had one - you guessed it - left over.Two M3x12mm (or thereabouts) self-tapping screws; I have hundreds of these left over from various other projects. They are super cheap (they are actually woodscrews) and self-tap really well into a 2.8mm hole in a 3D printed model - always worth having a few hundred in a wee drawer.Some hookup wire to solder the two strip ends together (or just go with a single strip if you don't like soldering).Instructions:I spray-painted my wooden strip with some Plastikote left over from another project, but you don't have to do this. However it does look cool and probably helps the self-adhesive strip on the back of the LED tape to stick better. I should've sanded the strip first, but I am pathologically lazy about sanding.Stick the LED strip to the wood. If you are using two strips like I did, solder short wires to join the two strips - positive to positive, negative to negative.Screw down through the top of the holders into the back of the wooden strip.Slide the whole assembly into the V-slot rail at the top of the Z-axis.Plug and play…I am really pleased with the results - it's highly effective, and I didn't spend a single penny! Nothing but leftovers. Also, I got to tell my wife, “See, this is why we keep that Big Box of Wall Warts”. Great success!
With this file you will be able to print DIY Printer Light Bar with your 3D printer. Click on the button and save the file on your computer to work, edit or customize your design. You can also find more 3D designs for printers on DIY Printer Light Bar.
