DIY Personalized Drink Coaster
prusaprinters
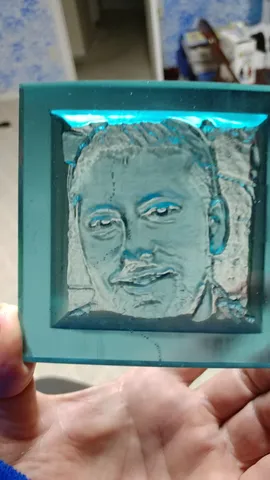
While making poker chips of my grandchildren (see https://www.printables.com/model/185055-diy-lithophane-poker-chip-and-figurine-base) my son challenged me to make drink coasters. I've played around and made coasters of cartoon characters for the grandkids and sports team logos for friends.How I Make The CoastersFirst select an image/photo and crop it as a square. Open the image in your slicer (I use Cura) and set the lighter colors as higher. The image should then be 1. a mirror image (especially if your image has text); 2. resized as 98mm x 98mm x 10mm. (the finished coaster will be 100x100x10) Open the coaster frame bevel side up (bottom of finished coaster). Ensure the image and frame are lined up properly and both are selected and save as an .stl file.The coaster is too big to print horizontally on my Anycubic Photon Mono, so I print vertically…which is OK, because I have printed up to three coasters at a time. No supports are needed. I have printed coasters using transparent blue, transparent green and transparent red…and all turned out quite nicely.Finishing The CoastersI wet sanded both sides of the coasters using several grit sandpaper, starting around 300 grit and finishing at 2000 grit (the finest grit I had on hand). I used full size sheets of sandpaper on a flat surface and moved the coaster in a circular motion. The coaster was still “hazy” when dry, but looked very good wet (when I rinsed residue). I then finished by spraying a few coats of a clearcoat paint and placing small felt pads in each of the corners (underside).Additional NotesI'm not sure if it is a function of printing orientation, shrinkage or an issue with my printer, but the coasters I printed had a slight arch to them (not perfectly flat). This did result in more sanding than originally planned to get the surface flat. (otherwise, the drink containers would wobble)I like the way the coasters look, but you can also paint/color the underside of the coaster to highlight areas of the image. I have used paint pens to outline areas (black pens) and have also colored some areas of an image. Just note that the resin color will impact the final color of your efforts…so choose wisely. Coaster HolderI threw together a coaster holder so that I could transport the coasters with minimal damage…although resin is pretty sturdy. It's nothing fancy, but it should hold any 100mm x 100mm coasters.FinallyThanks for taking the time to consider this concept. I would love feedback if others have a more efficient manner to print and finish the coasters. I'm a novice and learning as I go.
With this file you will be able to print DIY Personalized Drink Coaster with your 3D printer. Click on the button and save the file on your computer to work, edit or customize your design. You can also find more 3D designs for printers on DIY Personalized Drink Coaster.