DIY Lithophane Poker Chip (and Figurine Base)
prusaprinters
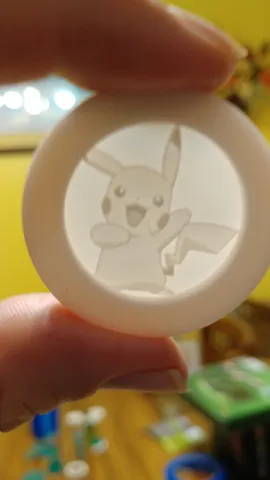
This is a simple poker chip with a lithophane center. The files are the outer ring of the chip. I've included rings with the word "King", "Queen", "Ace" and "Joker". I've also included a blank ring in the event you would like to add your own text.Printing in PLAThe Chip can be printed horizontally (flat) or vertically. I used a raft and supports for vertical prints. Either way will work, but the lithophane is cleaner and the chip surface is smoother if printed vertically. Horizontal Printing PreparationOpen the photo or graphic (.jpg) in Cura. (I assume other slicers or software may provide the same option) Resize the image to a 28mm x 28mm square. Make sure the image opening as “darker is higher”. Open the ring, lay it flat and carefully orient over the image until the corners are not visible and there are no gaps along the inside of the ring.Vertical Printing PreparationOpen the image (.jpg) in Cura. Resize the image to a 28mm x 28mm square. Ensure “darker is higher”. Export the file as an .stl. Open the ring, lay it flat and carefully orient over the image until the corners are not visible and there are no gaps along the inside of the ring. Hold the shift key and click on the ring and image so Cura sees the two items merged. You may then export the poker chip as an .stl file. When ready to print, open the chip in your slicer program, orient vertically and print. I use supports and a raft when printing vertically.Printing in Resin (Preferred).This is actually easier because you may simply import the ring and image stl files directly into your slicer and arrange on the build plate…thus eliminating the need to merge the files. Patience is required in removing the poker chips from the build plate. In addition, my son asked that I print figures from his favorite game...so, of course I had to print a base for the figures. I resized a poker ring (thicker and wider) and placed his face on the underside of the base. This is done in the same manner as the process for poker chips, but set the lighter colors higher. (I also raised the height of the image on the Z axis to make the facial features stand out).Given the options, I highly recommend printing the chips in resin.Comparison photos: The man and bird chips were made with my Ender 3 (FDM). The other two chips were made with my Photon Mono (SLA). The gray items are not poker chips (although I have made some with a positive relief), but rather a base for figurines. Print SettingsPrinter Brand:CrealityPrinter: Ender 3Rafts:YesSupports: YesResolution:.15Filament:Eforink PLAWhite Category: Toy & Game Accessories
With this file you will be able to print DIY Lithophane Poker Chip (and Figurine Base) with your 3D printer. Click on the button and save the file on your computer to work, edit or customize your design. You can also find more 3D designs for printers on DIY Lithophane Poker Chip (and Figurine Base).