DIY 24VDC laptop power supply
thingiverse
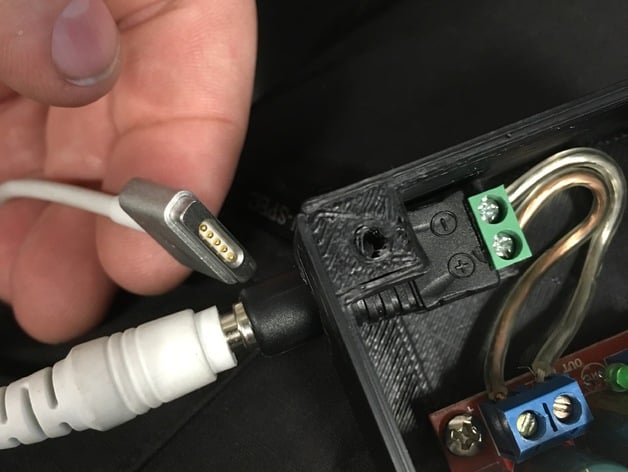
I run the solar power system in my trailer using 24VDC; with a converter that lets me use 12VDC stuff, it's nice to be able to run things off of 24VDC without needing the converter. This is an enclosure that you can use with some Amazon items to make a laptop power supply that works off of 24V. You could probably swap around components and tweak the design to make one that would work off of 12VDC as well - just need a boost circuit instead of a buck circuit. Anyway, get one of these: http://smile.amazon.com/DROK-Converter-Transformer-Synchronous-Adjustable/dp/B00C9UUFHC or http://smile.amazon.com/dp/B00C4QVTNU. Then get a plug for it: http://smile.amazon.com/Ksmile%C2%AE-Female-2-1x5-5mm-Adapter-Connector/dp/B015OCV5XO. Connect the power on the "in" and use a voltmeter to measure the voltage on the "out". Use a screwdriver to adjust the blue potentiometer until the voltage is where you want it - 19V is probably safe for most anything, but check your laptop power supply for output voltage and set it accordingly. My MacBook Pro MagSafe 2 power supply says 20V on it, so I set mine to that. You'll need one pair of wires for input power - 24VDC. Run it in through the hole on one end of the box and then connect it to the "in" terminals on the stepdown converter. Tie a knot in the wire close enough to the regulator board that it will fit in the case, but far enough to provide stress relief. Take one of the plug/receiver parts from the second link above and connect ~4 inch long wires from + to + and - to -. Make sure you don't cross them! That would be bad. You may have to use a razor knife to open up the hole on the side a bit, but stick the narrowest part of the plug out through the hole and push all the way through until it can fit in place. Screw down the board using standard computer hard drive screws or similar so it doesn't go anywhere. Test everything before you install the lid - I used #6-19 1/2" long screws (http://smile.amazon.com/Thread-Rolling-Plastic-Finish-Phillips/dp/B00GDXT716) to attach the lid. There are a few ways to get the adapters from this box to your laptop. If you need a MagSafe 2 plug, get one of these: http://smile.amazon.com/Connector-DC-MagSafe-Cable-5-5x2-5mm/dp/B00JQ4I4D6. If you have a jump start battery like the Emergency Road Battery Starter Charger (http://smile.amazon.com/Emergency-Road-Battery-Starter-Charger/dp/B016KVONGY), the laptop power adapters from those will work. Good luck! Print Settings Printer Brand: LulzBot Printer: TAZ 5 Rafts: No Supports: No Resolution: 0.25 layer height Infill: 20% Notes: I'd make your shell thickness a little thicker than normal - at least 1.5mm. That's just for strength; this prints pretty cleanly, though, and it's very strong.
With this file you will be able to print DIY 24VDC laptop power supply with your 3D printer. Click on the button and save the file on your computer to work, edit or customize your design. You can also find more 3D designs for printers on DIY 24VDC laptop power supply.