Digital Hourglass
prusaprinters
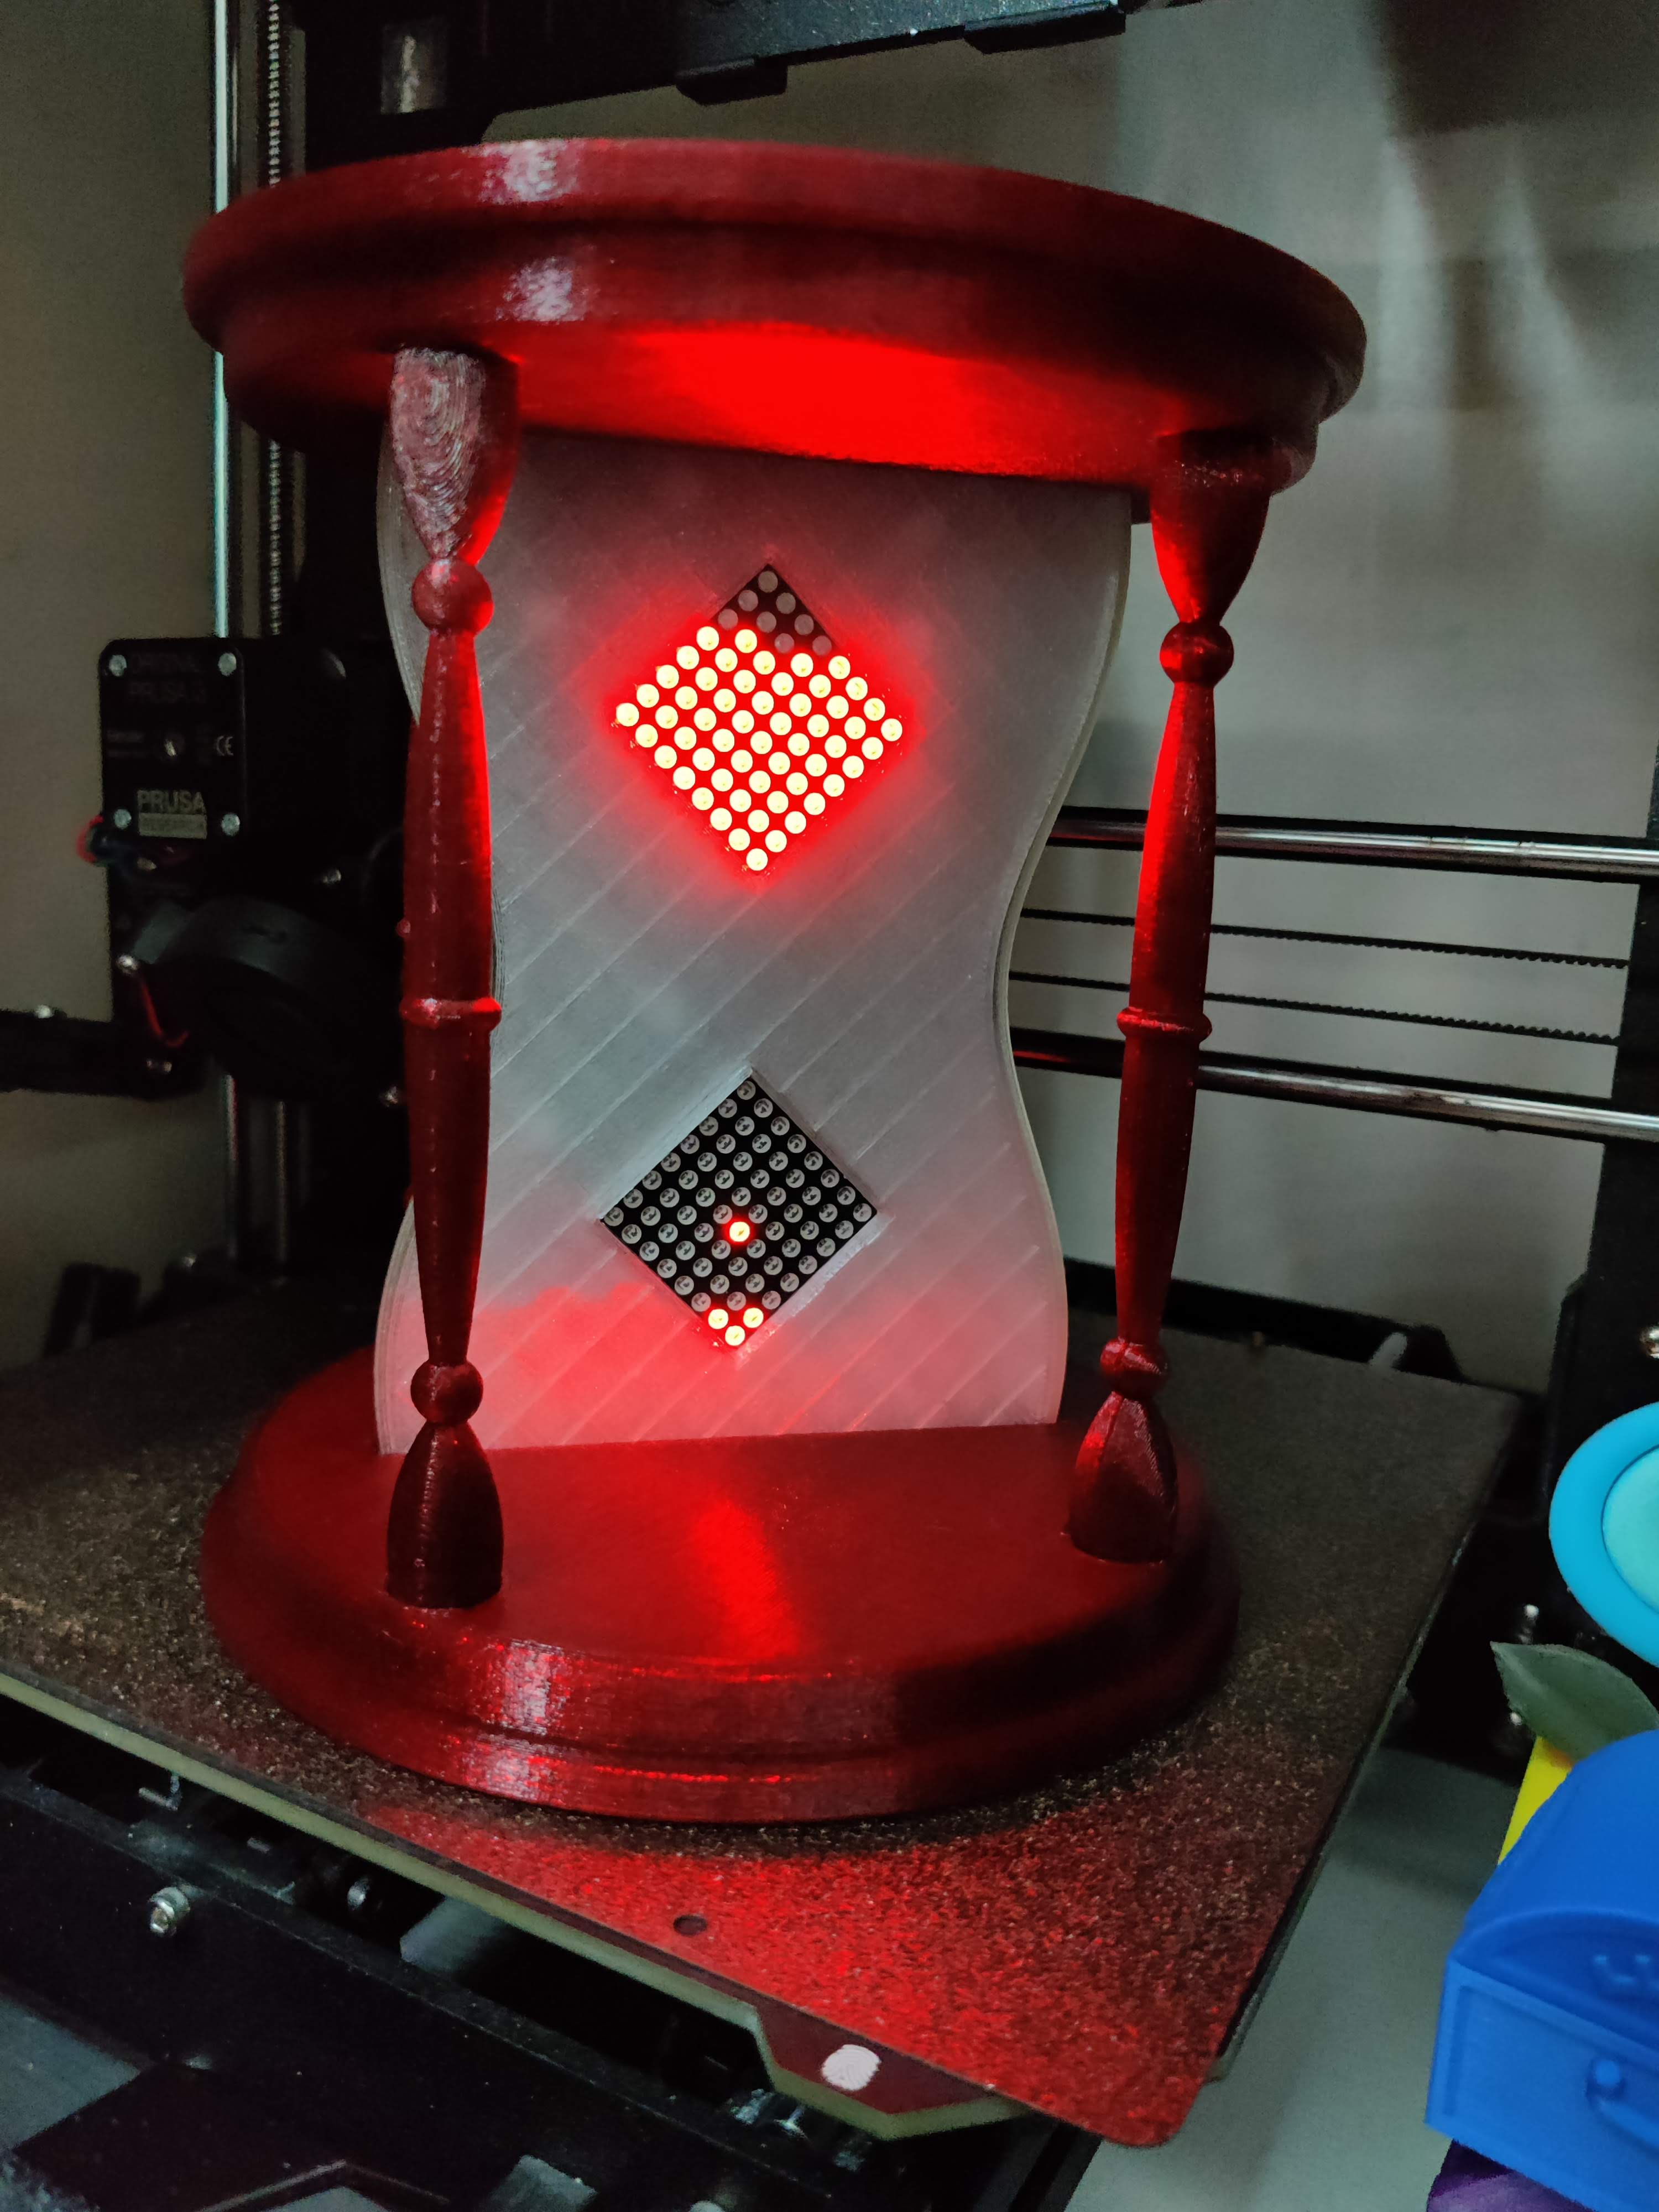
<h3>***** If you downloaded any of the arduino files before 12/24/21 Please download the updated version below ****</h3><p> </p><p>This is a digital hourglass inspired by a project on Instrucables.com by Edison Science Corner<br><a href="https://www.instructables.com/Hourglass-Using-Arduino/">https://www.instructables.com/Hourglass-Using-Arduino/</a></p><p>This project uses an Arduino nano, 2 8x8 led matrix, and an accelerometer. It has been put together for the <a href="https://www.alien3d.us/">https://www.alien3d.us/</a> monthly project box for November of 2021.</p><figure class="media"><oembed url="https://youtu.be/q5czbGYXMF0"></oembed></figure><p> </p><h3><strong>Parts List: </strong></h3><p>(all electronics parts included in the Alien3D.us November 2021 box)</p><ul><li>Arduino Nano<ul><li>https://www.amazon.com/dp/B07WWK29XF/ref=cm_sw_r_tw_dp_BHTPGDFGSKMC3D8Q5BP7 </li></ul></li><li>2 8*8 Led Matrix with MAX7219<ul><li>https://www.amazon.com/dp/B07FHXHFDZ/ref=cm_sw_r_tw_dp_BS1H2RFH37WPEHY18F0K</li></ul></li><li>ADXL345 Accelerometer<ul><li>https://www.amazon.com/dp/B01DLG4OU6/ref=cm_sw_r_tw_dp_DYRTRP80VRJ2C0701ZHH?_encoding=UTF8&psc=1 </li></ul></li><li>9v battery</li><li>Toggle switch</li><li>Wires</li><li>M3 screws (not included in alien box)<ul><li>any M3 screw between 6 and 10mm will work.</li></ul></li></ul><h3><strong>Programming the Arduino:</strong></h3><p>First lets get the Arduino ready. First thing we will need to do is get some libraries added to your Arduino IDE. If you have never used Arduino's before or the software to program them you can visit <a href="https://www.arduino.cc/en/Guide">https://www.arduino.cc/en/Guide</a></p><h5>Adding libraries:</h5><p>Once you have the Arduino software open we will click on <i>Sketch > Include Library > Manage Libraries</i><br><img src="https://media.prusaprinters.org/media/prints/88103/rich_content/3b22697a-acc4-46b7-9029-f78a89a0ae0f/snag-0017.jpg#%7B%22uuid%22%3A%224710271a-f4f3-4fcf-b7ac-635ca26f2d81%22%2C%22w%22%3A607%2C%22h%22%3A262%7D"></p><p>Once there we will add 3 libraries<br>The Adafruit ADXL345, Adafruit Unified Sensor, Adafruit BusIO<br>Do a search for the Adafruit ADXL345 and click install, it should ask you to also install the other 2 libraries but if it does not search for those as well and click install<br><img src="https://media.prusaprinters.org/media/prints/88103/rich_content/42512f2d-0a98-4c64-92c1-5b8563c8c155/snag-0018.jpg#%7B%22uuid%22%3A%22507accdd-0956-4868-86c4-246866680cb3%22%2C%22w%22%3A791%2C%22h%22%3A199%7D"><br> </p><h5>Setting up files:</h5><p>Now download the hourglass.zip and extract the files.<br>Should look like this:<br><img src="https://media.prusaprinters.org/media/prints/88103/rich_content/61aed8d2-1e4c-496d-8580-e5ea88e49412/snag-0019.jpg#%7B%22uuid%22%3A%2261dc3108-2fd2-4f66-b16b-55f7de2e6cfd%22%2C%22w%22%3A664%2C%22h%22%3A162%7D"></p><h5>Setting Arduino Board:</h5><p>You should now be able to open the hourglass.ino file in the Arduino IDE<br>Now to select the Arduino board in the software.<br>Click on <i>Tools > Board > Arduino AVR Boards > Arduino Nano</i><br><i>Next Tools > Processor > ATmega328P (old bootloader)</i><br><i>Should end up looking like below:</i></p><p><img src="https://media.prusaprinters.org/media/prints/88103/rich_content/1043942e-6103-4dc6-bd3d-3ccaa93909ed/snag-0052.jpg#%7B%22uuid%22%3A%228d2c21b3-ec08-4d2a-8fa1-52468872e35b%22%2C%22w%22%3A559%2C%22h%22%3A329%7D"></p><p>Please verify the correct Com port is also selected. I cant tell you which com port it will be on your computer as the number can change depending on what you have plugged or installed on your computer. But if you have multiple com ports listed try one and if it doesn't work try the other/s.</p><p>After that you should be able to click on the Verify and then upload buttons and the Arduino is programmed. (The button with a check and then the Arrow)</p><p> </p><p>If you are having difficulties with the code and would like an easier approach please visit</p><p>Arudino Web Editor getting started so you can install the create plug in<br><a href="https://docs.arduino.cc/cloud/web-editor/tutorials/getting-started/getting-started-web-editor">https://docs.arduino.cc/cloud/web-editor/tutorials/getting-started/getting-started-web-editor</a></p><p>Then go to Web Editor Hourglass Project:<br><a href="https://create.arduino.cc/editor/dsk001785/900a489f-160d-41b9-b3bc-5fe3e5949f4f/preview">https://create.arduino.cc/editor/dsk001785/900a489f-160d-41b9-b3bc-5fe3e5949f4f/preview</a></p><p>There Arduino provides an online editor with all the needed libraries installed and the files all setup and verified, you only need to upload to the to the Arduino.</p><p> </p><h3>Printing Parts:</h3><p>You will need to print one of each file included except the pillars that one will need to be printed 8 times. The back hourglass piece shown in natural PLA below was printed vertically so that it has a smooth surface and wouldn't require supports. the others are printed with their flat faces to the bed. The only part that requires a little bit of support is the Top piece for where the switch goes.</p><figure class="image image_resized" style="width:75%;"><img src="https://media.prusaprinters.org/media/prints/88103/rich_content/1b0fee16-0a99-4111-a1dd-f5f88eb490d2/img_20211119_164326.jpg#%7B%22uuid%22%3A%22bdf150e6-cc18-4c72-b045-9e14ea1b4f8a%22%2C%22w%22%3A3000%2C%22h%22%3A4000%7D"></figure><h4>Wiring Up Electronics:</h4><p>Below you an see a picture with the wiring diagram of how to connect all the wires needed for the project. Make sure your Arduino is connected to the top led matrix and then that matrix connects to the bottom one. The bottom pins of the bottom matrix are left disconnected. </p><figure class="image image_resized" style="width:75%;"><img src="https://media.prusaprinters.org/media/prints/88103/rich_content/554097e3-4ceb-46fa-8b3b-666c7aeca132/diagram_bb.png#%7B%22uuid%22%3A%2296ab2f64-07b4-4f59-b531-81ab25ccc5da%22%2C%22w%22%3A1716%2C%22h%22%3A1983%7D"></figure><p>Here is an actual photo of how my final wiring looks like: ( I used 7 M3 screws to hold everything together but a bit of hot glue would work just as well.)<br>Please make sure to take note of the orientation of the accelerometer, if it is installed backwards or rotated the LEDs will not react as expected. If you will be soldering all the wires together make sure the switch is installed into the printed part first.</p><figure class="image image_resized" style="width:75%;"><img src="https://media.prusaprinters.org/media/prints/88103/rich_content/76ad331e-df56-496d-9586-865a2944f9b3/img_20211119_193313.jpg#%7B%22uuid%22%3A%22474fdc82-3200-4de0-b2d0-03b9774e4d18%22%2C%22w%22%3A3000%2C%22h%22%3A4000%7D"></figure><h4>Final Assembly:</h4><p>Arrange all parts like in the picture above, so you have the front plate with all the electronics, the top lid with the battery and switch and bottom with the Arduino top pins inserted into the pillar at the bottom. This will be a snug fit and will hold the Arduino in place.<br>The you can place the back piece. This would be an excellent time to perform a final test and make sure the electronics turn on and function being careful to hold everything in your hands.<br>If it passed the final test then you can take a pair of pillars and place them into the round holes on the bottom piece and they should click into place. When all 4 pairs are in then with some wiggling you should be able to get everything to line up with the top piece and click the pillars into that one as well.</p><p> </p><p><strong>If you would like to keep up to date with my latest work, follow me on Instagram/Twitter!</strong></p><p><a href="https://twitter.com/Dsk001_3D">https://twitter.com/Dsk001_3D</a></p><p><a href="https://www.instagram.com/dsk001_3d/">https://www.instagram.com/dsk001_3d/</a></p><p><strong>If you would like to support me, please use the link below to become a patron! </strong></p><p><a href="https://www.patreon.com/Dsk001">https://www.patreon.com/Dsk001</a> </p><p> </p>
With this file you will be able to print Digital Hourglass with your 3D printer. Click on the button and save the file on your computer to work, edit or customize your design. You can also find more 3D designs for printers on Digital Hourglass.