dice pencil extender or cap
prusaprinters
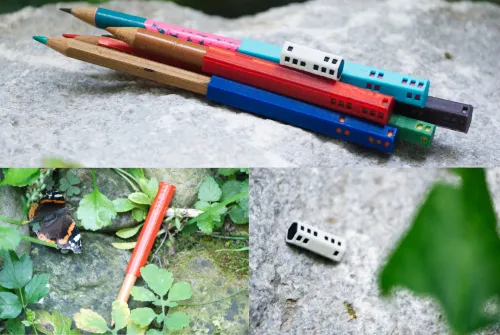
Pencils are great, however when they are used they get shorter and shorter every time they are sharpened until is is hard to hold them. So an extender makes using them way more fun if they get shorter. While modifying my Allen key/hex key extender to work as an extender I thought it would be great to add a dice as additional feature to the thing. Since I also have round pencils they are also supported. The following can be adjusted: shape (hexagon or round) generate the extender and/or some filler part (makes it easier to print those in different colors) use the dice or don’t use it the diameter (for a hexagon use the inner diameter) the height of the extender/dice the minimum thickness of the shell If you generate a filler you also might want to us it as a cap. If you use the setting cap a little hole is created that might or might not help you to not break the tip of the pencil. If you want to use it as a pencil extender please don’t forget to set a sufficient depth of the hole for the pencil. This can be printed as two separate parts and put together afterwords if you want to have it in two colors. Since I don’t have a printer with a dual extrude I might revisit the project in the future. Print Settings Rafts: No Supports: No Resolution: 0.2 mm Infill: 100% Notes: I used 0.2 mm resolution for a better grip and 100% infill to make it heavier. If you want to have it lighter and smother adjust these settings. Although it was not necessary for me - you can consider using a brim for stability. For a 2 color print just print the dice/extender separately and put them together after printing. How I Designed This Although this is more or less a remix of the Allen key/hex key extender I spent quite some time for getting this right. My first idea was to use the hexagon shape for a dice by making some holes. So the question was where to put these. Normal dices seem to have high and low numbers on opposite sides (6 <-> 1, 5 <-> 2 and 4 <-> 3). For better balance I decided to use this for nearby values (6 <-> 5, 4 <-> 3 and 2 <-> 1). So the next question was how to distribute them. Alternating even and odd numbers seemed to be a nice way to go. So if you start with 6 the 5 is already taken for the other side and 1 and 3 are the only remaining odd numbers to put as neighbors. (Since by turning the peace 180 degrees right and left change it doesn’t matter on which side you put them.) As a nice side effect for even numbers on top the sum of the upfacing sides is also always an even number (odd+even+odd=even -> in this case always 10, however I leave that for you to investigate feather) and the other way around for odd numbers (even+odd+even=odd -> and in this case always 11) So for an odd number (1+2+3+4+5+6=21) of holes they are distributed quite fair. After playing around with some different forms of distribution a little extra space between the top and button 3 with alignment on top and button seemed to be the best way to go. (By the way 10 on one and 11 on the other side.) Some hundred test-rolls with a prototype didn’t show any tendency to any number - so it seemed to be pretty fair. Since having the same color for the infill and the shell doesn’t make an easy readable dice I separated those two and printed them with different filaments. Of course the dots remain holes since I had to design it to be assembled together after printing since I don’t have a printer with a dual extrude (however if I can get a hold of one some day I might revisit this project). dice only The last step was to find a length and wight that would make it pleasant for the usage with a short pencil while keeping the depth of the hole deep enough to hold it tight even when using some pressure. My personal favorite settings are the default values, however your mileage may vary so don’t hesitate to play with the values of the customizer. With all the settings fine tuned it was time to find the right color combination. Of corse black and white has the highest contrast, however there are so many other color-combinations that are possible. Although I love red chalk and the dark translucent red filament this combination isn’t my favorite. The pink-blue looks great and with every short pencil there is a new opportunity to try out other color-combinations (at least as long as I don’t reuse another.) some prints in different color-cominations While taking some photos of the printed pencil extenders a butterfly (sorry this one is not 3d-printed) showed some interest - although always keeping some respectful distance. butterfly interested but keeping some respectful distance still interested and still keeping some distance Category: Dice
With this file you will be able to print dice pencil extender or cap with your 3D printer. Click on the button and save the file on your computer to work, edit or customize your design. You can also find more 3D designs for printers on dice pencil extender or cap.
