DiA Lens wiper
prusaprinters
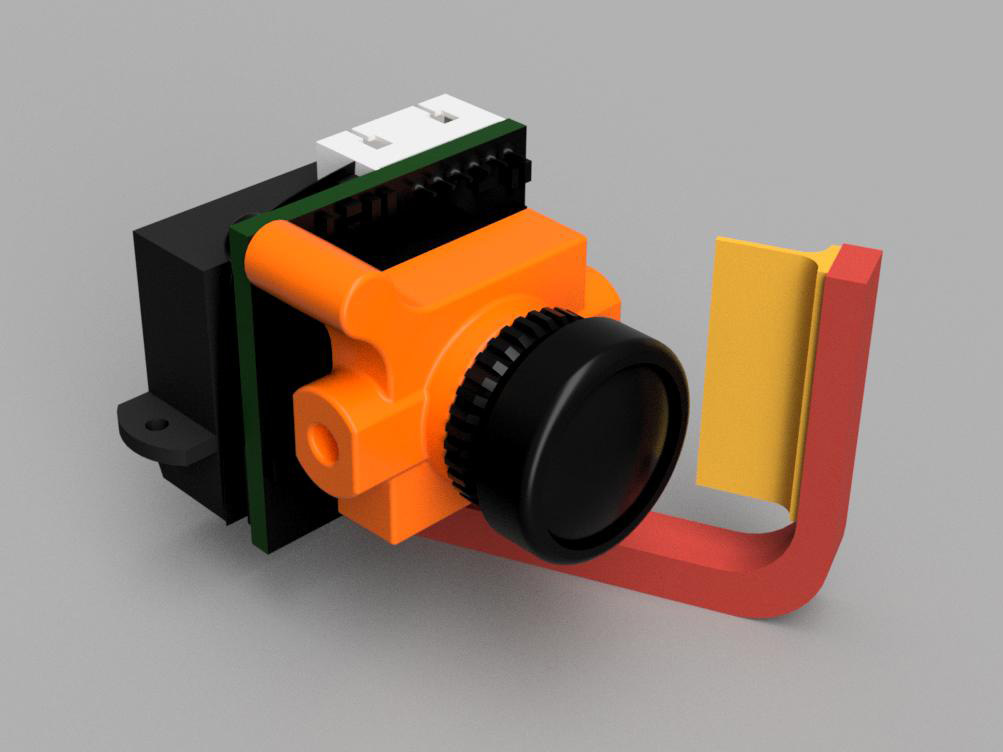
<p>There was a joke about rain wiper for fpv camera. I've heard that and my brains started ticking.</p> <p>There is no restriction to fly our quads, wings and plane in the rain. This restriction is just in someone's head. Just use a proper conformal coating and Send It. In Finland, we fly around the year, no matter whether there is sun, rain or snow. I believe that many other people share the same attitude.</p> <p>So is this a joke or not, useful or not? It's your decision.</p> <p>Here is an open source project for everyone to create a simple wiper system for fpv camera. Or whatever you want :D</p> <p>Here is a source file for Fusion360, so you can modify of develope this further for your needs. Remember to create a Thingiverse remix and credit me for your inspiration<em>cough</em>.</p> <p>You'll find here also a guide to configure Betaflight to use the servo for the wiper. And the configurations on your OpenTX radio with LUA script.</p> <p>Thank you very much Jari Kankare for providing awesome Wiper script! Check out his <a href="https://www.instagram.com/meatg_fpv/">Instagram profile @meatg_fpv</a>!</p> <p>Enjoy and share your creation here and on <a href="https://www.instagram.com/dialeksi/">Instagram@dialeksi</a> or where ever your social life is!</p> <h3>Print instructions</h3><h3>Category: R/C Vehicles Building guide</h3> <p><strong>Before printing</strong></p> <p>First, get a <a href="https://www.banggood.com/1_7g-Low-Voltage-Micro-Digital-Servo-Mini-JST-Connector-for-RC-Model-p-1157620.html?p=MW151810738534201705&custlinkid=169782">1.7g micro servo</a> and attach it to the back to your camera with double-sided tape. Make sure that the servo's shaft is closer to the centre of the camera.<br/> Then measure the distance between the shaft centre and the front lens.</p> <p>If there is no ready-made arm here for your camera, then you can generate it in Fusion360 CAD software. Open<em>DiA Lens Wiper.f3d</em> file included here.</p> <p>Use the measured size and set it by modifying the<em>Servo_lens</em> parameter. It will automatically regenerate the wiper arm part.</p> <p>Export modified arm as STL. Make a Thingiverse remix or send it to me, so I can keep a list of all ready-made arms available here.</p> <p>Print the arm and the rubber blade. Rubber blade part is long, because of the difficult nature of super flexible filament. So you can just cut the cleanest part from it.</p> <p><strong>Printing</strong></p> <p>I recommend to print wiper's arm with less brittle filament like Armadillo 75D TPU, PETG or Nylon. You can try testing with other material too :)</p> <p>Put the arm in the slicer on its side and fill it with perimeters only.</p> <p>Print the wiper's rubber blade part with very soft, like Ninjaflex 85A, TPU. Put the rubber in the slicer on its back, blade pointing up.</p> <p><strong>Assembly</strong></p> <p>Cut the cleanest part of the rubber blade and glue it to the arm. You can use Loctite or such cyanoacrylate based glue.</p> <p>Slide the wiper arm on to the servo's short one handed arm that came with the 1.7g servo. Lock with some tiny whoop's screw or wire.</p> <p>Put assembled wiper arm on the servo, but don't lock it yet. Make sure that the wiper is on the desired location by default and moves in the right direction. Lock it with a screw as the last part.</p> <p><strong>Configuration</strong></p> <p>If you use Betaflight or such flight controller. Make sure that you have spare pwm output for the servo. Check the directive guide in my previous project <a href="https://www.thingiverse.com/thing:3053840">DiA Compact tilt camera system</a>.<br/> Or you just can put it on the receiver's spare pwm output.</p> <p>Get the<strong>Wiper.lua</strong> mixer script from <a href="https://github.com/MeatG/OpenTX-LUA">MeatG's Github</a>. Save this file to radio's SD card<em>/SCRIPTS/MIXES/</em> folder.</p> <p>Then in your model settings you can set these setting that I used. You can set what suites you best:</p> <ul> <li><p>Go to<strong>Custom scripts</strong> tab</p> <ul> <li>Click on the first LUA1<ul> <li>Script: select Wiper from the list</li> <li>Name: WiperSl (Wiper Slow)</li> <li>Speed: 5 (bigger slower)</li> <li>Delay: 30 (bigger longer)</li> <li>See the Wipe's live output for a result</li> <li>Go back to the script list</li> <li>Create second LUA2</li> <li>Name: WiperFa (Wiper Fast)</li> <li>Speed: 5</li> <li>Delay: 7</li> </ul> </li> </ul> </li> <li><p>Go to<strong>Inputs</strong> tab</p> <ul> <li>Add new input, mine is I09. Use a knob or slider as a source, mine is S2</li> </ul> </li> <li><p>Go to<strong>Mixer</strong> tab</p> <ul> <li>Add new to selected channel, mine is CH9<ul> <li>Mix name: Wiper</li> <li>Source: Created input, mine is I09</li> <li>You can change the moving direction of the arm by inverting the Weight from 100 to -100</li> <li>Go back to Mixer list</li> <li>Insert After created mixer</li> <li>Mix name: Slow</li> <li>Source: LUA 1 WipeSl</li> <li>You can change the moving direction of the arm by inverting the Weight from 100 to -100</li> <li>Switch: Select swich and its position, mine is SB center</li> <li>Multiplex: Replace</li> <li>Go back to Mixer list</li> <li>Insert After again</li> <li>Mix name: Fast</li> <li>Source: LUA 2 WipeFa</li> <li>You can change the moving direction of the arm by inverting the Weight from 100 to -100</li> <li>Switch: Select swich and its position, mine is SB up</li> <li>Multiplex: Replace</li> </ul> </li> </ul> </li> </ul> <p>And you done!</p> <p>So with a slider you can move the wiper manually. And with the switch you set the wiper to move automatically at your deisred speed, like we have in the cars.</p> <p> <figure class="media"> <oembed url="https://www.youtube.com/watch?v=FYegUYdasrQ"></oembed> </figure> </p> <p>Wiper in real action: <a href="https://www.youtube.com/watch?v=N1ddc08FXdA">https://www.youtube.com/watch?v=N1ddc08FXdA</a></p>
With this file you will be able to print DiA Lens wiper with your 3D printer. Click on the button and save the file on your computer to work, edit or customize your design. You can also find more 3D designs for printers on DiA Lens wiper.