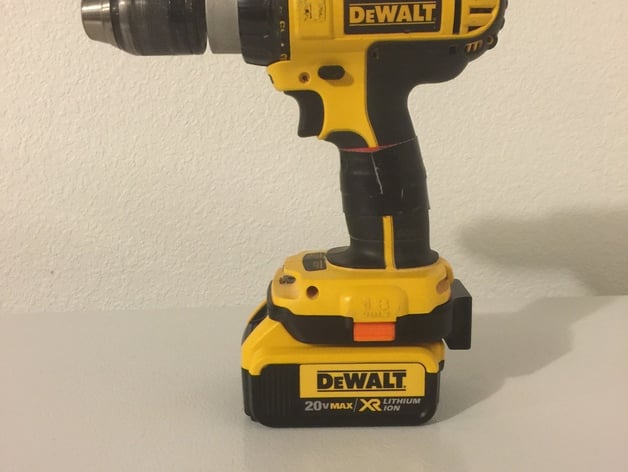
Dewalt 18 volt to Dewalt Lithium Ion 20 Volt Adapter - With Battery Monitor
thingiverse
I've created an adapter that allows you to use a Dewalt 20v Lithium Ion Battery with my 18v Dewalt tools. Use this adapter at your own risk, as over-discharging lithium batteries can be extremely hazardous - there's a serious risk of fire or explosion. The 20V Dewalt Tools have the battery protection circuitry built-in to the tool itself, not the battery, so you'll need to be careful not to over-discharge the battery. I've included an inexpensive lithium battery monitor with low voltage alarm (available for between $2-$5) that's commonly used in the RC hobby. Print Settings: Printer Brand: MakerGear Printer: M2 Rafts: Not required Supports: Yes Resolution: 0.2mm Infill: 60% or higher Notes: I didn't need supports for the top (18v) part, or the side clips, but it's necessary to use support on the bottom (20v) part as it prints upside down. I printed the top battery clip (18V), and the top part of the adapter with ABS. The side clips, bottom battery connector (20V), and bottom part of the adapter were printed with PLA. Post-Printing Assembly: The 20V contacts are designed to push 24 to 28 gauge (~0.5mm) metal strips through to connect to the terminals of the battery and the tool. I used a sheet of 24 gauge 260 brass that I purchased from Amazon (search "260 Brass Sheet, 24 Gauge") to cut the metal strips. You can use other types of metal, such as galvanized strapping for hanging plumbing pipes, as long as it can be soldered. For the wires, I used 10 Gauge automotive wire for the battery connections and some strands of cat3 wire to make the connections to the battery monitor. See the pictures below for details on the connections. You'll need to solder a good solid connection between the top connector and the bottom one. When assembling, I made the terminals for the top, then pushed them through the small top clip and soldered the 10 gauge wire to them. Next, I pushed the top connector and wires into the top part of the adapter, and sized up the length of the wires so that they would reach the B+ and B- terminals of the 20V connector block without having too much wire length. It's a tight fit by the time everything is assembled. The connections to the battery monitor were fairly simple - you must remove the terminal strip from it before soldering the small wires to the terminals for each cell. The battery monitor connections are (from left to right, looking at the front of it) B-, C1, C2, C3, C4, and B+ (which is C5), as labeled on the 20v battery. Be sure that the connectors aren't shorted to each other when assembling, as the battery could burn or explode if shorted out. You'll need 4x #6-32 x 1/2" machine screws to assemble the top and bottom half - I had to cut the front two off at about 3/8" to allow the 20v battery to fit. Leave the back screws long so that they hold the 20v battery connector in place. I used a spring from a click pen, cut in half, for the side clips - stretching them slightly. The clips are held in place by the top and bottom half. The 20V battery connections (looking at the back of the connector) show the layout. The top 18V terminal was cut and bent to fit over the top connector. Solder your 10 gauge wires to the bottom of the connector before installing it in the top of the adapter. The 18V tool connections polarity is shown below.
With this file you will be able to print Dewalt 18 volt to Dewalt Lithium Ion 20 Volt Adapter - With Battery Monitor with your 3D printer. Click on the button and save the file on your computer to work, edit or customize your design. You can also find more 3D designs for printers on Dewalt 18 volt to Dewalt Lithium Ion 20 Volt Adapter - With Battery Monitor.
