Deutsche Bundesbahn MDyg986 "Behelfsgepäckwagen" - Gauge 1 (1:32)
prusaprinters
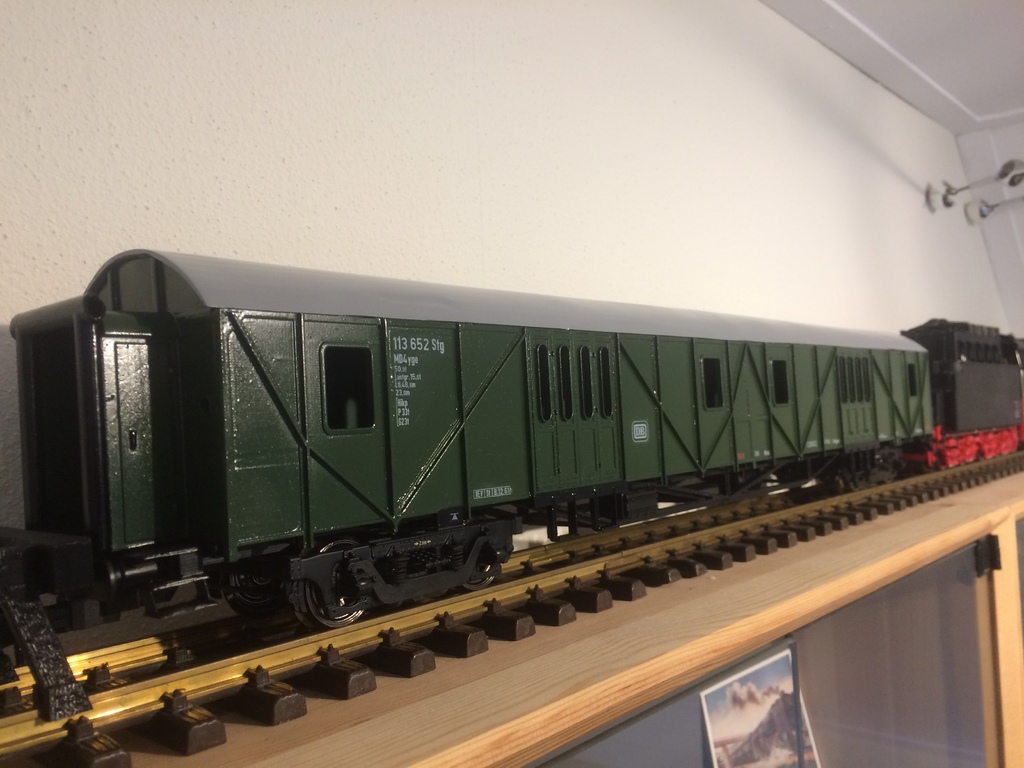
<p><a href="http://www.modellbau-wiki.de/wiki/Behelfspersonenwagen">http://www.modellbau-wiki.de/wiki/Behelfspersonenwagen</a></p><p>A MDyg 986 in gauge 1 (1:32) will be ~700 mm long.</p><p>Luckily the Deutsche Bundesbahn MDyg986 "Behelfgepackwagen" is very symmetrical.</p><p>I "only" needed to design a quarter of this express luggage wagon, and copy it on 2 axis. ;-).</p><p>The parts fit only just on the build plate of a Creality CR10 (300 x 300 mm). Place the part diagonally, and minimize the "skirt" in your slicer software.</p><p>For the proper alignment of two "quarter" model parts", 3 mm alignment holes are designed in the floor, roof and walls. I glued in 3 mm pieces of metal wire.</p><p>All parts are glued with CA glue prior to painting.</p><p>Spring loaded coupling rods designed. The Marklin style gauge 1 coupling is modified from <a href="https://www.thingiverse.com/thing:1605582">https://www.thingiverse.com/thing:1605582</a>.</p><p>Window insert from plexiglas are routed.</p><p>I know my design is not perfect up to the last minute detail. I did not count and draw ALL the rivets, bolts, etc...... It was never my intention to be 100% accurate.</p><p>My goal was to make a model that leaves a good impression of the MDyg986 Behelfsgepackwagen. I think I've managed just that ;-)</p><p>Update 21AUG2018:</p><p>Published final design.</p><p>Update 11NOV2018:</p><p>Several additions made to make assembly easier to achieve a more stable model.</p><p>The side walls is fitted with 2.5 mm holes to tap M3 threads. In the body screw holes are present to screw the walls to the floor.</p><p>The end wall is to be glued between the side walls. The roof is attached to the floor by M4 screws, while resting on the walls.</p><h3>Print Settings</h3><p><strong>Printer Brand:</strong></p><p>Creality</p><p><strong>Printer: </strong></p><p>CR-10</p><p><strong>Rafts:</strong></p><p>Yes</p><p><strong>Supports: </strong></p><p>Yes</p><p><strong>Resolution:</strong></p><p>0.1 mm</p><p><strong>Infill: </strong></p><p>33%</p><p><strong>Filament:</strong> REEL Filament PETG Whatever</p><p><br> </p><p><strong>Notes:</strong></p><p> </p><p>For thermal stability, it is advised to print all parts in PETG, ASA, etc. Using PLA, your wodel will warp in warm summer weather.</p><p>When orientating the parts at 45' the "zig-zag" pattern of the "iron" feature in Cura results in a smooth surface finish. No filler is required, just a primer will do.</p><p>A brim is needed to keep the roof stuck to the print bed.</p><h3>Post-Printing</h3><p>To build this model, you need to print and assemble:</p><ul><li>Undercarriage: 2 x FLOOR, 2 x COUPLING ROD and 2 x BUFFERS.</li></ul><p>Tap M4 screw thread in the mounting pins for the bogies.</p><p>The bogies are "Schwanenhals Drehgestellen", made by Hubner.</p><p>The coupling rods slide over the mountin pins. Some spacer are required. The coupling rods are pulled to the middle of the wagon by small springs.</p><p>The Marklin style claw coupling is sprin loaded.</p><p>Use a suitable primer before the parts are painted in the final color. (Satin black, RAL6020 Chrome-oxide green and grey for the roof).</p><p>No surface preparation is needed on the walls. The "ironing" of the surfaces in Cura almost eliminates the visibility of layer lines. They are concealed completely by the primer.</p><p>The roof needs some primer/putty to achieve a smooth surface.</p><p> </p>
With this file you will be able to print Deutsche Bundesbahn MDyg986 "Behelfsgepäckwagen" - Gauge 1 (1:32) with your 3D printer. Click on the button and save the file on your computer to work, edit or customize your design. You can also find more 3D designs for printers on Deutsche Bundesbahn MDyg986 "Behelfsgepäckwagen" - Gauge 1 (1:32).