Detailed Dalek model redrawn
thingiverse
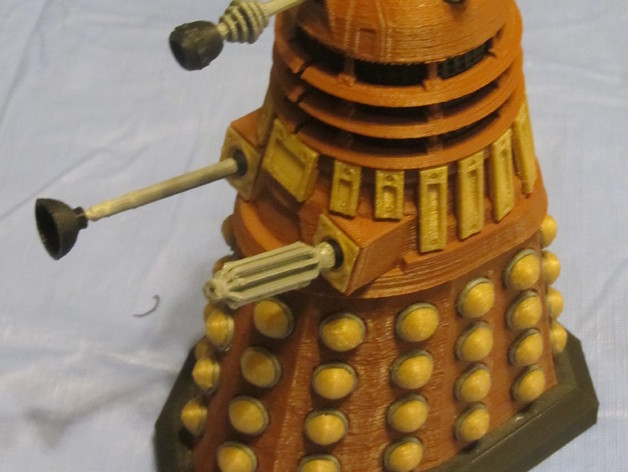
This model is the result of my learning experience with Solidworks over the course of my end-of-year vacation. I took Audrey2's excellent Accurate Dalek model and redrawn every part from scratch, utilizing it alongside photos and repurposed components from my older Dalek models. My goal was to create a reasonably accurate and detailed Dalek model that was both easy to print and assemble and could be entirely produced with printed parts. This model is not as precise as Audrey2's, but at the scale it's designed for, you won't be able to discern the difference. It's composed entirely of printed components (which resulted in significant loss of detail on the eyestalk and gun) with a single exception - 1.75mm filament used for the eyestalk hinge. It does require some adhesive for assembly but very little is needed as most parts fit together by friction. To assemble this model, print one each of the bumper, core, eye, and plunger pieces in black. You'll also need to print two armball pieces in black (or silver; the show's props used different materials). Next, print one each of the skirt, shoulder, dome, and three ring halves in brown or your preferred base color. The shoulder will likely require support printing and possibly so for the dome. Now, print two lamps, two eyestalk halves, two gun halves, and a plunger arm in silver. You'll also need to print one shoulder joint cap file in gold; this contains two parts. Print one of the slats files as well - this includes 18 individual pieces which fit into specific slots on the shoulder piece. It's advisable to print the shoulder first, then proceed with printing the slats and carefully attaching them one at a time so you avoid confusion. Next, print 54 bumps in gold or matching color to your slats, along with 54 bump rings in black or silver or another preferred color. Also, don't forget to print a dome pin of any desired color. The assembly begins with the attachment of bumps and bump rings. These are added without glue or fasteners; simply place them through their respective holes and twist them into place by 90 degrees to secure them. Next, align the skirt over the bumper ensuring it presses down firmly and secures itself in place through friction. It may help if you apply a dab of glue here for extra security. The core should also press into its topmost position on the skirt where it'll stay through sheer force, with possibly another slight aid from glue to lock them together. For assembling each slat into their corresponding slots on the shoulder assembly - these parts fit snugly through friction although another light dab of adhesive might be wise to keep things in place securely. Once assembled correctly the three ring halves snap tightly into their designated grooves on the core piece starting from bottom and proceeding upwards with a total count of 3 distinct rings. Now comes the step of attaching each armball piece into its respective socket at the front shoulder, secured firmly in place by their matching joint caps (glued in, carefully avoiding jamming). You can easily omit this crucial detail altogether for gun and plunger motion but it makes assembly a wee bit more manageable - with or without it. Carefully removing support material from your printed plunger arm before attaching the rest. The armball pieces then connect securely in their designated places - glue them into place on either end if necessary. Last of all you simply slide this beautiful structure into position on top of the core - completing your Dalek model entirely!
With this file you will be able to print Detailed Dalek model redrawn with your 3D printer. Click on the button and save the file on your computer to work, edit or customize your design. You can also find more 3D designs for printers on Detailed Dalek model redrawn.