Desktop Cyclonic Vacuum
prusaprinters
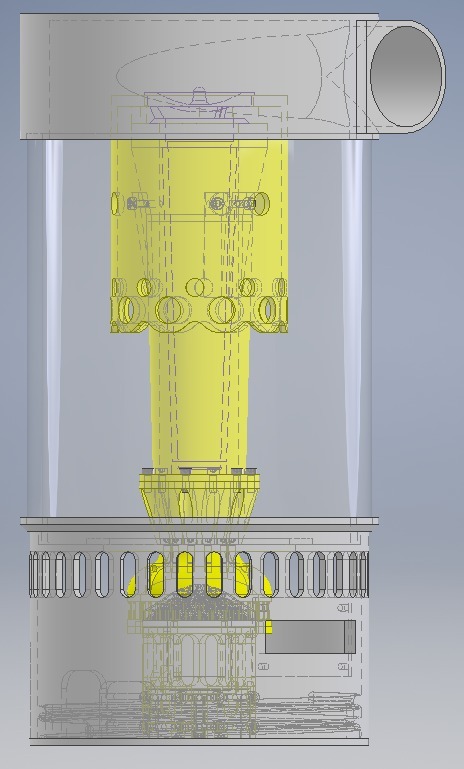
<p>I wanted a little vacuum cleaner for my desktop - mostly because it's funny. It works pretty ok and it looks decent. It is by no means an optimized, or even intelligently designed piece of equipment. I'm sharing the files in the hope they they might be useful if you want to make something similar.</p> <p>Video if it running: <a href="https://www.youtube.com/watch?v=L5AofjQuuh4">https://www.youtube.com/watch?v=L5AofjQuuh4</a></p> <p>The design was made with the rules that everything be assembled via screws (no glue), everything is modular, and there should be very minimal post processing of parts necessary. Mostly this was achieved - although you may need to post process more depending on your printer.</p> <p>In the video it's being run off a large power supply with a function generator creating the signal for the ESC. The final version will have electronics integrated - but I'm not there yet. I'll release the files for the integrated electronics when I have them.</p> <p>I should note that this thing is SCARY when it is running and the impeller is running fast enough to absolutely explode. I never had this happen but you really should expect it to and wear safety glasses at all times!</p> <h3>Build Instructions</h3> <p><strong>Parts needed</strong></p> <div><p>These are what I am using - much of this I had laying around so I cannot vouch for where to get it, how to get it, or whether substitutions would work</p> Motor: Propdrive 28-16s 3000kv <p>ESC: HobbyKing 60A SBEC (I've also used SimonK 30A ESCs)</p> <p>Power: 12V 30A power supply from ebay</p> <p>Filter: Filter for a Dyson handheld (purple cone - I'm using a knockoff)</p> <p>Hose: Cut from an old shop vac hose</p> <p>Clear tube for the lid: 6" diameter clear acrylic</p> <p><strong>Screws:</strong></p> <p>All M3 except for the impeller which has M2.5</p> <p>Mostly M3x6 and M3x12</p> <p><strong>A note on screws:</strong></p> <p>The parts are designed so that screws can self-tap the holes. You may want to clear some parts with an M3 drill so the screws only thread the correct part.</p> <p>Be careful with longer screws - there are some places where they could interfere with motion (especially around the motor)</p> <p><strong>Motor connection:</strong></p> <p>The impeller connects to the outrunner end of the motor. I do not know if this is a good idea or a terrible one. It seems to work but it might also be destroying the motor.</p> <p><strong>Printed parts</strong></p> <p>The impeller was printed with PETG at 80% infill (which is solid on my printer). I don't know if PLA would or wouldn't work - but I didn't have any PETG impellers fail. I tried to power through the impeller binding against the PLA frame and destroyed three ESCs - it's worth it to get it well-aligned so it runs well!</p> <p>The rest of the parts are PLA printed with standard settings. Mostly 300um layers with 20% infill an 3 shells.</p> <p>The gray parts of the case and lid are PLA and printed with a 800mm nozzle - although they should work with a 400um nozzle no problem. The bottom is designed to screw together. The threads should be loose once cleaned up.</p> <p>All printing orientations are obvious.</p> <p><strong>Electronics</strong></p> <p>The case is designed to hold the ESC internally as well as having a control circuit. I'm using an Arduino Pro Micro, a generic i2c OLED, and a rotary encoder.</p> <p>The electronics aren't final - I will include those files with the arduino code at a later date.</p> </div> Category: Tools
With this file you will be able to print Desktop Cyclonic Vacuum with your 3D printer. Click on the button and save the file on your computer to work, edit or customize your design. You can also find more 3D designs for printers on Desktop Cyclonic Vacuum.