Delta 2040 Carriage for Duet Smart Effector (MagBall Spacing 55mm)
thingiverse
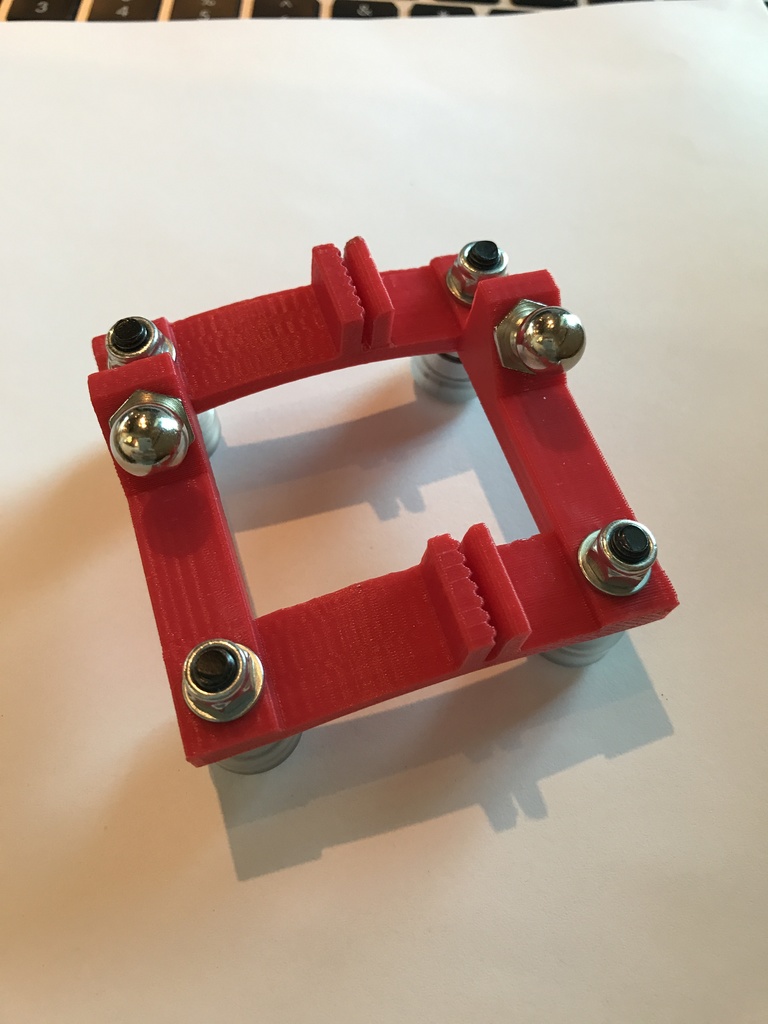
Kossel / Delta Carriage designed for the Delta Smart Effector from Duet3D with specific machine parameters: IMPORTANT: Print this part on its head as laid out in the STL file or view above, with supports. Alternatively, print it at the opposite end if your printer can handle up-sloping without supports. The following machine parameters are required: 1) 2040 vertical rails 2) 55mm Mag-Ball Diagonal Arm spacing to match Delta Smart Effector 3) Mini-VWheels 4) GT2 Belt 5) 10mm Magnetic Balls with M3 x 10 stud 6) FYI: My Delta is built with 16T Pulleys and Smooth Idler Pulleys from OpenBuilds. This Carriage can be easily snapped on and off 2040 rail due to the spring tension inherent in its design. Required parts: 1) 4x Mini-VWheel Kit from OpenBuilds Store 2) Spring Tensioner for GT2 Belt 3) M5 6mm aluminum spacer from OpenBuilds Store 4) M5 30mm low-profile bolt from OpenBuilds Store 5) M5 Washer from OpenBuilds Store 6) M5 Locking Nut from OpenBuilds Store 7) 2x 10mm Magnetic Ball with M3 x 10mm stud from Ultibots Assembly instructions: 1) Install 10mm Mag-Balls using a 10mm socket, apply force as you screw them in. Note that the holes are undersized on purpose at 2.8mm; don't screw in too fast since the plastic may heat up and possibly ruin the hole. 2) Assemble the Mini-VWheel's according to OpenBuilds website instructions, ensuring bearings are snapped in securely to prevent the mini-wheel from not spinning freely. a) Insert M5 x30mm low-profile bolt through VWheel b) Install mini VWheel washer (IMPORTANT otherwise inner bearing may not spin freely) c) Slide M5 6mm spacer onto bolt d) Thread wheel assemblies into back of each Carriage corner e) Install M5 washer f) Install M5 Locking Nut, tighten accordingly for PLASTIC parts. 3) Snap assembled Carriage on to v-rail by inserting wheels (on one side) into slot and bending carriage outward which will give enough slack to snap the other set of wheels into the opposite v-slot on the 2040 vertical rail. 4) Slide Carriage up and down to verify it moves freely, then verify there's no diagonal slop or racking. 5) GT2 Belt: install belt in lower belt slot first, remove as much slack as possible and insert top end in remaining belt slot. Belt should have no play at this point. 6) Install GT2 Spring Belt Tensioner below the Carriage. DO NOT install tensioner above Carriage. 7) Install Diagonal Control arms to Effector Plate assembly. 8) Config / Calibrate / Enjoy !!
With this file you will be able to print Delta 2040 Carriage for Duet Smart Effector (MagBall Spacing 55mm) with your 3D printer. Click on the button and save the file on your computer to work, edit or customize your design. You can also find more 3D designs for printers on Delta 2040 Carriage for Duet Smart Effector (MagBall Spacing 55mm).