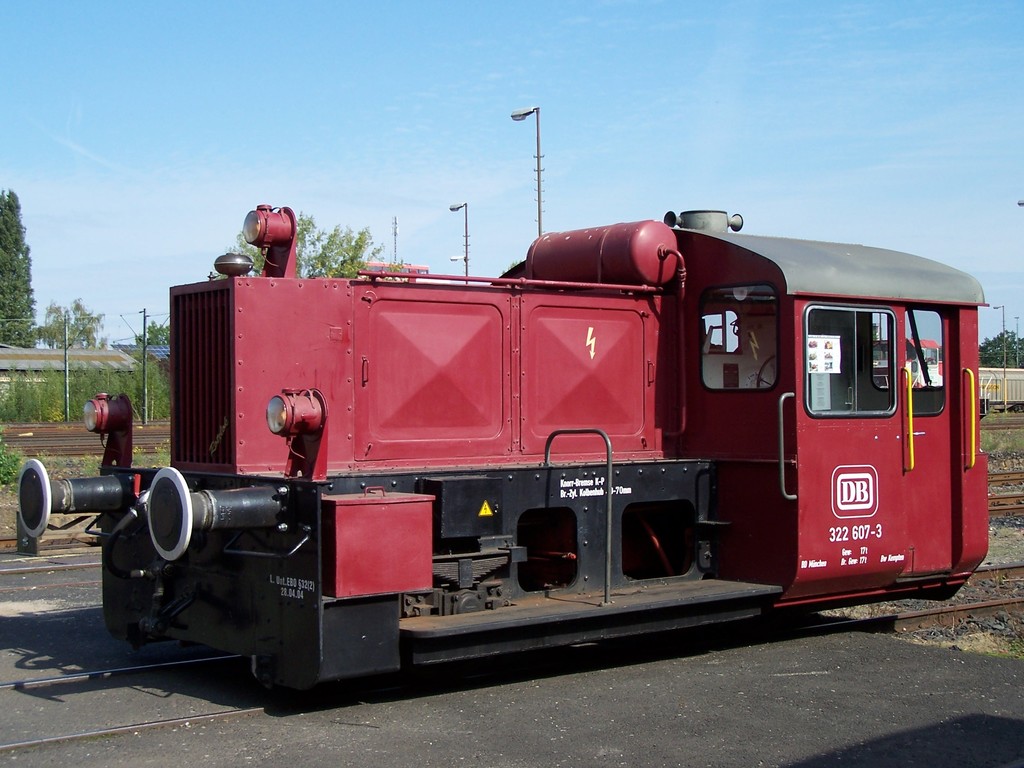
DB KÖF II, Gauge 1 (1:32) / 45 mm
prusaprinters
<p>The small diesel locomotive KÖF II was first introduced in 1932 by the Deutsche Reichsbahn. They were in service untill 1999 with the Deutsche Bundesbahn. Many have survived and are still shunting on industrial railways and in railway musea.</p><p><a href="https://en.wikipedia.org/wiki/DRG_Kleinlokomotive_Class_II">https://en.wikipedia.org/wiki/DRG_Kleinlokomotive_Class_II</a></p><p>This is my first project designed in Fusion360. It was quite a steep learning curve from TinkerCad.</p><p>It was never my intention to create a 100% acurate model. I've attempted to capture the essential features of this nice locomotive. Not every bolt and rivet is captured.</p><p>Video: <a href="https://www.youtube.com/watch?v=SfoTOIxP3wk">https://www.youtube.com/watch?v=SfoTOIxP3wk</a></p><p>I've designed this locomotive in several individual components.</p><ul><li>A motorized chassis. The wheels and pulleys screw to M3 theaded rods and are mounted in bearings. Glue the wheels and pulleys to the axles. A pulley slides on the output shafft of the motor. A rubber band drives the wheels. A motor mount is fitted with M3 countersunk screws. To fit all the required electronics, an alternative version of the motor-mount is added. A 1.5" speaker fits in the front of the chassis. Fit the speaker with some hot glue.</li><li>The outside frame. The frame is mounted to the chassis with M3 screws. The holes are already M3 threaded. Use some 4.0 mm material to glue the buffers to the provided holes. A Märklin coupling hook can be fitted.</li><li>The cabin and roof are available in an OPEN and CLOSED setup. (Note: each cabin-type has it's own roof). The cabin is held to the frame by a Märklin coupling hook and 2 M3 screws. Glue on 2 buffers. If you need access to the cabin, the roof can be left detachable. Otherwise I advise to glue it on.</li><li>The engine cover comes with a separately mounted air-tank and radiator. Because inside the electronics and battery are store, I advise not to glue the cover to the frame and cabin.</li></ul><p>At several positions 1.75 mm holes are provided to fit hand-rails made of filament.</p><p>Required parts:</p><p>I have bought the bearings, speaker, motor, ESC, Arduino's and Bluetooth module from shops like Ali, Gearbest, BangGood, eBay, etc. All other materials are fromlocal sources.</p><ul><li>4 x F623ZZ bearing (3.0 mm i.d.) for the axles.</li><li>2 x M3 thread, 55 mm long as axles.</li><li>Rubber bands to transfer the power from the motor to the wheels by pulleys.</li><li>1 x Powerbank (1 18650 cell inside) to provide 5V.</li><li>1 x 6V Geared motor (10 x 12 x 30 mm) 300 RPM</li><li>1 x ESC module (10A without brake for brushed motors) to drive the geared motor.</li><li>1 x 1.5" speaker</li><li>1 x NPN transistor</li><li>1 x 2 kOhm potentiometer</li><li>2 x Arduino Nano (1 for the RC control by RemoteXY, The other controls the sound module)</li><li>1 x Bluetooth module (HC10, BLE/Bluetooth 4.0 for IOS devices, the conventional HC-05 bluetooth module works fine with Android devices)</li><li>Some wires to connect all components.</li><li>Several M3 screws to mount the motor-drive</li><li>Glue. Superglue (CA) and or hot glue.</li><li>Decalls: <a href="http://www.modellbahndecals.de/Decals-Loks/Komplettbeschriftungen-90/Epoche-120/DB-Dieselloks-200/-Nassschiebebilder--Lok-Komplettbeschriftung-Koef--DB--Epoche-3--Artikel-Nummer--7859-.html">http://www.modellbahndecals.de/Decals-Loks/Komplettbeschriftungen-90/Epoche-120/DB-Dieselloks-200/-Nassschiebebilder--Lok-Komplettbeschriftung-Koef--DB--Epoche-3--Artikel-Nummer--7859-.html</a></li><li>2 coupling hooks (european style) like these: <a href="https://www.maerklin.de/en/products/details/article/56101/52/?tx_torrpdb_pi1%5Bbacklink%5D=52&tx_torrpdb_pi1%5Bpage%5D=1&tx_torrpdb_pi1%5Bperpage%5D=10&tx_torrpdb_pi1%5Bera%5D=&tx_torrpdb_pi1%5Bnewonly%5D=0&tx_torrpdb_pi1%5Bgaugechoice%5D=4&tx_torrpdb_pi1%5Bgroupchoice%5D=4&tx_torrpdb_pi1%5Bsubgroupchoice%5D=&tx_torrpdb_pi1%5Bfilter%5D=1&tx_torrpdb_pi1%5Bpagesort%5D=artnrasc&tx_torrpdb_pi1%5BbrandId%5D=1&tx_torrpdb_pi1%5BnoPaging%5D">https://www.maerklin.de/en/products/details/article/56101/52/?tx_torrpdb_pi1%5Bbacklink%5D=52&tx_torrpdb_pi1%5Bpage%5D=1&tx_torrpdb_pi1%5Bperpage%5D=10&tx_torrpdb_pi1%5Bera%5D=&tx_torrpdb_pi1%5Bnewonly%5D=0&tx_torrpdb_pi1%5Bgaugechoice%5D=4&tx_torrpdb_pi1%5Bgroupchoice%5D=4&tx_torrpdb_pi1%5Bsubgroupchoice%5D=&tx_torrpdb_pi1%5Bfilter%5D=1&tx_torrpdb_pi1%5Bpagesort%5D=artnrasc&tx_torrpdb_pi1%5BbrandId%5D=1&tx_torrpdb_pi1%5BnoPaging%5D</a>=</li><li>Some 1.75 mm filament to create the hand-rails</li><li>SMD-leds (6 x white, 4 x red) for the A-signal lights.</li></ul><p>The RC-control Arduino Nano is configured for control by the RemoteXY app. Project: <a href="http://remotexy.com/en/editor/e54607139e8f8d00a5178e465b460758/">http://remotexy.com/en/editor/e54607139e8f8d00a5178e465b460758/</a></p><p>The user interface for your phone or tablet is stored in the sketch. Any ios or android device receives the interface from the Arduino.</p><p>This app is free to use for up to 5 elements. (I've configured 5 elements)</p><p>My sketch provides the motor drive, horn control and lighting. The motors can be driven by an ESC (PWM-servo signal) and with an an H-bridge.</p><p>In the sketch comments the pin-setup is described. This module can be replaced with the receiver of a conventional 2.4 GHz RC-system.</p><p>Another Arduino Nano runs the sound module. It is based on this project for ship engine sounds: <a href="https://www.youtube.com/watch?v=D-_IvxzKwkg">https://www.youtube.com/watch?v=D-_IvxzKwkg</a> In the sketch comments the pin-setup is described.</p><p>A PWM-servo input reproduces the engine sound for the set speed. The other PWM-servo input controls the sound of the horn.</p><p>Currently 3 engine sounds are available. Please feel free to modify or add your own sounds (and share the results)</p><p>I'd like to get rid of 1 Arduino Nano by combining both sketches. My programming skills were not sufficent to achieve this. Please feel free to merge these sketches and publish the results.</p><p>Best regards,</p><p>Rob</p><p>IMPORTANT REMARK: If you decide to build this modell, I encourage you to use the motor-block designed by "bahndrucker" (<a href="/Bahndrucker">https://www.thingiverse.com/Bahndrucker</a>) instead of the "contraption"I've created. He designed an overall superior drive-unit, compatible with the motor-block by LGB: <a href="https://www.thingiverse.com/thing:4764519">https://www.thingiverse.com/thing:4764519</a>.</p><p>Adapters to mount this drive in the KÖF-II are also published by "Bahndrucker": <a href="https://www.thingiverse.com/thing:4753430">https://www.thingiverse.com/thing:4753430</a>. In this remix several items are optimized, and LGB-style couplings are added.</p><h3>Print Settings</h3><p><strong>Printer Brand:</strong></p><p>Creality</p><p><strong>Printer:</strong></p><p>CR-10</p><p><strong>Rafts:</strong></p><p>Yes</p><p><strong>Supports:</strong></p><p>Yes</p><p><strong>Resolution:</strong></p><p>As required</p><p><strong>Infill:</strong></p><p>As required</p><p><strong>Filament:</strong> 12-3d.nl PETG</p><p>Black How I Designed This ===================</p><p>This is the first project I've designed using Fusion360.</p><p> </p>
With this file you will be able to print DB KÖF II, Gauge 1 (1:32) / 45 mm with your 3D printer. Click on the button and save the file on your computer to work, edit or customize your design. You can also find more 3D designs for printers on DB KÖF II, Gauge 1 (1:32) / 45 mm.
