Da Vinci Duo 2.0 Dual E3D conversion no drilling no cutting
thingiverse
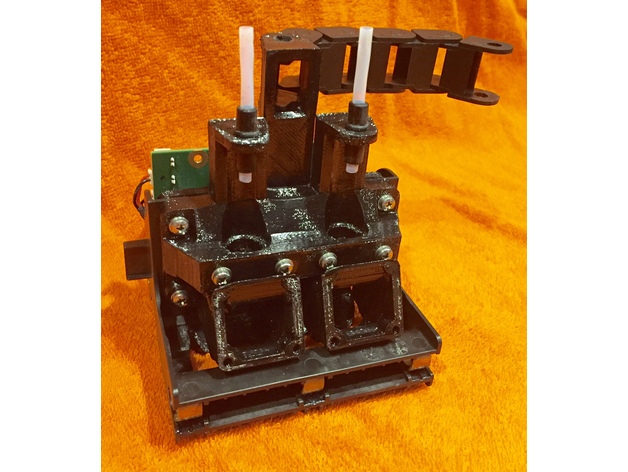
Update: Added an E3D themed fan cover for repurposed Da Vinci 40mm fans, also added a version of cable chain mount using M3 heat sets instead of sliding in a nut. Okay, so this is a remix of several different things all put together to provide for a drop-in, no-drill, no-cut dual E3D extruder mount. Please refer to the original designs for other possible installation tips as most have not changed. I've loaded two designs for the backing plate and hotend mount. One design is a bare-bones basic, the other is a remix I'm using on my 1.0 that gives me an integrated chain mount on the backing plate and PTFE guides on the hotend base. The PTFE guides are designed to use the existing rubber mounts installed in your original Da Vinci extruder. I've installed the original PTFE guides from mine as well as a few pieces of cable carrier chain for examples. I've also included a layer cooling fan duct (you'll need to print two) that allows the use of your original cooling fans once you make the changes in your Repetier firmware. I used the original height and location from the 1.0 E3D mount I remixed, which positioned the extruder at nearly the same height and position as the original on my 1.0. My hope is this will produce the same results on the 2.0. Unfortunately, I didn't have two E3D extruders available to test fitment and function. Installation: Layer Cooling Fan Ducts: Install these first before everything else. Use one #6 metal screw in each (they are designed to fit either side). Inner screen holes will line up with the bottom inner stepper motor mounting holes. Install original cooling fans from your Da Vinci extruder. Some trimming or shaping of outlet may be required to clear the extruder tip (again, didn't have one available for testing). Don't forget your fan cover to let everyone see you upgraded to E3D.. Hotend Mount: Required hardware... * 8x M3 brass heat set threaded insert for plastic (McMaster No. 94180A331) * 8x M3 washer (i.e. McMaster No. 90965A130) * 4x M3 x 16mm Phillips machine screw (i.e. McMaster No. 92005A126) * 4x M3 x 25mm Phillips machine screw (i.e. McMaster No. 92005A130) Heat set four M3 brass inserts into the backing plate and four into the back side of the hot end base. Mount your E3D hotends to the base with 4 M4 x 25mm machine screws and the cap. Take care when fitting the hot ends to make them as even as possible. There is a small amount of play on the carriage for final leveling. Line up the backing plate on the stepper motor side of the carriage with the hot end base on the extruder side. Start the top two M3 x 16mm screws but leave them loose to allow the fan shroud to slide in. Insert the remaining two M3 x 16MM thru the fan shroud and hot end base, threading them into the backing plate. You can not snug down the screws yet. Chain Mount: Attach the drag chain anchor to the fixed mount with two M4 x 8mm machine screws and nuts. The nuts just slip into the rectangular slot. Remove the screws from the top right Z-axis slide mount, put the fixed mount over the holes, and reinstall screws. Attach the other end to the built-in mount on the backing plate. Feed your cables through and take the chain apart where you need to make connections. Reassemble and you're ready to go. There is a lot of info and hopefully I didn't miss anything. Good luck to anyone that tries this, and please let me know how it works for you. Oh yea, and please make sure you run your print bed leveling routine after installation. Don't want to see any broken print beds.. Print Settings: Printer: Da Vinci 1.0a Supports: Doesn't Matter Resolution: .2mm Infill: 75% Notes: Most parts were printed with 2mm top, bottom, and sides and 75% infill for structure. Supports were only used on the backing plate to support the cable tie loop but may help for a better print on the fan shroud. The layer cooling fan duct will print correctly without supports if stood on the fan mount end.
With this file you will be able to print Da Vinci Duo 2.0 Dual E3D conversion no drilling no cutting with your 3D printer. Click on the button and save the file on your computer to work, edit or customize your design. You can also find more 3D designs for printers on Da Vinci Duo 2.0 Dual E3D conversion no drilling no cutting.