Da Vinci Duo 2.0 Chimera Edition with 200x200 printbed upgrade
thingiverse
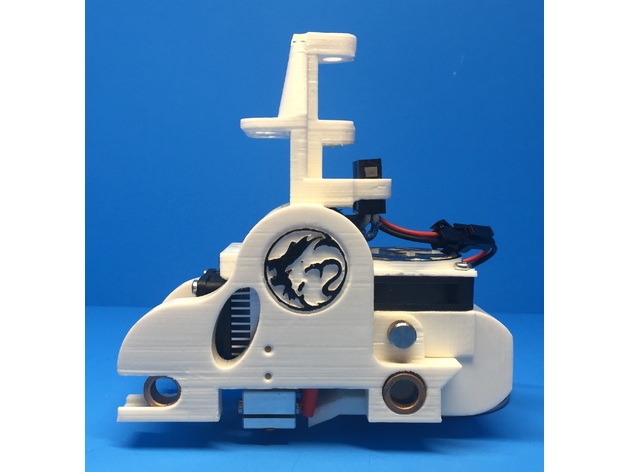
This appears to be a detailed guide on how to upgrade an E3D Chimera 3D printer kit with a custom carriage design. The guide covers various aspects of the upgrade, including: 1. Design modifications: - Two small holes are added on each side of the carriage for easy access to print head adjustment screws. - The circuit board is relocated back onto the chassis and mounted using cable chain mounts. 2. Parts List: - A list of parts required for the upgrade is provided, including screws, heat sets, thumb screws, and other components from McMaster-Carr. 3. Installation Instructions: - The guide provides detailed instructions on how to install the bearings in the new carriage. - It also explains how to assemble the print heads as per E3D V6 instructions and attach them to the heat sink. - The heater and thermistor cables are routed through the chassis, and the original heater connectors are installed. 4. Extruder Upgrade: - The guide recommends switching to Bowden extruders and provides a link to purchase a left and right kit. - Some cutting of the plastic case may be required for easy access. 5. Wiring: - The wiring instructions involve pulling back all the wiring from the original carriage, plugging in the extruder steppers, and running thermistor feeds from the carriage circuit board to the carriage. - A 12v run is added for permanent power to the heat sink fan, and a feed is created for the layer cooling fan. The guide also mentions that it will cover extruder alignment and position settings in future updates.
With this file you will be able to print Da Vinci Duo 2.0 Chimera Edition with 200x200 printbed upgrade with your 3D printer. Click on the button and save the file on your computer to work, edit or customize your design. You can also find more 3D designs for printers on Da Vinci Duo 2.0 Chimera Edition with 200x200 printbed upgrade.