D6/MMU cable clip head cap with push-fit connector
prusaprinters
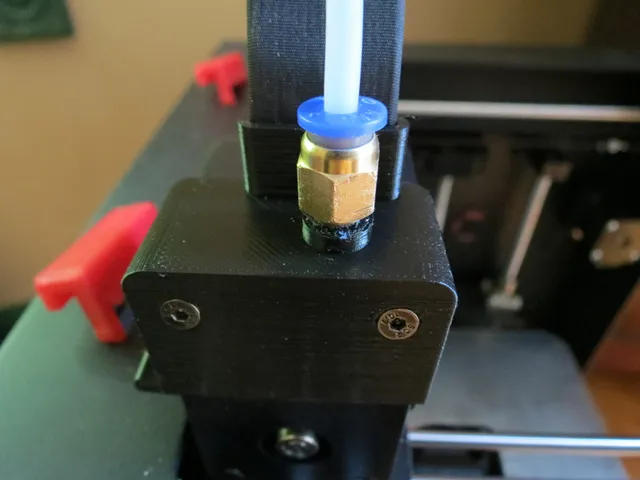
A couple years ago, Hlanderd had the neat idea of fitting the head with a pneumatic cable connector. I found this useful, too, as if the filament is a little bent, it might not go straight down the hole below the PTFE tube. When this happens, pushing on the filament just makes the PTFE tube pop out, then I have to take the cover off... kind of a pain. Nothing was posted back after that suggestion/request, so I figured I'd have a go. Edit: I wasn't thinking things "through!" This design is a little silly because after you get the filament past this fitting, it has to go down through another tube. I revised this design to make a push-through version that lets you take the PTFE down through the bracket all the way to the idler arm. See remix, https://www.thingiverse.com/thing:3749924 Print Settings Printer Brand: Prusa Printer: i3 MK2.5 Supports: Yes Resolution: 0.2 + variable to smooth the shoulders Filament: Hatchbox PLA Black Post-Printing ============= Ideally, you'll drill and tap a perpendicular thread into the hole to accommodate the connector. Not having that size tap, I fudged it, using a few twists of a countersink to taper out the top of the hole to make it easier to self-tap the connector. I also ran the countersink in the top hole of the bracket that comes just below this cap and guides/straightens the filament to make it less likely to get stuck at that transition. I didn't quite get my self-tapped connector perfectly straight, but I was able to soften the plastic a little and straighten it by hand+eye well enough. A hair dryer would be safer, but I softened the plastic by turning my soldering iron down to its lowest 180C setting and pushing its tip up into the bottom of the connector (not the plastic cap side!) for a few seconds. How I Designed This With only the .stl file to work from, I had to use FreeCAD's mesh workbench which isn't what I'd prefer, but it was good enough to get something that worked for me. Basically, I created a mesh from the STL, then did a Boolean subtract of a carefully positioned cube to remove the existing tube holder while leaving the cable clip. Added a 10mmx3mm cylinder on top of the existing hole to support the connector, then subtracted a 5mm cylinder for the hole to drill and tap. Category: 3D Printer Accessories
With this file you will be able to print D6/MMU cable clip head cap with push-fit connector with your 3D printer. Click on the button and save the file on your computer to work, edit or customize your design. You can also find more 3D designs for printers on D6/MMU cable clip head cap with push-fit connector.