D20 RGB Lamp
thingiverse
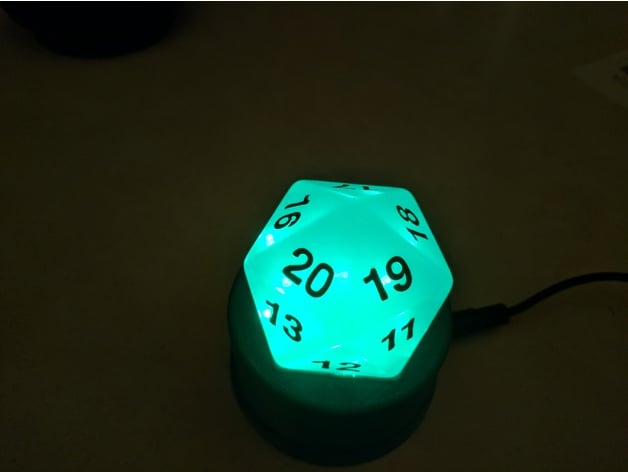
Human: 3D Printed RGB D20 Lamp Driven by Arduino. Full Write-up Here: http://blog.colecago.com/?p=743 Parts: Arduino - https://www.sparkfun.com/products/11113 LEDs (x5) - https://www.sparkfun.com/products/13282 Power Supply - https://www.sparkfun.com/products/12889 Barrel Jack - https://www.sparkfun.com/products/10785 Push Buttons (similar, x2) - https://www.sparkfun.com/products/9190 D20 Translucent - http://amzn.to/2hLp1iy Print Settings Files are now rotated and should be flat to the bed. Post-Printing Base gets glued to the electronics compartment using super glue. Push the pushbutton leads through the switch backing, then push the backing up into the electronics compartment with the buttons through. Secure it in place with hot glue. Ribbon cable is connected to the LEDs and pulled through the holes. A spot of hot glue holds the circuit board in place on the plastic. Then the electronics can be wired together. Power and ground are connected to all LED's, one digital output pin from the Arduino goes into the data in on the first LED. Chain the data outs to data ins of the other LEDs. The last LED's data out is not used. Ground is connected to one side of both push buttons. Then wire the other side of them to two of the digital inputs on the Arduino. A capacitor is added to the 5V line in from the barrel jack, then power is wired from there to the Arduino and all the LED boards. You could probably chain the power and ground board to board, but I had the room and didn't want any lights dimmer than another due to voltage drops in the wires. Action Video
With this file you will be able to print D20 RGB Lamp with your 3D printer. Click on the button and save the file on your computer to work, edit or customize your design. You can also find more 3D designs for printers on D20 RGB Lamp.