D.I.Winder v.1
prusaprinters
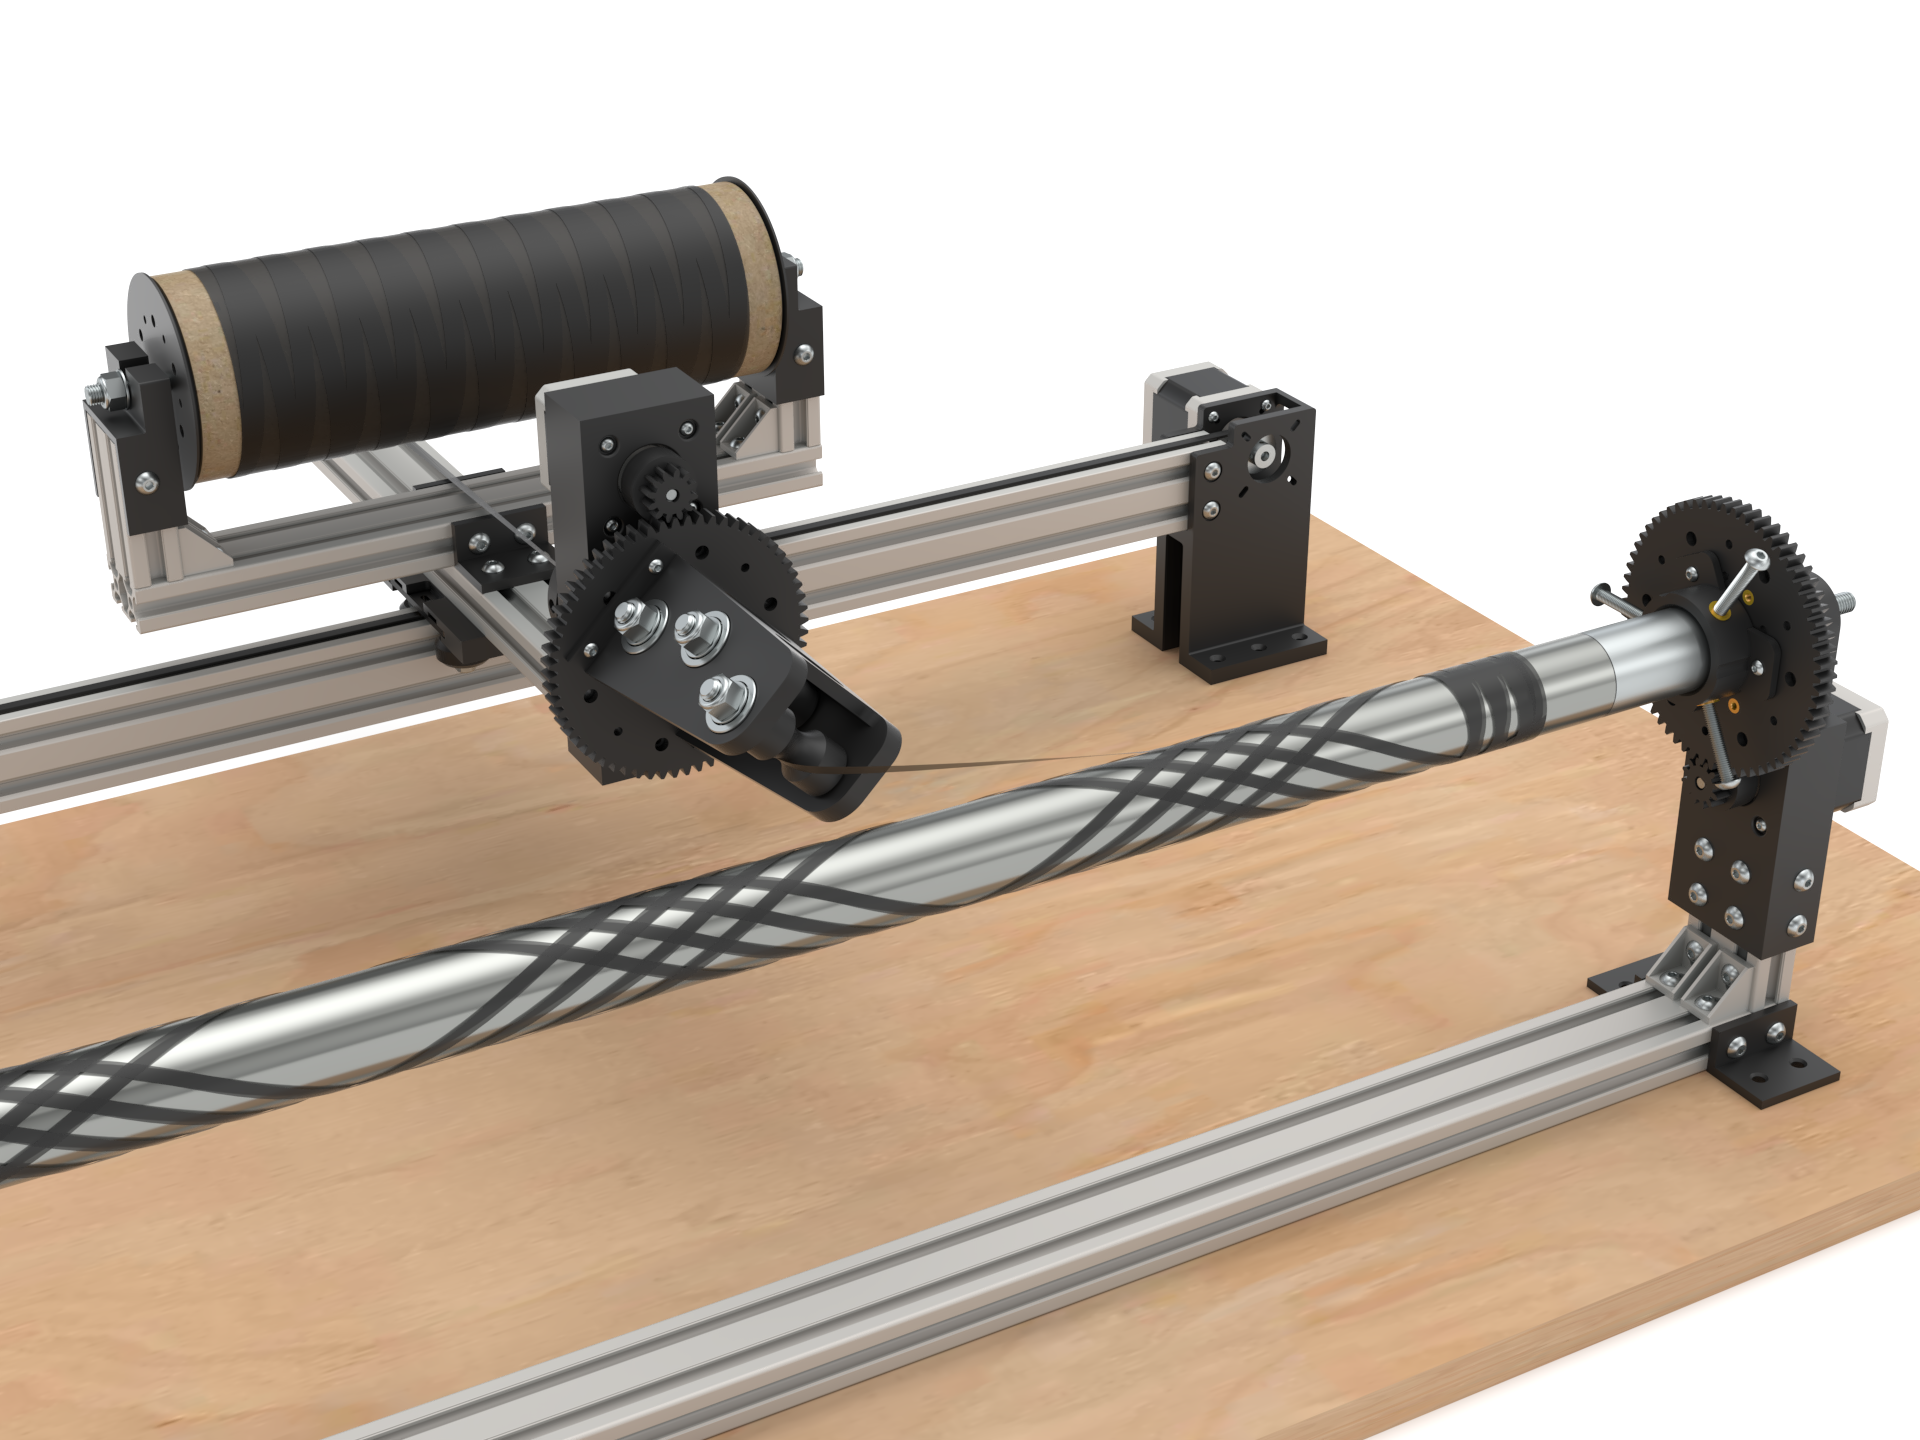
<p>The D.I.Winder is an accessible, desktop CNC filament winder for composite prototyping and manufacturing. It can can be used to create sports equipment, furniture, uav/drone components, or anything that requires strong, lightweight parts. </p><p>The D.I.Winder is controlled by an <a href="https://store-usa.arduino.cc/products/arduino-uno-rev3">Arduino Uno</a> + <a href="https://blog.protoneer.co.nz/arduino-cnc-shield/">CNC Shield</a> running <a href="https://github.com/grbl/grbl">GRBL</a> and is capable of winding parts up to 875mm length and 250mm in diameter. It runs standard gCode, that can be written / edited in any text editor. Parts for a complete machine can be sourced for under $500USD. </p><figure class="media"><oembed url="https://youtu.be/4n2Z82TlVdM"></oembed></figure><p><strong>Assembly + Configuration</strong><br>Once you've gathered and printed all parts listed in the ‘Bill Of Materials’, assembly is straightforward – 3d printed parts are attached to each other using M3 hardware and heatset inserts, all connections to 2040 extrusion are made using M5 hardware and T-nuts. Assemble the Rotational Axis, Linear Axis and Gantry/Tow Guide, then mount to a table or plywood base. A wiring diagram is included in the attached images. Step by step assembly instructions will be uploaded shortly. </p><p>GRBL configuration is dependent on the motors and drivers you've purchased. The X axis is your linear axis and the steps should be calculated to match 1mm of linear travel. The Y and Z axis are rotational and should be calculated to match 1 degree of rotation. The Y axis rotates the mandrel while the z rotates the tow guide. </p><p><strong>Tools + Supplies</strong><br>In addition to the machine, you'll need some tools and supplies to get started</p><ol><li>A Mandrel (mandrels can be 3d printed, purchased, or improvised) </li><li>Mold release </li><li>Carbon fiber, fiberglass, basalt or kevlar tow. </li><li>Epoxy resin (preferably with a long pot life at room temperature)</li><li>Disposable brushes and cups for mixing</li><li>Composite heat shrink tape or some form of compression (shrink tubes, molds, etc)</li><li>Safety equipment (gloves, respirator, safety glasses, etc)</li><li>Heat gun or curing oven</li></ol><p><strong>Basic Winding</strong><br>If the mandrel you're using is to be removed, polish and seal with mold release. You can use EMT conduit, aluminum tubing, PVC, or even 3d printed parts as mandrels. Take into account the shape of the mandrel if it needs to be removed intact. Complex 3D printed mandrels can be heated and removed in sections. In addition to mold release, wrapping the mandrel in wax paper or receipt paper can make releasing a cured part easier. </p><p>Once the mandrel is prepped, secure it in the machine and test your gCode without tow or using inexpensive curling ribbon. Thread your tow through the machine and secure it to the mandrel (in the example gCode, winding begins on the right hand side). Mix a small batch of resin, and run your file. This version of the D.I.Winder does not include a resin bath, but one will be available to download + print in the near future. For now, wetting out the tow with a chip brush works well (see video). Once the tow is wound and fully wetted out with resin, you can wrap the part with shrink tape or secure it in a mold for curing. <br><br><strong>Printed Parts</strong><br>All parts were printed/tested at .25mm layer height on a Lulzbot Taz 6 with .5mm nozzle. Tolerances may need to be adjusted for printers with larger or smaller nozzle diameters. </p><figure class="table" style="float:left;width:100%;"><table style="border-color:#65C900;border-style:solid;"><tbody><tr><td style="width:50%;"><strong>Part</strong></td><td><strong>Quantity</strong></td><td><strong>Material</strong></td><td><strong>Infill %</strong></td></tr><tr><td style="background-color:#E0E0E0;height:15.75pt;width:50%;" colspan="4">Linear Axis</td></tr><tr><td style="height:15.75pt;width:50%;">Linear Axis Motor Mount</td><td>1</td><td>PLA / PETG</td><td>20-40</td></tr><tr><td style="height:15.75pt;width:50%;">Linear Axis Idler</td><td>1</td><td>PLA / PETG</td><td>20-40</td></tr><tr><td style="background-color:#E0E0E0;width:50%;" colspan="4">Rotational Axis</td></tr><tr><td style="width:50%;">Rotational Axis Motor Mount</td><td>2</td><td>PLA / PETG</td><td>20-40</td></tr><tr><td style="width:50%;">Large Gear</td><td>2</td><td>PLA / PETG</td><td>40</td></tr><tr><td style="width:50%;">Gear Spacer</td><td>2</td><td>PLA / PETG</td><td>80</td></tr><tr><td style="width:50%;">Small Gear</td><td>1</td><td>PLA / PETG</td><td>80</td></tr><tr><td style="width:50%;">Base Bracket</td><td>4</td><td>PLA / PETG</td><td>80</td></tr><tr><td style="background-color:#E0E0E0;width:50%;" colspan="4">Tow Guide</td></tr><tr><td style="width:50%;">Tow Guide Motor Mount</td><td>1</td><td>PLA / PETG</td><td>20-40</td></tr><tr><td style="height:15.75pt;width:50%;">Tow Guide Gear</td><td>1</td><td>PLA / PETG</td><td>40</td></tr><tr><td style="height:15.75pt;width:50%;">Collar </td><td>1</td><td>PLA / PETG</td><td>80</td></tr><tr><td style="height:15.75pt;width:50%;">Tow Guide</td><td>1</td><td>PLA / PETG</td><td>40</td></tr><tr><td style="height:15.75pt;width:50%;">Roller</td><td>4</td><td>PLA / PETG / TPE</td><td>80</td></tr><tr><td style="height:15.75pt;width:50%;">Rear Guide</td><td>1</td><td>PLA / PETG</td><td>40</td></tr><tr><td style="height:15.75pt;width:50%;">Rear Roller</td><td>2</td><td>PLA / PETG</td><td>80</td></tr><tr><td style="background-color:#E0E0E0;width:50%;" colspan="4">Gantry Cart</td></tr><tr><td style="width:50%;">Gantry Cart</td><td>1</td><td>PLA / PETG</td><td>80</td></tr><tr><td style="width:50%;">Gantry Bracket</td><td>2</td><td>PLA / PETG</td><td>80</td></tr><tr><td style="width:50%;">Spool Holder</td><td>2</td><td>PLA / PETG</td><td>20-40</td></tr><tr><td style="width:50%;">Spool End Toray</td><td>2</td><td>PLA / PETG</td><td>20-40</td></tr><tr><td style="background-color:#E0E0E0;width:50%;" colspan="4">Chuck</td></tr><tr><td style="width:50%;">Chuck</td><td>2</td><td>PLA / PETG</td><td>80</td></tr></tbody></table></figure><p><strong>Hardware + Electronics</strong><br>When ordering hardware, order a few extra of the most used nuts and bolts. Any 5/16" hardware is interchangeable with M8 hardware of the same length. Printed parts were designed to be compatible with heatset inserts from McMaster-Carr.</p><figure class="table" style="float:left;width:100%;"><table><tbody><tr><td style="width:50%;"><strong>Description</strong></td><td><strong>Quantity</strong></td><td><strong>Supplier</strong></td></tr><tr><td style="background-color:#E0E0E0;" colspan="3">Hardware</td></tr><tr><td style="height:15.0pt;width:50%;">M5x10mm Button Head</td><td style="height:15.0pt;width:111pt;">74</td><td>McMaster-Carr</td></tr><tr><td style="height:15.0pt;width:50%;">M5x35mm Button Head</td><td style="height:15.0pt;">7</td><td>McMaster-Carr</td></tr><tr><td style="height:15.0pt;width:50%;">M5 Heatset Insert</td><td style="height:15.0pt;">6</td><td>McMaster-Carr</td></tr><tr><td style="height:15.0pt;width:50%;">M3 x 10mm Button Head Screws</td><td style="height:15.0pt;">22</td><td>McMaster-Carr</td></tr><tr><td style="height:15.0pt;width:50%;">M3 Heatset Insert</td><td style="height:15.0pt;">16</td><td>McMaster-Carr</td></tr><tr><td style="height:15.0pt;width:50%;">5/16 x 2in Bolts</td><td style="height:15.0pt;">2</td><td>McMaster-Carr</td></tr><tr><td style="height:15.0pt;width:148pt;">5/16 x 2.75in Bolts</td><td style="height:15.0pt;">4</td><td>McMaster-Carr</td></tr><tr><td style="height:15.0pt;">5/16 x 12in Threaded Rod</td><td style="height:15.0pt;">1</td><td>McMaster-Carr</td></tr><tr><td style="height:15.0pt;">5/16 Nylock Nuts</td><td style="height:15.0pt;">8</td><td>McMaster-Carr</td></tr><tr><td style="height:15.0pt;">5/16 Washers</td><td style="height:15.0pt;">8</td><td>McMaster-Carr</td></tr><tr><td style="height:15.0pt;">#6 x 3/4" Wood Screws</td><td style="height:15.0pt;">18</td><td>McMaster-Carr</td></tr><tr><td style="height:15.0pt;">GT2 Timing Belt</td><td style="height:15.0pt;">2 Meters</td><td>OpenBuilds </td></tr><tr><td style="height:15.0pt;">GT2 16 Tooth Pulley 5mm ID</td><td style="height:15.0pt;">1</td><td>OpenBuilds </td></tr><tr><td style="height:15.0pt;">GT2 Idler 5mm ID</td><td style="height:15.0pt;">1</td><td>OpenBuilds </td></tr><tr><td style="height:15.0pt;">608 Bearing</td><td style="height:15.0pt;">18</td><td>VXB</td></tr><tr><td style="background-color:#E0E0E0;" colspan="3">V-Slot Extrusion </td></tr><tr><td style="height:15.0pt;width:148pt;">Rotational Axis (2040 x 100mm)</td><td>1</td><td>OpenBuilds / Misumi</td></tr><tr><td style="height:15.0pt;">Rotational Axis (2040 x 70mm)</td><td>2</td><td>OpenBuilds /Misumi</td></tr><tr><td style="height:15.0pt;">Linear Axis (2040 x 1000mm)</td><td>1</td><td>OpenBuilds / Misumi</td></tr><tr><td style="height:15.0pt;">Gantry (2040 x 500mm)</td><td>1</td><td>OpenBuilds / Misumi</td></tr><tr><td style="height:15.0pt;">Spool Holder (2040 x 300mm)</td><td>1</td><td>OpenBuilds / Misumi</td></tr><tr><td style="height:15.0pt;">Spool Holder (2040 x 60mm)</td><td>2</td><td>OpenBuilds / Misumi</td></tr><tr><td style="background-color:#E0E0E0;" colspan="3">V-Slot Hardware</td></tr><tr><td style="height:15.0pt;">V-Slot Gantry Kit 20mm</td><td>1</td><td>OpenBuilds</td></tr><tr><td>5mm T-Nuts</td><td>74</td><td>OpenBuilds / Misumi</td></tr><tr><td style="background-color:#E0E0E0;" colspan="3">Electronics</td></tr><tr><td style="height:15.0pt;width:148pt;">Arduino Uno</td><td style="width:111pt;">1</td><td> </td></tr><tr><td>CNC Shield</td><td>1</td><td> </td></tr><tr><td>Pololu Drivers (A4988 or DRV8825)</td><td>3</td><td> </td></tr><tr><td style="height:15.0pt;">Nema 17 Stepper Motors w/ cables</td><td>3</td><td> </td></tr><tr><td>12V Power Supply</td><td>1</td><td> </td></tr><tr><td>AC Power Cable</td><td>1</td><td> </td></tr><tr><td>14awg 2 Conductor Wire </td><td>1 YD / Meter</td><td> </td></tr><tr><td style="background-color:#E0E0E0;" colspan="3">Base</td></tr><tr><td>24" x 48" x ¾" Plywood or MDF</td><td>1</td><td> </td></tr><tr><td> </td><td> </td><td> </td></tr></tbody></table></figure>
With this file you will be able to print D.I.Winder v.1 with your 3D printer. Click on the button and save the file on your computer to work, edit or customize your design. You can also find more 3D designs for printers on D.I.Winder v.1.