Cylinder lamp nach Art des Frimmels
prusaprinters
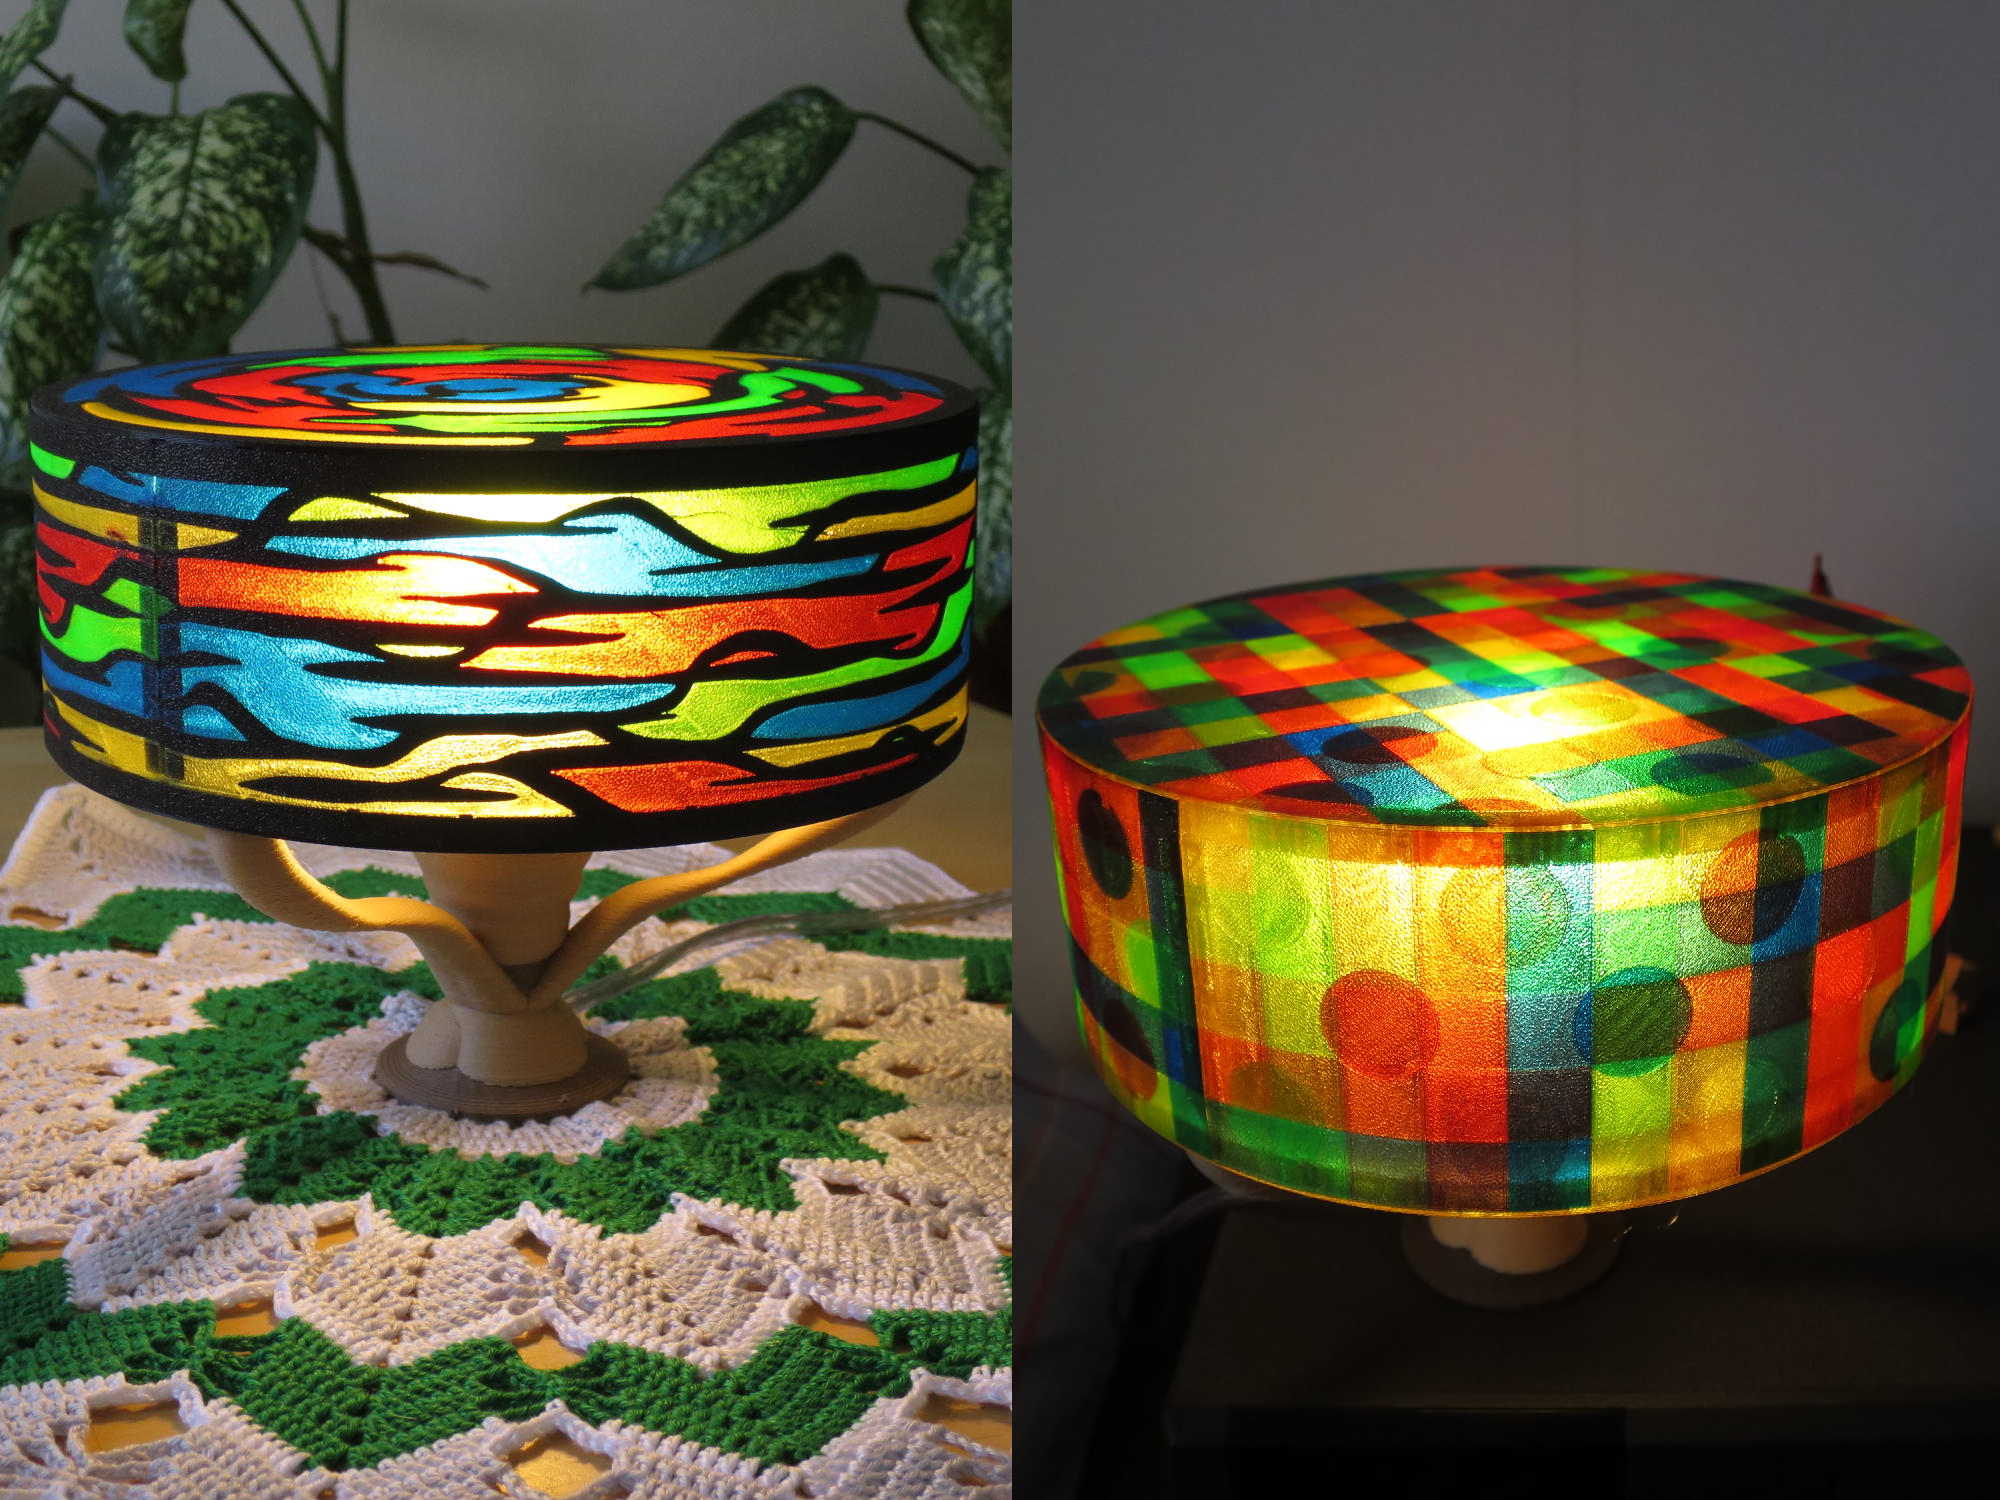
<p>This is my second lamp, named "Cylinder lamp nach Art des Frimmels", originally posted at thingieverse. As I suspect some prusa printer owners haven't yet found it, and there is a lamp contest going on, I publish it here as well. Moreover, I merged the initial publication with a multicolor lamp shade pattern.</p> <p>The lamp measures around 15cm of height, and 40 cm in diameter.</p> <p>Basically, you need to print a lamp base (two 2-material .3mf, around 8 hours in total), a ring (single material .3mf, less than 2 hours) and the lamp shade of your choice (two .3mf files, around 8 hours in total).</p> <p>Please see the screen dumps of the setup and verify that your setup looks alike (eg for some newer PrusaSlicers I have seen the wipe tower move around, just move it back into place if so). Please note that the print bed (for i3mk3 at least) is quite filled up. Clean it properly all to the very edges before the print. Also, consider using the 7x7 mesh bed leveling (found within the settings menu).</p> <p>This lamp was designed using blender, freecad-daily, gimp and inkscape. If you would like to see my other designs, just search for "frimmel" at <a href="https://www.thingiverse.com">https://www.thingiverse.com</a>. Please be aware that my designs are generally CC non-profit. Please respect this decision, as I constructed the objects and drew all the patterns myself.</p> <p>Before you print this lamp, be sure to actually read the printing instructions.</p> <h3>Print instructions</h3><h3> The various parts in brief </h3><p>The lamp base is constructed in two parts in order to be able to attach the lamp socket. However, please note that the base consider mainly of three arms, and therefore must be printed for strength. You should verify that the perimeter setting et.c. suits your selected material, e.g. for wood fills you might want to increase the perimeters to make a fuller, possibly even a solid, print. I have used woodfills from ColorFABB, Fillamentum and FormFutura, all with stunning results.</p> <p>For the lamp shade, you should use transparent PETG or equivalent AND you should use the "powder coated" plate if you own one, as this will render a "pearl" look to the transparent surface. Most lamps, I printed using Filament-PMs range of PETG, which looks great! Also, Filamentums CPE-HG100 will look just beautiful! The good thing is, there are only a few material changes so the shades are printed much faster than you might expect. The lamp shade are preferrably sliced with layer 1=0.2mm and all other layers 0.3mm.</p> <p>I have printed the lamp base using various materials. With eg regular PLA the threads might become almost a bit loose. If you consider this a problem, try to scale down the lamp base by 1-3% in X and Y directions (you can easily do this in the slicer). If you still have problems, then please visit the original thingieverse publication (<a href="https://www.thingiverse.com/thing:4267901">https://www.thingiverse.com/thing:4267901</a>) where I have added some custom parts for such rare cases.</p> <p>Please adjust temperatures and material parameters for your print - e.g. the temperatures I have set up in the .3mf might be wrong for you. You might also want to consider using my good old temperature correction script for the wipe tower as found in: <a href="http://www.frimmel.se/print3D/">http://www.frimmel.se/print3D/</a> (the script patches the gcode to better filament change and wiping temperatures).</p> <h3> Parts to print </h3><h4>Lamp base (2 materials, print time 7 hours + 1 hour)</h4><p>cylinderfot_komplett_WOOD_WOOD.3mf<br/> låsdel_WOOD_WOOD.3mf</p> <p>(The print is intentionally split into two to improve cosmetics as less movement between objects gives smoother surface. As the mmu parts are at different Z-height, the added cost in time is very small.)</p> <h4>Lamp shade attachment ring (1 material)</h4><p>underkantsring_PET.3mf</p> <h4>Lamp shade theme "Modernthorisontellt" (5 materials, print time 3.5 hours + 4.5 hours)</h4><p>cylinderskärm_lock_modernthorisontellt_PET_PET_PET_PET_PET.3mf<br/> cylinderskärm_skärmsida_modernthorisontellt_PET_PET_PET_PET_PET.3mf</p> <h4>Lamp shade theme "RUT" (5 materials, print time 3.5 hours + 4.5 hours)</h4><p>cylinderskärm_lockRUT_PET_PET_PET_PET_PET.3mf<br/> cylinderskärm_skärmsidaRUT_PET_PET_PET_PET_PET.3mf</p> <h3> About electricity </h3><p>The lamp is set up for an E14 lamp socket found for example at the "Kjell & Co" shops in Sweden (<a href="https://www.kjell.com/se/produkter/hem-kontor-fritid/belysning/lamptillbehor/hallare/lamphallare-ojordad-e14-p39361">https://www.kjell.com/se/produkter/hem-kontor-fritid/belysning/lamptillbehor/hallare/lamphallare-ojordad-e14-p39361</a>) but available world wide, e.g. search ebay for "socket e14 lamp". Obviously, you will also need to buy an electric cable including a connector (I bought mine at "Clas Ohlson" in Sweden).</p> <p>You must ENSURE not to overheat the printed parts so take good care of which lamps to use. Personally, I use LED lamps of <strong>no more than 3W</strong> in my constructions.</p> <h3> Assembly </h3><p>Please also refer to the explanatory images. The shade sides snaps together (just bend them sligtly, as a zip-lock). Then, gently and evenly push the shade top onto the sides. Look carefully where the indentations are, and do it a small part at a time, always monitoring your progress. Take special care at the points where the sections meet, as they are important, and sometimes a bit tricky to fit. If you do it slowly, don't get agressive, and sometimes consider to untighten a few millimeters, then it will all go well.</p> <p>Now, do the same with the lower ring (the three triangular holes at the inside of the lower ring will later be attached to the base).</p> <p>Push the electric cable through the base interior. Attach the cable to the lamp holder (be aware: only do this if you are experienced with electric components and you are allowed by local regulations to do so). Then screw the lamp holder in place (simultaneously rotating the cable at the other opening to ensure it does not become twisted inside the lamp). Attach the "låsdel" to the lamp holder to complete the design. Now, just carefully attach the lamp shade to the three arms (there are corrsponding holes in the lower ring of the lamp skirt).</p> <p>For MMU prints, I recommend using my "De Luxe/Grand Luxe/Gran Turismo Selector" (<a href="https://www.thingiverse.com/thing:3608229">https://www.thingiverse.com/thing:3608229</a>) and replacement IR sensor holder (<a href="https://www.thingiverse.com/thing:3554066">https://www.thingiverse.com/thing:3554066</a>)</p> <p>Last but not least, please don't forget Gretas hard work, thank you!</p> <h3> How the lamp shade modifiers are set up </h3><p>As an example, this is a list of all parts and modifiers in "cylinderskärm_skärmsidaRUT_PET_PET_PET_PET_PET.3mf":</p> <p>cylinderskärm_skärmsida.stl *** default color, main skirt object</p> <p>RUT_skärmsida_MODIFIER_A.stl *** color 1, modifier</p> <p>RUT_skärmsida_MODIFIER_B.stl *** color 2, modifier</p> <p>RUT_skärmsida_MODIFIER_C.stl *** color 3, modifier</p> <p>RUT_skärmsida_MODIFIER_D.stl *** color 4, modifier</p> <p>RUT_skärmsida_MODIFIER_E.stl *** color 5, modifier</p> <p>RUT_skärmsida_MODIFIER_A.stl *** color 1, PART</p> <p>RUT_skärmsida_MODIFIER_B.stl *** color 2, PART</p> <p>RUT_skärmsida_MODIFIER_C.stl *** color 3, PART</p> <p>RUT_skärmsida_MODIFIER_D.stl *** color 4, PART</p> <p>RUT_skärmsida_MODIFIER_E.stl *** color 5, PART</p> <p>The reason for using both modifier and part objects, is to create an uneven surface, having material only where needed, still being able to use the initial lamp shade construction.</p>
With this file you will be able to print Cylinder lamp nach Art des Frimmels with your 3D printer. Click on the button and save the file on your computer to work, edit or customize your design. You can also find more 3D designs for printers on Cylinder lamp nach Art des Frimmels.