Cylinder Knife Holder
prusaprinters
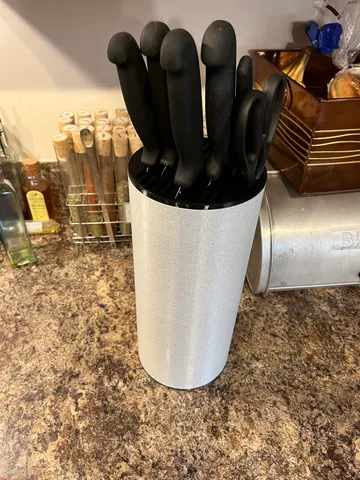
I saw the Knife Holder Contest and decided I wanted to try my hand at making something. I currently have a cylinder Knife Block Holder in my Kitchen but one of my knifes is a bit too long for my current Knife Block Holder. So I wanted to design and make something similar but yet taller. So it was my inspiration. This holder has 10 knife slots. 1 slot for a pair of Kitchen shears and 1 slot for a Honing/Sharpening Steel.I designed the model into 4 printable parts so this could be printed on smaller printers like the Prusa Mini. But this also makes for easier cleaning since the bottom and top can be removed as well as the cylinder splitting into 2 parts.This Knife holder can also be made into 3 different heights. 160mm, 270mm and 320mm. The original design was 320mm. But I noticed that was quite a bit taller than I realized. So I made a new additional copy for the Lower Mid section to create the 270mm size. The 160mm size was a happy accident because the Upper Mid section allows for both the Top and Bottom sections to attach. Parts List:Bottom sectionTop section 1.2mm slots and 1.5mm slots and 1.2mm to 2.1mm slots(Only need one version. Just different slot sizes)Top section Size Test part is the same as the 1.2mm to 2.1mm version except it only prints 7.5mm tall.Lower Mid section 110mm/160mm (Only requires one depending on desired height)Upper Mid sectionPrinting:Nozzle: 0.6 mm (I used the 0.6 mm nozzle to drastically reduce my print times).Layer Height: 0.3 mmPrinter: Prusa MINI+ with Revo Micro upgrade.Filament Type: I printed the Bottom section and Top section in PETG and the Mid sections in PLA. Infill: 15% (I would typically just use 20% but I wanted to save some time)Perimeter Layers: I left it at the default of 2 to help with print times. PRINTING NOTES:The STL files are already oriented in the way I printed them on my Prusa MINI. I found I didn't need a brim. But if you have adhesion issues feel free to use a Brim. The only part that may require supports may be the Bottom section. But if your printer is decent at Bridging you don't need supports. CAUTION: SLOT SIZES on the top sections. I used the 1.2mm version. The slots have some flex with the PETG I printed. This allows for a decent amount of grip while still being able to pull out my Knives when using everything other slot. Knives thicknesses can vary so I created a couple more versions. A 1.5mm version and a version that has size ranges from 1.2mm to 2.1 mm. I would advise printing my Test Size version of the part to verify if you need to modify the top section for a larger or smaller gap for your Knives. You do not want the slots to be too tight. Part Assembly Instructions:I designed the parts to assemble to each other without any nuts and bolts. I added a block and a slot to my parts in order to prevent the parts from rotating after assembled. The designed tolerance is 0.1 mm. I found 0.2 mm to be loose in my first prototypes. If you find the tolerances too tight I have provided the Fusion360 file for modifications.Additional Notes: This holder can be assembled in three different heights. A 320mm, 270mm, and 160mm version. Please select a height and see the corresponding Instructions below for assembly. Instructions for 320mm holder:Print the following parts:Bottom sectionTop sectionUpper Mid sectionLower Mid section 160mm Grab the Bottom section and the Lower Mid section. Line up the grooves of the Bottom section with the Lower Mid Section. Then push the 2 parts together. It will be pretty fairly snug. Grab the Upper Mid Section. Line up the grooves of the Lower Mid Section with the Upper Mid Section. Then push the 2 parts together. It again will be fairly snug. Grab the Top section. Line up the grooves of the Top section with the Upper Mid Section. Then push the 2 parts together. It will be fairly snug. Build complete!Instructions for 270mm holder:Print the following parts:Bottom sectionTop sectionUpper Mid sectionLower Mid section 110mm Grab the Bottom section and the Lower Mid section. Line up the grooves of the Bottom section with the Lower Mid Section. Then push the 2 parts together. It will be pretty fairly snug. Grab the Upper Mid Section. Line up the grooves of the Lower Mid Section with the Upper Mid Section. Then push the 2 parts together. It again will be fairly snug. Grab the Top section. Line up the grooves of the Top section with the Upper Mid Section. Then push the 2 parts together. It will be fairly snug. Build complete!Instructions for 160mm holder:Print the following parts:Bottom sectionTop sectionUpper Mid section Grab the Bottom section and the Upper Mid section. Line up the grooves of the Bottom section with the Upper Mid Section. Then push the 2 parts together. It will be fairly snug. Grab the Top section. Line up the grooves of the Top section with the Upper Mid Section. Then push the 2 parts together. It will be fairly snug. Build complete!If you made it this far thanks! Here's some extra fun info if you are interested.Additional Design Info:The most fun part to design was the Top section. I have redesigned it several times over.. first few redesigns I had issues with the size of the slots not gripping my knives quite to my liking. Then once I had that figured out I then noticed my sliced gcode for the Top Section was taking anywhere between 16 hours to 26 hours(with a 0.6mm Nozzle/0.3mm Layer Height) depending on my designs. I also noticed the estimated amount of filament being used for the part was fairly significant almost up to 500g on my worst design. To reduce the time and filament used I started by reducing the number of knife slots. I got it down to about 15 hours. But I wanted even less time so I got creative and cut some weight underneath the Top section as you will notice since the bottom of the part is facing up in the STL. After reducing the knife slots it allowed me to add some additional features such as a slot for Kitchen Shears and a Honing/Sharpening Steel while still being less print time than if I had more Knife slots. With my settings I was able to get the print time down to about 12h 51m and estimated filament used to 314.21g. Final Note:I have uploaded the Fusion360 file containing all the parts. This should allow others to customize their own heights and their own custom Top sections to better fit their needs as a Knife Holder. As well as allowing others to make further improvements.
With this file you will be able to print Cylinder Knife Holder with your 3D printer. Click on the button and save the file on your computer to work, edit or customize your design. You can also find more 3D designs for printers on Cylinder Knife Holder.