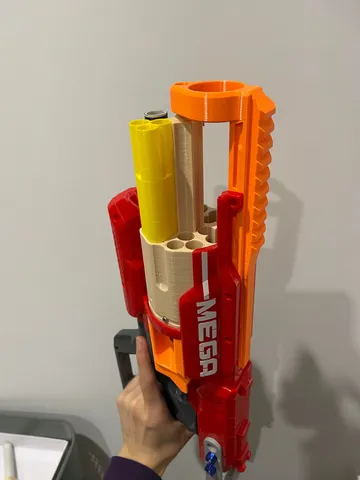
Cycloneshock uncompensated extended modular cylinder
prusaprinters
Uncompensated back and front pieces allow you to use an extended cylinder by simply cutting out the existing front post holder. Front also uses a picatinny rail - I needed to add more mass as reinforcement to handle the stress of the plunger tubes' forward force, figured we may as well make it useful. The angling was an attempt to avoid unnecessary overhang supports, feel free to give feedback about that.Cylinderfront is bolted onto the cylinder with an M3 bolt/screw instead of being integrated because I wanted to be able to tweak the clearance with the front piece. You may have to tweak the dimensions on this depending on how your printer handles tolerancing of holes.Extended cylinder is also modular, allowing for various inserts:inline shotgun12 rounds per insert for a max of 72 roundsmegaMega tolerancing is fiddly, hopefully the light flaring helps, this definitely needs some workshotgun tightshotgun separateshotgun joinedI have no clue which style of barrel arrangement is the most effective, so I've just included them all, feel free to provide feedback16mm16mm barrelling material is pretty common, I'm using 16mm conduit20mm20mm conduit is available around here to wrap around 16mm conduit for inline barrels, so here we are.Future workI can probably remove more mass from the sides of the cylinder since it's just to hold the inserts in place, which might allow for more visibility for inline barrelsI don't actually have a normal barrelled insert i.e. without having to acquire a 16mm barrel, might be worth making oneI could look into rival, maybe throw in a hop-upThis blaster will likely act as a testbed for more complex inline barrelling and barrel rifling mechanisms. Installation:(Read all before starting)Open up your blaster and remove the top orange piece circled in green, and the grey stock cylinder circled in blue:Cut the red blaster shell to allow for the front to be replaced (Green cut lines)Print and install the “uncompensated front piece” and “uncompensated back piece” to replace the orange top piece we removed in step 1Print the “modularcylinder” to replace the stock cylinder we removed in step 1 (this should just be a press-fit)Print the inserts that correspond to your desired build. Attach them by sliding them into the cylinder, and then inserting M3 bolts into the holes below (I've circled a couple of the hidden ones):Note: If you are using the full length of the cylinder (i.e. long barrel build), I would recommend that you also install rear-loading capabilities. I have a piece for this:https://www.printables.com/model/562310-nerf-cycloneshock-rear-loading-guideThe above link also describes where to cut the shell to install this rear loading guide.I've also designed an altered the plunger tube front piece (i.e. a "dead space filler cap) - https://www.printables.com/model/608112-cycloneshock-plunger-tube-head-replacement. The idea here is to remove dead space for efficiency. I've been using it with this cylinder, I'm not sure if that affects functionality much.
With this file you will be able to print Cycloneshock uncompensated extended modular cylinder with your 3D printer. Click on the button and save the file on your computer to work, edit or customize your design. You can also find more 3D designs for printers on Cycloneshock uncompensated extended modular cylinder.
