Customized wrist support for tying on keyboard
myminifactory
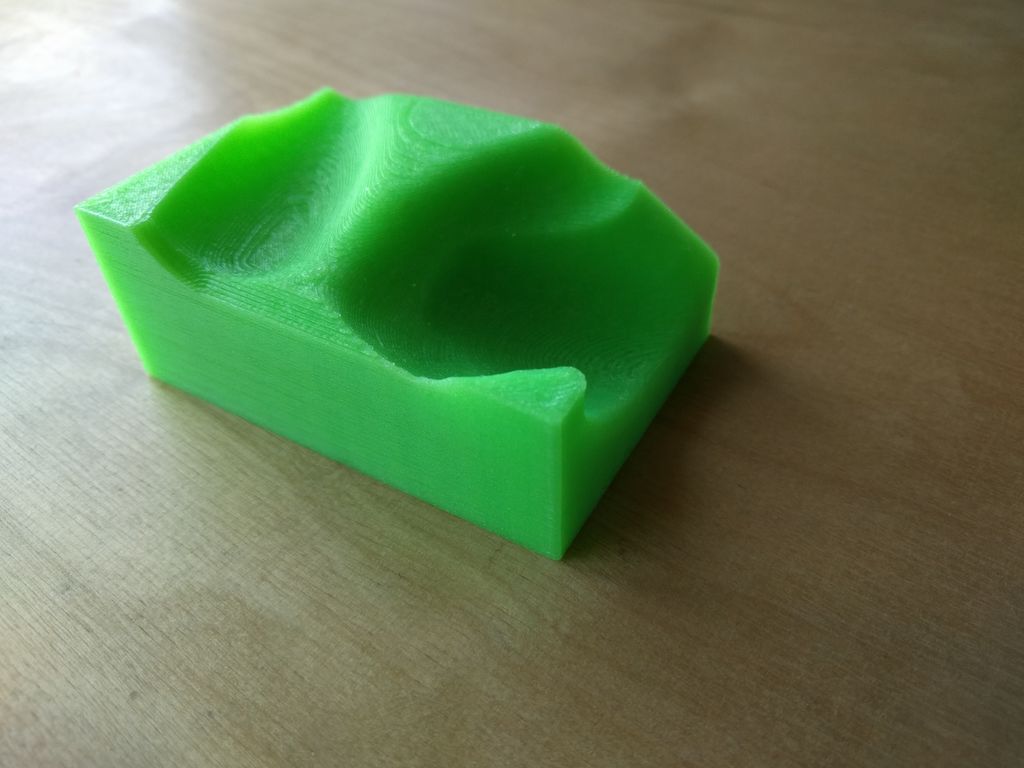
As seen in the image, sourced from nomorepainergonomics.com.au, the correct way to type on a keyboard is by having a support below your hand so that the axis passing through your wrist remains parallel to the table. For computer users and typists who spend long periods of time at their keyboards every day, a common problem called Carpal Tunnel Syndrome (CTS) often arises. Research suggests that more than 10% of computer users and typists experience CTS issues, as reported by People experiencing problems. When focusing specifically on software developers, one of the groups most prone to typing for extended periods, the number jumps to an astonishing 18 million individuals, according to infoq.com. Combining this data with that of other keyboard-intensive professions reveals a staggering figure: over 1.8 million software developers worldwide struggle with CTS. Considering only these numbers is already a cause for concern; however, when accounting for all those affected by this issue, the actual number is undoubtedly higher. The solution to this pressing problem lies in leveraging advanced technology - specifically, 3D printing. This innovative method not only addresses the problem quickly but also does so at an affordable cost. A perfect example of how 3D printing makes our world a better place is its ability to provide customized ergonomic solutions for those who need them most. Step 1: Scan your hand We begin by creating a precise model of your hand, which will serve as the foundation for crafting a tailored support that fits perfectly and ensures painless typing on your keyboard for hours. To achieve this, scan your hand using a reliable method and then import the data into a CAD software to create a cavity in the shape of your hand. Step 2: 3D print your object Having completed the first step, you are now halfway to creating a customized support that will revolutionize your typing experience. Convert your file into .stl format and proceed with 3D printing it. Choose any color you like and enjoy your new ergonomic aid. As depicted in two images above, side views of my hand with and without the support clearly demonstrate how this innovation helps maintain a straight axis passing through the wrist and parallel to the table - a critical aspect of proper ergonomics, as per reference guidelines. Step 3: Cushioning your support A simple yet effective step is all it takes to turn your 3D-printed support into a soft, comfortable accessory. Begin by selecting an old piece of cloth of your choice, along with a sewing needle and thread. Cut the fabric to the desired shape and start sewing, leaving one end open. Once completed, add some cotton inside and sew the remaining end shut. Your cushion is now ready to be placed on top of your 3D-printed support, as shown in the figure below. Place the cushion on your customized 3D print and you are ready to enjoy comfortable typing on your keyboard with a soft, ergonomic support that fits perfectly under your hand.
With this file you will be able to print Customized wrist support for tying on keyboard with your 3D printer. Click on the button and save the file on your computer to work, edit or customize your design. You can also find more 3D designs for printers on Customized wrist support for tying on keyboard.