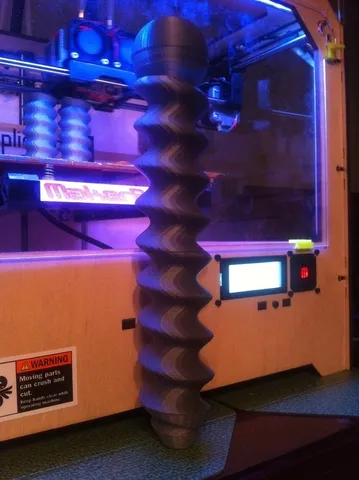
Customizable Stackable Magic Wand - fixed
prusaprinters
Wish you had a Customizable, snakey, spiral-ly magic wand? Here's your chance! Aside from that, this is an experiment in using OpenSCAD's linear_extrude function, twisting and extruding a circle to form a cool magic rod. I then use the same technique to make screws and screw holes, allowing me to assemble a long magic wand from even a small build area. This technique of making screws and nuts is pretty simple to code and works well. Note that the screws and holes are pointed, so that the holes can print with 45 degree slopes inside (i.e. so no bridging). The wand requires no support to print (unless the wiggles are extreme) and minimal infil - none if you use several layers to make the tops solid. The way the sphere fits onto the head of the wand also looks pretty nifty, if I say so myself. Now Customizable! And fixed. Thanks to alfonso82 for pointing out a problem - one of the threads was generated screwing in counter-clockwise, and the rest were all clockwise. Oops! Thanks! And tweaked so cross-section view is rendered for the 'stacks' but full parts are rendered for plates and individual parts. Instructions Print a top segment, a bottom segment, and as many 'middle' segments as you like. Screw just a top and bottom together and make a magic wand. Screw in a bunch of middle segments and you have a printed walking stick. I printed one in glow-in-the-dark for a Maker Faire, and had a blast. Play around with the parameters to generate wands of different sizes. In particular: shape = which part to print: Top has a ball, and socket at bottom Middle has screw at top, socket at bottom. Use lots of these to make a walking stick Bottom has screw on top, tapered at the bottom Plate with a Top and Bottom piece Plate with four Middle pieces Preview a 'short stack' showing how the top and bottom screw together. Don't print this. Preview a 'long stack' showing how a Top, two Middles, and Bottom look assembled. h = height of a rod segment (should be your print height) cr = radius of the circle that forms the rod w = distance of 'wiggle' in the rod, 2 is subtle, 10 is wacky (and might generate angles over 45 degrees depending on the number of wiggles) nw = number of 'wiggles' in each rod segment gap = the distance between each screw and the hole in the next rod segment. If they're too hard to screw together, make the gap larger so that there's more 'play'. Doesn't need to be too tight, as the rod segments tighten when screwed down. spacing = the spacing between rod segments arranged in a row and 'plated'. If you make the rod very wide, you will need to increase the spacing as well. c = 'crossiness'. 0 = spiral, 1 = spiral and counter-spiral, 2 = four spirals, forms cross pattern. You can also preview a 'short stick' of top and bottom or a 'long stick' of more. These are all of the segments lined up so that you can see what the combination will look like, for a preview. Category: Props
With this file you will be able to print Customizable Stackable Magic Wand - fixed with your 3D printer. Click on the button and save the file on your computer to work, edit or customize your design. You can also find more 3D designs for printers on Customizable Stackable Magic Wand - fixed.
