Customizable Rupee Lamp Shade
pinshape
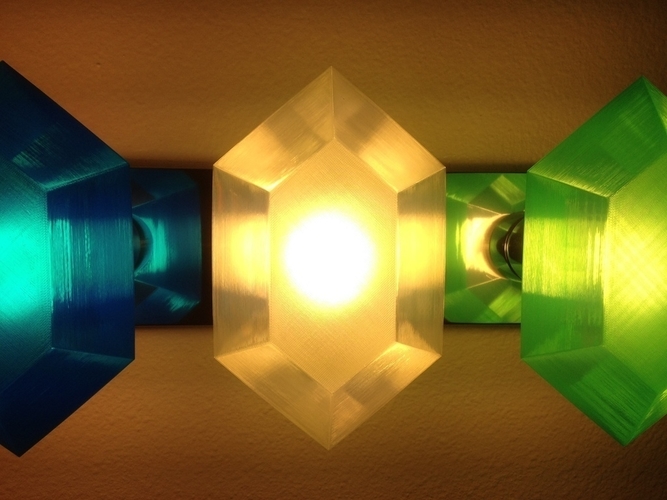
In this tutorial, I'll show you how to decorate your bathroom for the low cost of 52 rupees! While they're great on their own, as a bonus these rupees will likely distract any adventurers that happen to walk into your house, potentially leaving your clay pots and precious life savings alone! SAFETY NOTE: For my current 13-watt compact fluorescents, I performed a two-hour worst-case test by hanging one of the stemless rupees directly onto one of the vanity lights while staying nearby with a fire extinguisher at hand. However, the end result was that the PLA rupee had just softened and slightly deformed, with no signs of discoloration or any residue left on the bulb. This test was well worth the time and effort, and told me that it was safe to continue with the project. GALLERY NOTE: Even though the room looks dimly lit in the pictures, in reality it's actually quite bright. As for the color balance and weirdness of having multi-color shadows, as some point I might switch to full set of clear shades. But for now, I'm going to stick with the 52-rupee version for the sheer silliness of it. Instructions First make sure the nozzle diameter and layer height match your slicer's settings, as by default the model is exactly 2 nozzle-diameters thick in each slice so as to avoid generating any fill paths (which would show up when lit). Also, try some test prints with various colors of PLA to see what works for you. If you happen to have any translucent colors on hand, go for it! If you have similar decorative cylinders around your light socket, then just measure its internal radius using a pair of digital calipers and set "Light Socket Connector Top Diameter" to that value. Ideally the shade just slides in and out of the socket with little effort, but still doesn't wiggle around. At this point I've also printed out a number of opaque rupees without the stems to give away to people, and they were quite a hit! Hmmm, maybe I'll post a derivative thing that's just the "bowl" version, as there are likely more people out there that'd want those to play with. For reference, the translucent PLA colors I used were: Red - https://ultimachine.com/content/pla-175mm-red-translucent-1kg-spool Green - https://ultimachine.com/content/pla-175mm-green-translucent-1kg-spool Blue - http://www.matterhackers.com/store/3d-printer-filament/175mm-pla-filament-blue-1-kg Clear - http://store.makerbot.com/pla-filament COLOR CHANGES: With the default settings in the scad file, the shade transitions from the rupee to the stem at 57 mm, so if you want to perform a color-change (eg. switch to clear filament), set your printer's pause-at-z to 57 mm (or whatever the scad file echoes out when viewed in OpenSCAD). STRUMMING: At least on my Replicator 1, the nozzle tip started "strumming" the print just before the two halves of the stem joined together. I've had this effect ruin entire tall-and-thin prints in the past (eg. Emmett's blossoming lamp), but in this case the effect was stopped before it got severe enough to disrupt the print. REMOVAL: While the rupees have ginormous footprints, the thin bottom and translucent plastic actually makes them pretty easy to remove from a blue painter's tape platform (the plain matte-surface kind, not the new smooth blue-with-printed-text stuff). The best tool I've used so far for this is my cricut spatula with a slightly sharpened edge. I can't believe it took me a year of printing to figure this out, but the rounded tip is handy because you can just apply light pressure while rolling the blade side to side, which usually works it under the print without even damaging the tape. It just takes a little patience, but ultimately saves time since it's so gentle!
With this file you will be able to print Customizable Rupee Lamp Shade with your 3D printer. Click on the button and save the file on your computer to work, edit or customize your design. You can also find more 3D designs for printers on Customizable Rupee Lamp Shade.