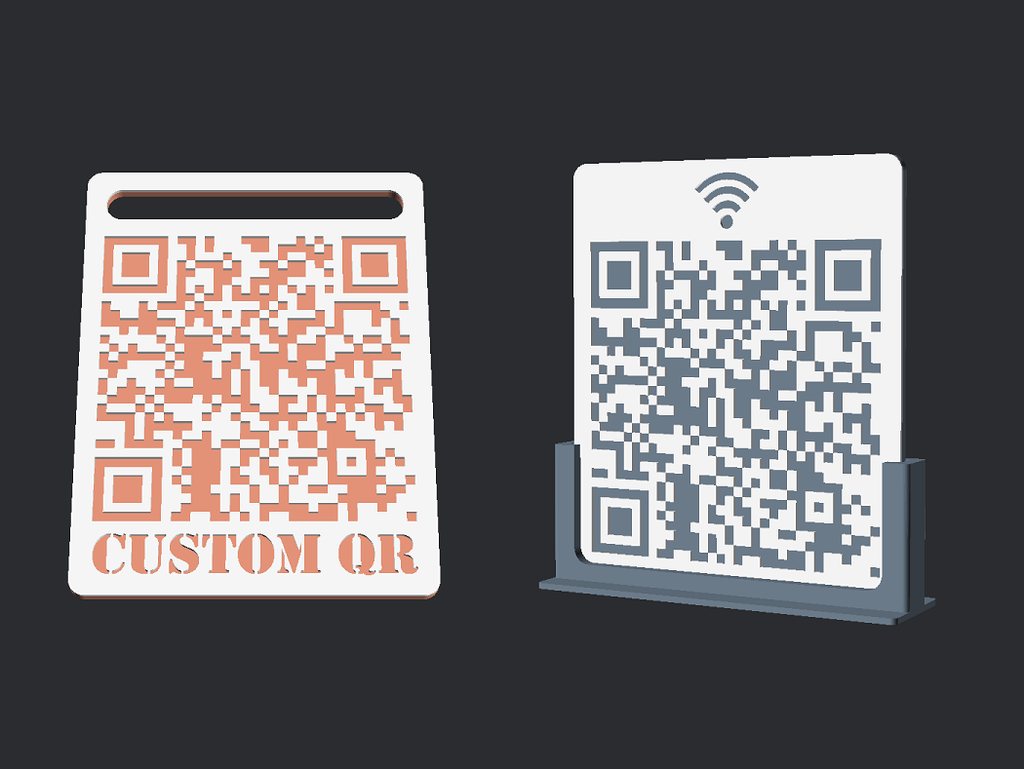
Customizable QR Code Keyring or Tag
prusaprinters
<h3>QR Code Key-ring or Tag</h3><h3>Features:</h3><figure class="image image_resized image-style-align-center" style="width:75%;"><img src="https://cdn.thingiverse.com/assets/c3/df/12/7f/c9/QR_New_Lg.gif"></figure><ul><li><strong>Multiple tag/key-ring options</strong></li></ul><figure class="image image_resized image-style-align-center" style="width:50%;"><img src="https://cdn.thingiverse.com/assets/26/ea/a7/ad/ff/Key_Types.gif"></figure><ul><li><strong>Multi-color options (change at layer, inlay or multi-color printers)</strong></li></ul><figure class="image image_resized image-style-align-center" style="width:50%;"><img src="https://cdn.thingiverse.com/assets/14/24/39/26/7c/QR_Types.gif"></figure><ul><li><strong>Add some text</strong></li></ul><figure class="image image_resized image-style-align-center" style="width:50%;"><img src="https://cdn.thingiverse.com/assets/f3/df/39/7b/75/Some_Text.png"></figure><ul><li><strong>Line size setting for FDM optimization</strong></li></ul><figure class="image image_resized image-style-align-center" style="width:50%;"><img src="https://cdn.thingiverse.com/assets/82/24/33/e0/f4/Line_Size_Setting.png"></figure><ul><li><strong>Add a holder for the code</strong></li></ul><figure class="image image_resized image-style-align-center" style="width:50%;"><img src="https://cdn.thingiverse.com/assets/78/a6/4d/a0/15/Holder.gif"></figure><ul><li><strong>SVG logo import</strong></li></ul><h3> </h3><h3>How To Customize:</h3><h4>Create the QR Code</h4><ul><li>Go to this site - <a href="https://www.qrcode-monkey.com/">https://www.qrcode-monkey.com/</a></li><li><strong>Only change the Content settings</strong><br>DO NOT change the color, logo or design settings</li><li>Click <strong>Create QR Code</strong></li><li>Click <strong>Download PNG</strong> and wait for the file to download</li></ul><p> </p><p><img src="https://cdn.thingiverse.com/assets/ef/64/36/63/8a/QR_01.png"></p><p> </p><h4>Convert it to a SVG file</h4><ul><li>Go to this site - <a href="https://convertio.co/png-svg/"><strong>https://convertio.co/png-svg/</strong></a> and convert the PNG image you just downloaded to a .SVG file</li></ul><p><i>I'm aware you can download the code as a SVG file from the first site, but this will not be formatted properly for our uses.</i></p><p> </p><p><img src="https://cdn.thingiverse.com/assets/fa/0d/f1/66/61/QR_02.png"></p><p> </p><h4>Customize with OpenSCAD</h4><ol><li>Download OpenSCAD from here and install it - <a href="https://openscad.org/downloads.html">https://openscad.org/downloads.html</a></li><li>Put the downloaded SVG file in the same folder as the .SCAD file from this page</li><li>Double-click the .SCAD file to open it</li><li>Click <strong>Window</strong>, then <strong>untick Hide Customizer</strong><br><i>Optional:</i> Click <strong>Window</strong>, then <strong>tick Hide Editor</strong></li><li>Enter the SVG file name in the basic settings tab (or rename the file to <i>qr-code.svg</i> before opening OpenSCAD)</li><li>Customize the settings. After changing a setting, you may need to click outside the text box to apply the change</li><li>Click <strong>Design</strong> > <strong>Render</strong> and wait for the design to render</li><li>Click <strong>File</strong> > <strong>Export</strong> > <strong>Export to STL</strong></li><li>Save the file</li></ol><p><i>Note: I've update the script since recording the video, so there are more features in the current version. To see a larger view of the below image - Right Click > Open in new tab</i></p><p> </p><p><img src="https://cdn.thingiverse.com/assets/01/f8/45/7d/e9/QR_Customize-opt.gif"></p><p> </p><h4>Notes</h4><p><strong>Raised</strong> and <strong>Cut-Out</strong> types are for changing filament at layer height</p><p><strong>Multi-color</strong> and <strong>Code</strong> are to be used together for inlay/multi-color printers</p><p>You can also set <i>Base Height</i> or <i>Code Height</i> to 0 and export each part on it's own</p><p>If you want to print a <strong>double sided tag</strong>, you can set <i>Base Height</i> to 0 and export the second side. Then just flip this over in the slicer</p><ul><li>The text options are a okay for basic text, but if you want to use another program to add some, you can add extra height to the top/bottom of the card under <strong>Extra Size Setting</strong></li></ul><h4> </h4><h4>Add an icon</h4><p>You can import another SVG file as a logo or use logo fonts.</p><p>The below example uses an wifi SVG file from IconMonstr - <a href="https://iconmonstr.com/?s=wifi">https://iconmonstr.com/?s=wifi</a></p><ul><li>Download the wifi SVG file</li><li>Place it in the same folder as the .SCAD file</li><li>In the customizer:<ul><li>Add some extra space to the top or bottom of the card under <strong>Extra Size Settings</strong></li><li>Go to SVG Logo Settings</li><li>Tick <strong>enable svg logo</strong></li><li>Enter the filename under <strong>svg logo name</strong></li><li>Set the <strong>svg y nudge</strong> position and <strong>svg logo scale</strong></li></ul></li></ul><p><i>Right-Click > Open In New Tab to see a large view of the image</i></p><p> </p><p><img src="https://cdn.thingiverse.com/assets/89/93/9b/e4/ff/Wifi_Instructions.png"></p><p>You can install any fonts to OpenSCAD, this allows us to use Icon Fonts:</p><p>A good place to start looking is here - <a href="https://www.dafont.com/theme.php?cat=717&page=1">https://www.dafont.com/theme.php?cat=717&page=1</a></p><p>The wifi icon in the title image is from <a href="https://www.dafont.com/wifi.font">here</a></p><p>Once you've downloaded one you want:</p><ul><li>Go to C:\Users\YOUR-USERNAME.fonts</li></ul><p>If the folder doesn't exist, create it (there is a fullstop in front of the word font, don't miss it)</p><p>Copy the font file into that folder</p><p>If you have OpenSCAD open, close it and re-open the file.</p><ul><li>Change the Font setting in the customizer and type the character for the logo you want into the text field</li></ul><h4>Advanced Notes</h4><p>There is some logic in the script that stop you from making the size too small if you have Line Size set, you can set Line Size to 0 or half your line size value if you really want to override this</p><p>You can change the <i>Customize Design</i> settings before generating the QR Code (on <a href="https://qrcode-monkey.com/">https://qrcode-monkey.com</a>), but you'll need to set Line Size to 0 and there are no promises that it'll print well</p><p>If you want to use a different site to create the QR code, resize the image to 1147x1147 pixels before converting it to an SVG. Or if the QR code in the image doesn't have a border, resize it to 1000x1000 px.</p><ul><li>If you want to use a different source for the SVG file, there are instructions for working out the size in the code at line 215. You'll need to export it as a STL and measure it outside of OpenSCAD, then enter the values into the script.</li></ul><p> </p>
With this file you will be able to print Customizable QR Code Keyring or Tag with your 3D printer. Click on the button and save the file on your computer to work, edit or customize your design. You can also find more 3D designs for printers on Customizable QR Code Keyring or Tag.
