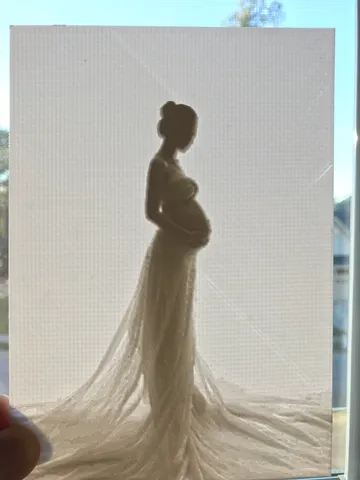
Customizable Lithophane with Cura
prusaprinters
Ok first this is a tutorial not a thing. The STL file is a placeholder; do not download. Cura has a powerful yet less known feature: turning any photo into a lithophane. It is much more convenient, flexible, and better quality than other methods posted on Thingiverse. Choose a suitable picture. The good candidates have good contrast and are not overly messy. Basically, any photo that looks good in black and white will look good as a lithophane. Drag and drop the picture file into the Cura window. A setting window will pop up. Set it up as below: --Height (thickest height): 2-4mm; the higher the darker black and better contrast, but more than 4mm and the dark region loses shades. Use a lower height for a life photo and a higher one for a silhouette. --Base (thinnest height): 0-0.4mm. Set 0mm if the image is not very bright, set 0.4mm if the image has highlights. --Width and depth: choose whatever fits your need. Personally I print as large as possible for finer details. --Choose "Darker is higher". --Smoothing: drag to far left, then increase it in the slightest manner possible. No smoothing and the 3D mesh is rugged, but anything more than the slightest smoothing blurs the image. Click on OK and the model is created. For portrait pictures you may need to rotate it 90 degrees. Slice the model. I use 0.1mm layer height. I don't recommend anything above 0.2mm. Use 100% infill for a solid print. A single wall is enough (you can add an extra wall for the first layer for adhesion). I print at the fastest speed because it's slow and there is no quality concern given the extremely flat shape. Check the sliced model. You want to make sure even the thinnest part of the picture has at least two or three layers, otherwise it will leak light. If the second or even first layer has holes in them, you need to repeat the process with a higher Base height. On the other hand if there are many (e.g., 8) solid layers, consider reducing the Base height. Print the gcode file in white PLA or ABS. While is the best. Translucent filaments are not dark enough but any colored filament is typically too dark. You may face adhesion issues around the corners. You may either use a brim, or this: https://www.walgreens.com/store/c/aqua-net-professional-hair-spray-extra-super-hold-3-unscented/ID=prod5458027-product. (This is the ultimate secret weapon in adhesion improvement. Use sparingly; you may have trouble removing your prints :-) Wait, remove, hold to light and be shocked! It makes the absolutely best gifts at little cost. Go out and make someone's day! P.s. some in the comment section have argued printing the 3D models upright/vertically (with a brim, of course). I tried it out. It only works with a thick Base height and small sizes. It helps avoid gradient contours but at the same time it introduces vertical/horizontal lines. To me it's much better to print the picture flat at larger sizes and low layer heights, but feel free to experiment around. Print instructionsCategory: 2D Art Print Settings Rafts: No Supports: No Resolution: 0.1mm Infill: 100%
With this file you will be able to print Customizable Lithophane with Cura with your 3D printer. Click on the button and save the file on your computer to work, edit or customize your design. You can also find more 3D designs for printers on Customizable Lithophane with Cura.
