Customizable Filament Gland v2.1
prusaprinters
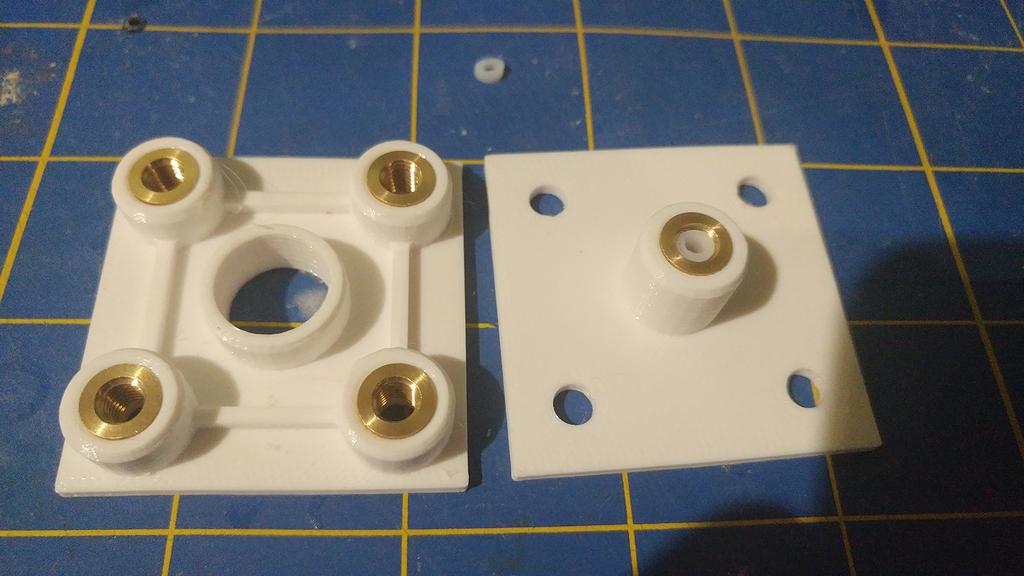
<h3> v2.1 update 2020-05-10:</h3> <ul> <li>added M10 threaded inner plate variant, for use with PC4-M10 fittings; updated instructions and hardware list</li> <li><p>added a couple of stls featuring the M10 inner variant Storage box filament gland with two holes. This version has a customizable number of filament openings. This version also fixes two problems I had with the earlier version:</p> <ol> <li>It's now much easier and faster to print, requiring no supports whatsoever</li> <li>Filament moves through it much more easily than the previous version When you assemble the M5 version, cut a short length of PTFE bowden tube a little shorter than the center post itself as seen in the first picture. This fits between the festo fittings and keeps the filament lined up. This step is not necessary with the P4-M10 version.</li> </ol> <p>Hardware Used:</p> </li> </ul> <hr/> <h3>For the M5 inner plate:</h3> <ul> <li><p>M5-4 push-in fittings (2x per post on each gland) https://www.amazon.com/gp/product/B00RN3KKWA/ ### for both M5 and M10 variants:</p> </li> <li><p>M5-0.8 heat-set inserts (6x per pair for singles, add 2 for each additional filament post) https://www.amazon.com/gp/product/B0754MY5H8/<br/> M10 variant will use 2 fewer of these as they are only needed for the corners</p> </li> </ul> <ul> <li><p>M5-0.8 screws of sufficient length (4x per pair, I used M5x10mm) Assembly:<br/> Four M5-0.8 heat-set inserts go into the corner pieces for the "outside" pieces.<br/> Two M5-0.8 heat-set inserts go into each filament post, from each end of the M5 inner post.<strong>Not needed or possible on the M10 version</strong><br/> Use the drill template piece to drill holes. I used a 5mm twist drill for the corner screw holes, and a 5/8" forstner bit for the center hole. The holes drilled don't need to be the exact size as long as the plate still covers them.<br/> Once the inserts have cooled a bit, insert a short piece of PTFE into each filament post, then thread an M5-4 push-in fitting into each end. The PTFE tube should be short enough to account for how far the fittings thread in so that they do not compress it, as this will cause filament to bind up inside the post instead of sliding through freely.</p> <h3>Print Settings</h3> </li> </ul> <p><strong>Printer Brand:</strong></p> <p>Prusa</p> <p><p class="detail-setting printer"><strong>Printer: </strong> <div><p>i3 MK2S</p></div><strong>Rafts:</strong></p> <p>No</p> <p><p class="detail-setting supports"><strong>Supports: </strong> <div><p>No</p></div><strong>Resolution:</strong></p> <p>0.2mm</p> <p><p class="detail-setting infill"><strong>Infill: </strong> <div><p>10%</p></div><br/> <strong>Filament:</strong><br/> any PETG recommended, anything should work </p> </p></p></p> Category: 3D Printer Accessories
With this file you will be able to print Customizable Filament Gland v2.1 with your 3D printer. Click on the button and save the file on your computer to work, edit or customize your design. You can also find more 3D designs for printers on Customizable Filament Gland v2.1.