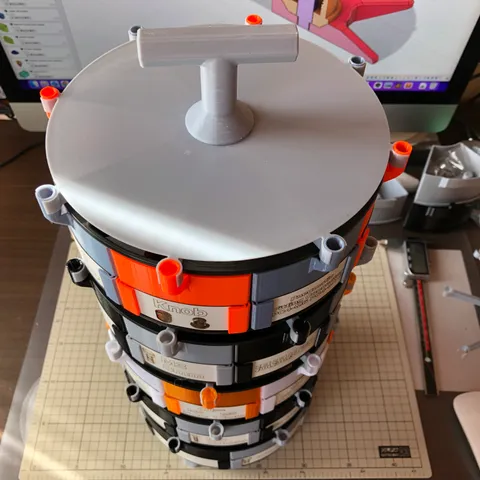
Customizable and Stackable Filament Spool Parts Bin
prusaprinters
Note: Filament spools vary in size from product to product. If you print the attached sample as is, it will probably not fit your spool perfectly.注意:フィラメントスプールの大きさは製品によってバラバラです。添付のサンプルをそのまま印刷しても、おそらくあなたのスプールにピッタリフィットすることはないでしょう。----------------------------------------------------------------------------------------------------------------Update 12/13/2022: Added “parts bin with finger hook” 「指掛け付き部品入れ」を追加----------------------------------------------------------------------------------------------------------------This parts bin has the following features.以下の特徴を持つ部品入れです。Parameterized major dimensions to fit any spool主要な寸法がパラメータ化されているので、任意のスプールに合わせることができるspool_heightspool_diameterspool_disc_thicknessspool_hole_diameterspool_core_diameterNumber of parts bins in a spool can be changedスプール内の部品入れの数を変更可能number_of_binStackable積み重ねが可能The parts bin has label holders, the dimensions of which can be changed部品入れにはラベルホルダーがあり、その寸法を変更可能label_thicknesslabel_holder_heightlabel_frame_widthSpools can be rotatedスプールを回転させることができるA handle is provided to carry the parts bin部品入れを持ち運ぶためのハンドルがついているNo screws or glue requiredネジや接着剤が不要The parts bin is not screwed down, so it can be easily removed and transported temporarily.部品入れをねじで固定していないので、一時的に取り外して持ち運びすることが簡単にできるHow to assemble組み立て方Step 1: Screw "rod" into "base".ステップ1:「base」に「rod」をねじ込みます。Step 2: Put the spool between "top" and "bottom" and screw "top" to "bottom".ステップ2:「top」と「bottom」でスプールを挟み込んで「top」を「bottom」にねじ込みます。Step 3: Insert the "rod" from step 1 into the center hole of the one made in step 2. If the "rod" and "top" are not flush, adjust the threading of the "top" and "bottom".ステップ3:ステップ2で作ったものの中心の穴にステップ1の「rod」を差し込みます。「rod」と「top」が面一(ツライチ)にならない場合は、「top」と「bottom」のねじ込みを調整してください。Step 4: Attach the parts bin so that the catch of the "top" clips the cylindrical projection of the parts bin.ステップ4:「top」のキャッチが部品入れの円筒状の突起を挟み込むようにして、部品入れを取り付けます。Step 5: Screw the "handle" into the "rod".ステップ5:「handle」を「rod」にねじ込みます。This is the end of the process if the spools are not stacked. If stacking spools, screw the "rod" in place of the "handle" in Step 5 and repeat Steps 2 to 4.スプールを積み重ねない場合は以上で終わりです。スプールを積み重ねる場合はステップ5で「handle」の代わりに「rod」をねじ込んで、ステップ2から4を繰り返します。The following picture shows an example of stacking 2 spools.以下の写真は2段積み重ねた例です。ParametersSupplemental Information補足情報To customize, change the parameters in Fusion360.カスタマイズする場合はFusion360でパラメータを変更してください。The attached sample is for a PETG filament spool from CC3D.添付のサンプルはCC3D社のPETGフィラメントスプール用です。When printing threads, it is recommended to set the seam setting to "random" so that the seams are not aligned. If it is still too tight, adjust "thread_gap".ネジ山を印刷する場合はシームが揃わないように、シームの設定を「ランダム」にすることを推奨します。それでもきつい場合は「thread_gap」を調整してください。The models affected by "number_of_bin" are "bin", "bin 2 div", "top", and "cover top". "bin 2 div" is a partitioned bin with a divider inside.「number_of_bin」の影響を受けるモデルは「bin」、「bin 2 div」、「top」、「cover top」です。「bin 2 div」は仕切りを入れて中を二分割した部品入れです。If you do not want to show the internal structure, you can change the topmost "top" to "cover top". In this case, you need to change the handle to "handle for cover top".内部構造を見せたくない場合は一番上の「top」を「cover top」に変更すると良いでしょう。その場合ハンドルを「handle for cover top」に変更する必要があります。The icons used in the sample labels were downloaded from the following URL.サンプルのラベルで使っているアイコンは以下のURLからダウンロードしました。https://www.thingiverse.com/thing:611726Parts bin with finger hookTo fix the parts bin more firmly, you can increase the value of the "catch_thickness" parameter, but this will make it difficult to remove the bin. To make this easier, a parts bin with a finger hook has been added.部品入れをより強力に固定するには「catch_thickness」というパラメータの値を大きくすれば良いのですが、そうすると取り外しが大変になります。それを容易にするために指掛け付き部品入れを追加しました。The following files were added.追加したのは以下のファイルです。bin 8 with finger hook.stepbin 8 - 2 div with finger hook.stepbin 8 with finger hook x 4.3mfbin 8 - 2 div with finger hook x 4.3mffilament spool parts bin 2.f3d
With this file you will be able to print Customizable and Stackable Filament Spool Parts Bin with your 3D printer. Click on the button and save the file on your computer to work, edit or customize your design. You can also find more 3D designs for printers on Customizable and Stackable Filament Spool Parts Bin.