Customizable Aerobar Bike Computer Mount
thingiverse
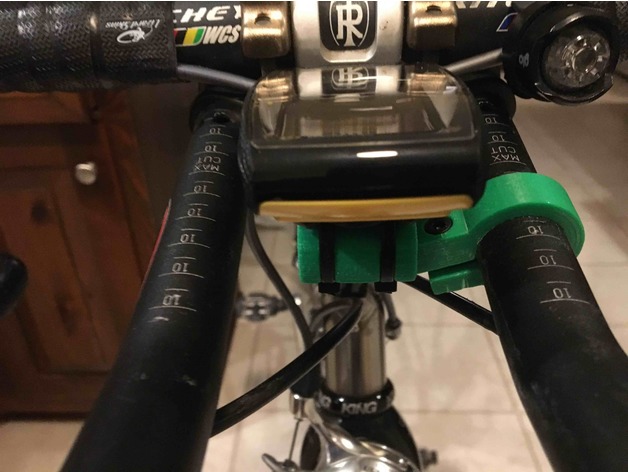
This is a highly customizable means of mounting a bicycle computer to your aerobars. Many aspects can be customized, including the clamp inner diameter, clamp wall thickness, clamp width, adapter diameter, arm angle, arm length, height of top of adapter above arm, channel depth/width/spacing for securing computer mount fastening straps, bolt/nut dimensions, and more. This can be printed in PLA or ABS. If you anticipate possibly leaving your bike in a hot car, ABS might be better. The round adapter piece fits over the arm of the clamp, and mine stays firmly in place as a result of the zip ties used to attach the computer mount base to the aerobar mount/adapter. It could also be glued or a small screw could be used, if desired. Mine does not move at all, just from the zip ties, which are needed for the computer base, anyway. I printed mine in ABS, and it has provided a very strong, secure and rigid mount for my computer. Someday I may print another one in a different color (black? red?), but green was what I had on-hand at the time! The round adapter piece can be printed in a vertical or horizontal orientation. Less support is needed for the vertical orientation, but I've found that the horizontal position, with support, gives better results. In horizontal orientation, the top of the round adapter is narrow, so the last section prints poorly. In this case, it's best to print it vertically. The arm length must be long enough to accommodate the needed adapter length. The height of the arm (and bolt block) can be adjusted by changing the arm height parameter. The angle needed to achieve the depth above (negative angle) or below (positive angle) the bar that you need the arm to be is calculated automatically based on the adapter height value. The thickness of the gap between the nut and bolt blocks can be adjusted by changing the block gap thick parameter. The width of the nut and bolt blocks (ie, distance from clamp toward arm) can also be adjusted. The height (thickness) of the nut block can be adjusted by changing the nut block height parameter. The diameter of the bolt head inset (use bolt head diameter plus 1-2mm) must be a sensible value compared to the clamp width. The height of the clamp bolt head (ie, depth of the bolt head countersink) can also be adjusted. The diameter of the shank of the bolt can be adjusted by changing the bolt shank diameter parameter. The circular diameter of the nut, plus about 1mm (for a 6-sided nut, the distance between 2 opposite corners on the nut, plus a little), must be a sensible value compared to the nut block height. The depth of the nut countersink can also be adjusted by changing the nut inset parameter. The length of the round adapter that fits on the arm - must be long enough for bands, ties, etc that hold your computer mount on - can be adjusted by changing the adapter length parameter. The outside diameter of the adapter - such that your computer mount will sit on it well - can also be adjusted. The height above the top, flat surface of the arm, that the top of the adapter should be can be adjusted by changing the adapter height parameter. If your aerobar is at an angle, where you'll be mounting the clamp, it can cant the arm one way or the other (so your computer would sit crooked) - this allows some compensation for that, if needed. This can be done by adjusting the adapter angle parameter. The fudge factor widens and deepens the slot in the adapter, to allow the adapter to fit onto the arm better. Use this if/as needed for your printer. Set to total mm extra width needed. Enable/disable generation of the clamp - in case only want to print one or the other - by changing the generate clamp parameter. Enable/disable generation of the adapter - in case only want to print one or the other - by changing the generate adapter parameter. Orientation for placement of adapter on print surface can be adjusted by changing the adapter print orientation parameter - 0 = vertical, 90 = horizontal (just for printing/plating purpose).
With this file you will be able to print Customizable Aerobar Bike Computer Mount with your 3D printer. Click on the button and save the file on your computer to work, edit or customize your design. You can also find more 3D designs for printers on Customizable Aerobar Bike Computer Mount.