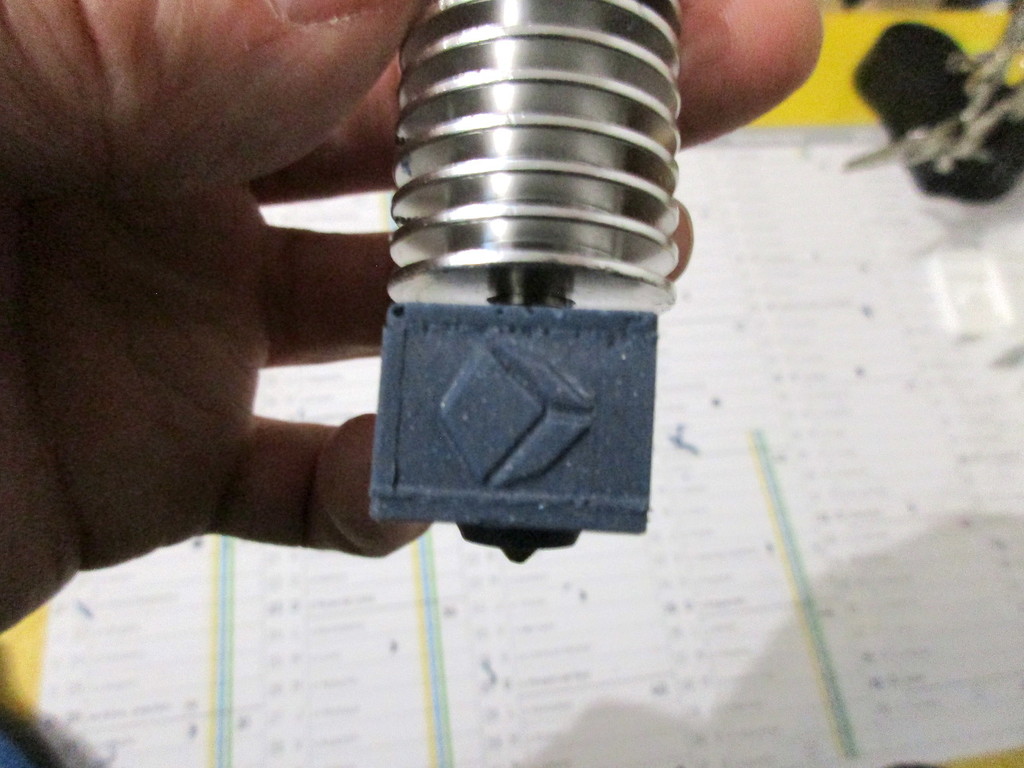
Custom silicone sock for Anycubic V5 Hotend
thingiverse
# English ## A. Intro Following [Stefan's CNC Kitchen excellent work](https://www.thingiverse.com/thing:3742037), I wanted to reuse the base principles he did show to make a custom silicone sock for the V5 hotend from Anycubic (factory hotend on i3 Mega series, Chiron, and Kossel) after quite a bunch of "commercial" socks were ruined in a short amount of time. I used the same silicone type as he did (TrollFactory type-3 silicone) ; I've been using my custom socks for a while now, and they don't show any sign of wear. ## B. Assembly Assembly is roughly the same has Stefan's version. You'll need 3 M3x30 screws (+ nuts and washers) : 1. Mount the printed heatblock with the front and back parts of the mold, fix the whole with 2 screws. Make sure it's tight enough. (pictures 7 and 8) 2. Put the freshly assembled block over the bottom part of the mold (picture 9). Make sure the holes match ! 3. Put the mold top part over the whole thing, secure it using the last M3 screw (picture 10) and tighten. Only thing left : fill the mold with silicone, using Stefan's video instructions. For the Anycubic V5 sock, you'll need about 5-6g of finished silicone (1:1 mix of each A and B part), + the wanted color. 3 variants are proposed here for the sides : - No logo - Anycubic "cube logo" - My own logo (R7) You can combine them as you want, of course. :) I can also make a custom version on request. ## C. Thermal performance improvement This is optional, yet I still would highly advise to do it. Most hotend brands advise to put a dab of thermal grease on the "cold end" side of the heatbreak. That makes sense. Though, it's also highly advisable to put some into the openings where the heating cartridge and thermistor are located. You may ask "why ?". Simple. This is to improve thermal conductivity : faster heating, better temperature reading ... and more stable temperatures. Though, a thermal grease able to withstand the temperatures at which the hotend operate is mandatory. For this purpose, Thermalright TF8 (https://www.amazon.com/Thermalright-TF8-Thermal-Paste-5-8g/dp/B07JN1DMG5/ref=sr_1_3?dchild=1&keywords=thermalright+tf8&qid=1613657571&sr=8-3) is a perfect match due to its impressive temperature range (-220°C to +380°C). I personnally use that one and the improvement is drastic once PID is done. # Français ## A. Introduction Suite à [l'excellent travail de Stefan (CNC Kitchen)](https://www.thingiverse.com/thing:3742037), j'ai voulu décliner le principe qu'il a utilisé afin de réaliser une chaussette en silicone pour la tête d'impression V5 d'Anycubic (celle équipant, d'usine, les séries i3 Mega/Chiron/Kossel) ... après avoir ruiné pas mal de chaussettes "commerciales". Le même silicone de chez TrollFactory (type 3) a été utilisé. Cela fait un bon moment que j'utilise ces chaussettes "custom" et elles sont bien plus solides que celles du commerce. Pas de décoloration, pas de déchirement. ## B. Assemblage Le principe et l'assemblage sont rigoureusement identiques à ce que Stefan a réalisé, 3 vis Mx30 (+ écrous et rondelles d'épaulement) sont nécessaires : 1. Assembler les parties bloc chauffant, devant, et derrière avec des vis M3x30 (images 7 et 8). 2. Placer le bloc assemblé sur la partie inférieure du moule (image 9). Veiller à ce que l'emplacement des trous correspondent. 3. Placer la partie supérieure sur le précédent bloc, et fixer le tout avec la dernière vis M3 (image 10). Assurez-vous que les écrous soient suffisamment serrés ! Il n'y a plus qu'à remplir le moule avec du silicone, en suivant la procédure décrite par Stefan. Vous aurez besoin d'environ 5-6g de silicone, soit 2-3g pour chaque composante A et B (+ couleur), pour réaliser cette chaussette. 3 variantes sont proposées pour les faces latérales : - Pas de logo - Logo "cube" d'Anycubic - Mon logo perso (R7) Il est bien sûr possible de combiner différentes parties avant et arrière, et je peux éventuellement faire une version custom sur demande. ;) ## C. Amélioration de la conductivité thermique Cette partie est optionnelle, néanmoins je ne saurais que trop conseiller de la mettre en œuvre. La plupart des constructeurs conseillent de mettre de la pâte thermique sur la partie supérieure du heatbreak ; c'est sensé, mais il est également conseillé d'en mettre dans les inserts de la cartouche chauffante ainsi que de la thermistance. Pourquoi ? Pour améliorer le transfert de chaleur, avoir une chauffe plus rapide, une meilleure lecture des températures ... et des températures bien plus stables. Une pâte thermique capable de résister aux températures que les têtes d'impressions génèrent est impérative. La Thermalright TF8 (https://www.amazon.com/Thermalright-TF8-Thermal-Paste-5-8g/dp/B07JN1DMG5/ref=sr_1_3?dchild=1&keywords=thermalright+tf8&qid=1613657571&sr=8-3) est parfaite pour ça (fontionne de -220°C à +380°C). C'est ce que j'utilise et je vous garantis que la différence est flagrante une fois le PID réglé.
With this file you will be able to print Custom silicone sock for Anycubic V5 Hotend with your 3D printer. Click on the button and save the file on your computer to work, edit or customize your design. You can also find more 3D designs for printers on Custom silicone sock for Anycubic V5 Hotend.
