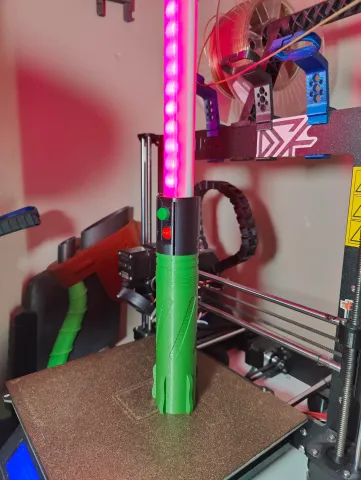
Custom LightSword
prusaprinters
UPDATE 6-4-22:The Handle Button Mount and handle core have been updated to accommodate the change in the buttons supplied in the Alien 3D box. The model was originally made for a 10mm rocker but a 20mm was included in the kit.The blank version of the button holder has been uploaded as a step file as well. This is a custom designed LightSword for display purposes or lighting.The parts for the Sword are included in the May Alien3d.us UFO box.This lightsword provides two buttons one to turn on the power and one to control the lights.If you quickly press the button the LED turn on/off. If you hold the button the color of the LED changes. Since it is using a ESP8266 with WLED firmware you can also connect to the board through wifi and change the color and effects through the web app.Parts needed:1 - ESP8266 (D1 Mini)1 - Momentary Button1 - Rocker Switch1 - 3xAA battery holder and batteries1 - 1M 60 LED StripThe Sword is modular in length. It can be any length in increments of 50 or 100mm.For the Alien UFO Box you have you choices if you wish to use the full length of the strip.(because of budget reasons only one led strip was included but you could easily obtain a second one and make a full one)You can either make a single sided 1M long blade (light only on one side of the blade), or a double sided .5M long blade folding the LED strip in half over the top of the sword.For the full length you will need to print out 9 of the inner pieces and one top, for half you would print 4 of the inner and 1 short inner with the top. Programming the ESP8266 (D1 Mini):You will need 2 things to program the ESP8266: ESP Flasher (latest version):https://github.com/esphome/esphome-flasher/releasesWLED Firmware releases.https://github.com/Aircoookie/WLED/releases(as of this model you would need to download WLED_0.13.1_ESP8266.bin)Plug in the ESP8266 and then load up the Flasher and select the com port and the bin file, then click Flash ESP. Wiring:(there is a pdf file included below you can zoom in for details)WARNING!!! ⚠️:Do not I repeat Do not power the LED strip through the esp8266. Do not try to power the esp8266 through usb and power everything through there. You WILL burn out your board as it cannot handle that much current. This is why in the wiring diagram above the LEDs are powered directly from the power switch/batteries. If you would like to externally power the circuit please connect a 5v power source to where the batteries would be connected.Printing:None of the parts need supports if printed in the orientation provided. WLED Settings:Once the sword is assembled and powered on you can connect to the Wifi of the sword to change the number of LED's and effects. Using your phone or pc connect to WLED-AP and select Open Controls, config, LED Preferences, scroll down and change the length from 30 to 60 and select save/apply. If you wish then you can go back and change the wifi settings and or colors and effects. More info at https://kno.wled.ge/
With this file you will be able to print Custom LightSword with your 3D printer. Click on the button and save the file on your computer to work, edit or customize your design. You can also find more 3D designs for printers on Custom LightSword.
