Curtainator
prusaprinters
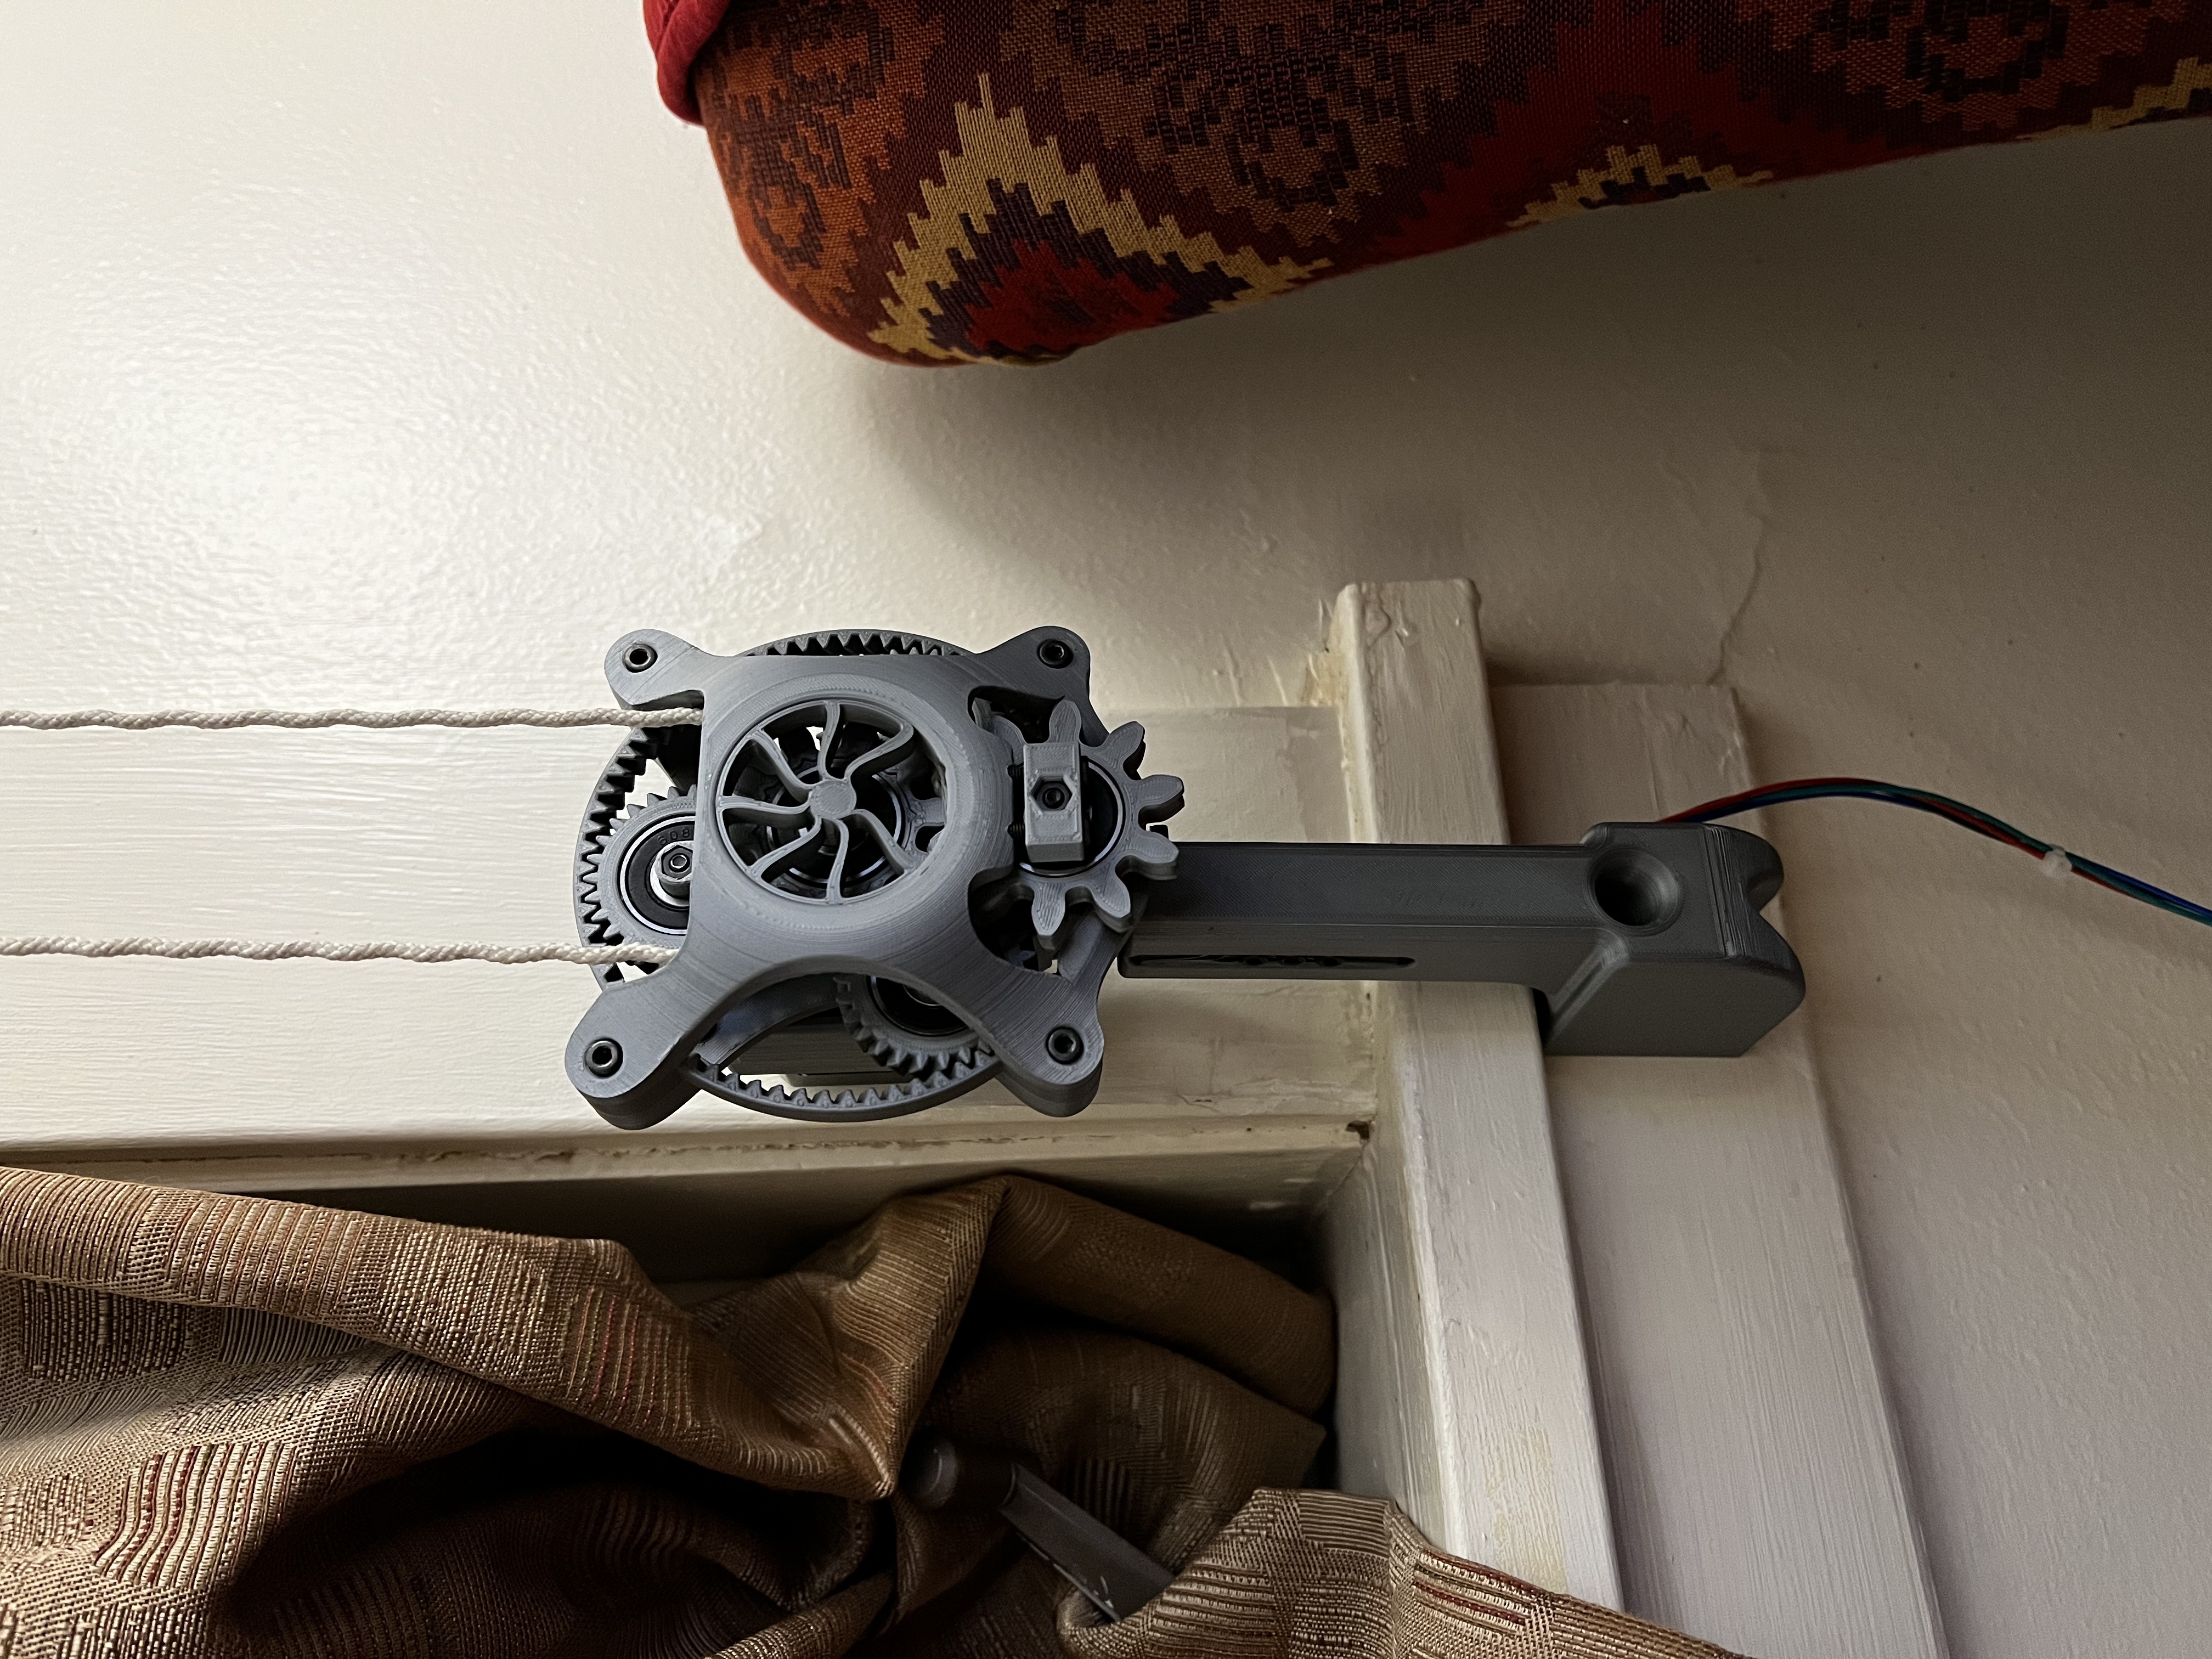
<p>This is the curtainator. It's designed to open curtains that use a rope loop on one end. I couldn't find any product like it so enjoy! I'll probably be making improvements to this as things break.</p><p> </p><figure class="media"><oembed url="https://youtu.be/zOosbQDJ-Bs"></oembed></figure><p> </p><h4>Components:</h4><p>There are 3 main components of this print:</p><h5>Wall Mount:</h5><p>The wall mount was pretty specific to my setup. I wanted to reuse the drilled holes that the previous pulley used and I needed to get around a window sill. There's a slit in the bottom mount so the top mount can slide up and down to adjust the tension on the rope. This is kinda tricky to print so you'll probably want supports in there.</p><ul><li>bottom-wall-mount.stl</li><li>top-wall-mount.stl</li></ul><h5>Gearbox:</h5><p>The curtainator uses a 5:1 planetary gearbox to increase the torque of the stepper. Why a planetary gearbox? Because it looks super cool. I used 3 planets in my gearbox. The planetary gears turn a spur gear that is concave to hug the rope. It links up to another spur gear (which I'm calling the auxiliary gear) to “grab” the rope and keep it from slipping.</p><p>planetary gears:</p><ul><li>ring-gear.stl</li><li>planet-gear.stl (x3)</li><li>sun-gear.stl</li></ul><p>rope spur gears (and related mounts):</p><ul><li>carrier-gear.stl</li><li>carrier-shaft.stl (x3)</li><li>carrier-arms.stl</li><li>aux-gear.stl</li><li>aux-gear-mount.stl</li><li>aux-gear-shaft.stl</li></ul><h5>Bracket:</h5><p>The bracket is what mounts to the stepper motor and keeps everything together. It uses 4 20mm M3 screws to combine the bottom bracket, ring gear, and top bracket into a fun curtainator sandwich. There's also a cap on the top that keeps the carrier gear centered.</p><ul><li>bracket-bottom.stl</li><li>bracket-top.stl</li><li>bracket-cap.stl</li></ul><p> </p><h4>Printing:</h4><p>I printed with prusament PLA and a 0.25 nozzle. Most things shouldn't need supports except for the bottom-wall-mount.stl and bracket-top.stl.</p><h4>Non-3D printed components I used:</h4><ul><li>A lot of M3 hex socket screws and nuts of varying lengths (6,8,12,16,20mm). The nuts should be hex, not square</li><li>5 608-2RS ball bearings </li><li>Nema 17 Stepper motor. Mine was 2A with 59Ncm of torque, but get whatever works<ul><li>I also used an esp32 to control a TB6600 driver, but again get whatever works for you</li><li>You'll also need a power supply, I used a 24v 5A power supply</li></ul></li></ul><p>All the components above were found on Amazon.</p><h4> </h4><h4>Automation?:</h4><p>You can do this however you want, but I'll share what I did. I use an esp32 with esphome to control the TB6600 driver. The code for esphome is below. Once esphome is flashed, I can use home asssistant to automate the curtains however I like. Currently I open/close for sunrise/sunset and also when I start watching my TV.</p><p> </p><pre><code class="language-plaintext">substitutions: deviceid: esp32_5 esphomename: esp32-5 # underscore in hostname is discouraged devicename: Curtains globals: - id: curtains_max type: int restore_value: no initial_value: "56000" - id: curtains_mostly_open type: int restore_value: no initial_value: "45000" esphome: name: $esphomename platform: ESP32 board: wemos_d1_mini32 on_boot: priority: -100.0 then: - stepper.report_position: id: curtains_stepper position: !lambda return id(curtains).position * id(curtains_max); - stepper.set_target: id: curtains_stepper target: !lambda return id(curtains).position * id(curtains_max); - sensor.template.publish: id: position_sensor state: !lambda return id(curtains_stepper).current_position; wifi: ssid: !secret wifi_smart_ssid password: !secret wifi_password fast_connect: true domain: .home # Enable fallback hotspot (captive portal) in case wifi connection fails ap: ssid: $deviceid captive_portal: api: ota: web_server: port: 80 # Enable logging to ESPHome logger: # Disable logging to serial baud_rate: 0 level: debug stepper: - platform: a4988 id: curtains_stepper step_pin: GPIO16 dir_pin: GPIO17 sleep_pin: number: GPIO21 inverted: true max_speed: 5000 steps/s acceleration: 5000 steps/s^2 deceleration: 5000 steps/s^2 sensor: - platform: template name: "Curtains Position" id: position_sensor binary_sensor: - platform: homeassistant name: "Curtain sensor" entity_id: binary_sensor.lumi_lumi_sensor_magnet_aq2_on_off id: curtain_sensor filters: - invert: internal: true on_press: then: - stepper.report_position: id: curtains_stepper position: 0 - stepper.set_target: id: curtains_stepper target: 0 - cover.template.publish: id: curtains position: 0.0 - sensor.template.publish: id: position_sensor state: !lambda return id(curtains_stepper).target_position; cover: - platform: template name: "Curtains" id: curtains device_class: curtain has_position: true open_action: # the first open command will only open partially, the second will open all the way - if: condition: - lambda: return id(curtains_stepper).target_position >= id(curtains_mostly_open); then: - stepper.set_target: id: curtains_stepper target: !lambda return id(curtains_max); - sensor.template.publish: id: position_sensor state: !lambda return id(curtains_stepper).target_position; - if: condition: - lambda: return id(curtains_stepper).target_position < id(curtains_mostly_open); then: - stepper.set_target: id: curtains_stepper target: !lambda return id(curtains_mostly_open); - sensor.template.publish: id: position_sensor state: !lambda return id(curtains_stepper).target_position; close_action: - if: condition: - binary_sensor.is_off: "curtain_sensor" then: - stepper.set_target: id: curtains_stepper target: -1000 stop_action: - stepper.set_target: id: curtains_stepper target: !lambda return id(curtains_stepper).current_position; - sensor.template.publish: id: position_sensor state: !lambda return id(curtains_stepper).current_position; - cover.template.publish: id: curtains position: !lambda return (float)id(curtains_stepper).current_position / (float)id(curtains_max); position_action: - stepper.set_target: id: curtains_stepper target: !lambda return pos * id(curtains_max); - sensor.template.publish: id: position_sensor state: !lambda return id(curtains_stepper).target_position; # if we only open the curtains partially, publish that on_open: - if: condition: - lambda: return id(curtains_stepper).target_position == id(curtains_mostly_open); then: - cover.template.publish: id: curtains position: !lambda return (float)id(curtains_mostly_open) / (float)id(curtains_max); optimistic: true assumed_state: true</code></pre>
With this file you will be able to print Curtainator with your 3D printer. Click on the button and save the file on your computer to work, edit or customize your design. You can also find more 3D designs for printers on Curtainator.