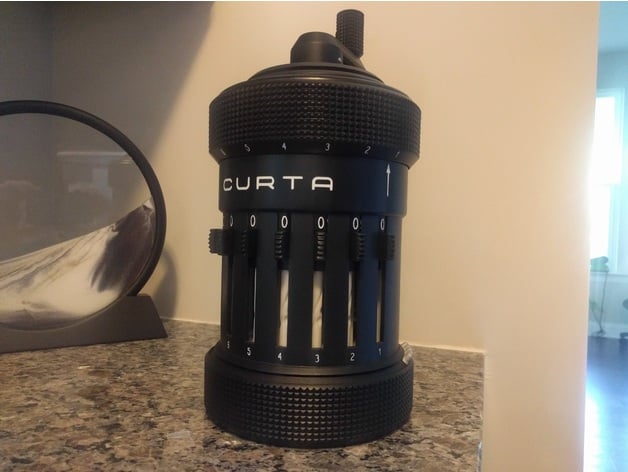
Curta Calculator Type I scaled at 3:1
thingiverse
The Amazing Curta Calculator is Now a Reality for DIY Enthusiasts! New group for discussion, bragging rights, and help with Curta builds: https://www.thingiverse.com/groups/curta Bill of Materials Build Manual Assembly Video (The build manual contains more details, but this is a good visual guide) See video of the Curta in action. See my original build for details on the project. The CAD files are shared on OnShape Update 11/22/2018: The tens bell has been updated to improve accuracy of the carry lever reset rings. Update 10/20/2017: The BOM has been updated to fix the size of the upper carriage spring and eliminate confusion in description of the main body. Update 9/29/2017: The BOM has been updated to add a file name column to make it easier to find the correct files. Also, removed the remaining references to the old 0.25mm nozzle requirement. Update 9/11/2017: A split step drum has been added to reduce the required printer print volume! Minimum print volume is now 160x160x170mm! Update 8/21/2017: Some naming problems with files and in the BOM have been fixed. Also, two missing files were added into the BOM. Update 8/18/2017: Missing bolt sleeves for zero positioning lever and anti-reversal pawl have been added. Update 7/6/2017: After manually aligning all the 5mm number stencils on the lower and upper housing, I created stencils for it (lower_housing.dxf and upper housing numbers.dxf). Those stencils are now uploaded. Also, a group has been added for those building the Curta. I will be answering questions there and I look forward to seeing pictures of people's in-progress builds: https://www.thingiverse.com/groups/curta Update 6/27/2017: The main axle and step drum model have been updated. The old one works, but the hole for the crank handle pin was 90 degrees off. This change is basically cosmetic. Update 5/3/2017: A few files that were requiring too much manual fitting work have been updated. The zero positioning disk has been updated for easier printing / better teeth for the anti-reversal pawl. Added missing crank pin file. Adding dxf files representing paint masks for numbering and lettering. I cut these from vinyl with a Cricut machine. Updating the BOM because the torsion springs for anti-reversal pawl and zero positioning lever recommended in the BOM were way too strong. I ended up making these springs by hand. The BOM is now available as PDF and XLS files. Adding the initial draft of the build manual. This covers the entire build process -- including making the springs mentioned above. Feedback on this build manual is desired and welcome -- help me improve it for others please. Update 3/29/2017: In the process of preparing the build manual, I have a list of several files which need correcting to get correct assembly and functionality out of the Curta. I recommend waiting until these issues are resolved before building. Update 3/9/2017: I have assembled a second Curta and taken loads of pictures along the way. I can now either work on a build manual utilizing the photos I took or a series of build videos. There are a LOT of photos and a lot of steps involved. What would you prefer (google form poll)? Update 1/18/2017: The transmission gear and lockout parts have been updated to be printable using a 0.4mm nozzle instead of a 0.25mm nozzle. Thanks to the feedback from MikeHenry. I also updated a repaired Lower Housing.stl due to non-manifold edges. Update 01/06/2017: I found that the tens bell also had non-manifold edges causing problems when slicing. A repaired copy has been uploaded. Update 12/30/2016: I found that the main axle and step drum had non-manifold edges that may cause problems when slicing (Simplify3D skips a few layers in the next to last row of teeth). A repaired copy has been uploaded. Update 12/17/2016: I found a part I had missed uploading a file for. It's the securing spring for the zero positioning plate. I have now added the file and added it to the BOM. Update 12/12/2016: I just added layer height, infill, orientation, and support notes to the printed files in the BOM. First step in getting actual build instructions.
With this file you will be able to print Curta Calculator Type I scaled at 3:1 with your 3D printer. Click on the button and save the file on your computer to work, edit or customize your design. You can also find more 3D designs for printers on Curta Calculator Type I scaled at 3:1.
