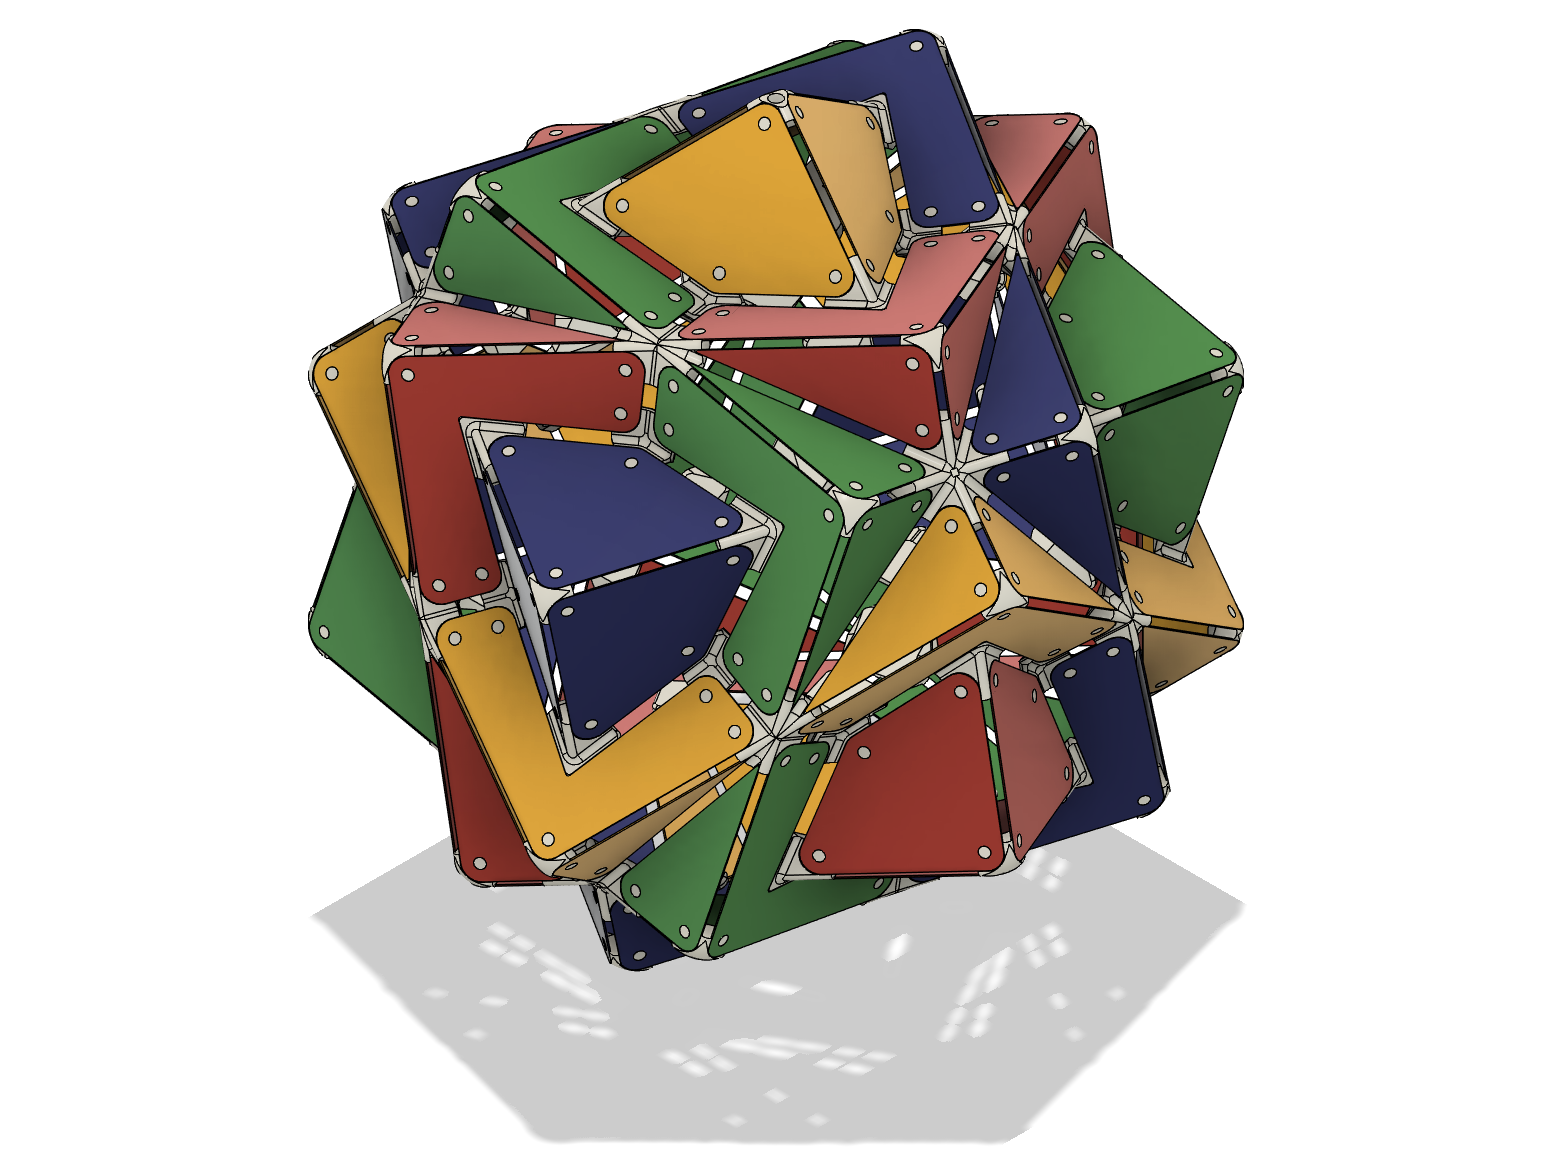
Cube Fourfold Lamp for IKEA Hemma
prusaprinters
<p>A geometrically intriguing Lamp.<br/> It consists of four cubes interlocked in each other to form a geometrically pleasing pattern.<br/> The theoretical fitting shpere would have a diameter of over 60cm, but as all the corners are rounded, its a bit less.<br/> As I dont have free access to a good 3D Printer, I haven't yet printed this model.<br/> This model consists of 195 pieces. 96 (24x4) Surface pieces, 98 corner pieces and 1 holder. Beside Printing, it's quite a bit of crafting too!</p> <h3>Print instructions</h3><p>This model is best printed in either PLA or PETG.<br/> You will need 4 different semi-transparent coloured filaments and a white or clear filament for the edges.<br/> I would go for Red, Green, Yellow and Blue for the sides.</p> <p>If you have access to a laser cutter, the surfaces can also be cut from 1mm tinted PMMA.</p> <p>To put the model together, different techniques can be used:<br/> If PLA is used, I consider acetone welding the best solution. Apply it with a medical syringe (thin metal tip) directly into the tolerance gaps. Take care of the fumes!</p> <p>Another way is hot welding: With a clean tip, heat up your soldering iron to extrusion temperature or a bit below. Carefully smear the studs on the "corner" prints a little bit so tolerance gap is filled and the material connects with the "surface" prints.<br/> This works fine for PETG and PLA.</p> <p>Superglue or any other glue can also be used. Take care no residues smear the surfaces!<br/> If you chose to cut the surfaces from PMMA, then superglue is the only tested path. Welding might work with PLA as the melting point is similar, but its untested wether they connect.</p> <p><strong>Printing Instructions</strong><br/> Print all the parts in the amount noted in the file name.<br/> If you are going to use hot welding, use the corner parts ending in _w, they have a litte bit of extra material on the studs which makes it easer to get a strong weld. If glue is used, print the other parts.<br/> The Surface C should be printed 6 times regular and 6 times mirrored for each colour.<br/> All the surfaces are 1mm thick. I would print with 0.2mm z resolution with 2 floors and 2 ceilings. This leaves a single layer to choose an infill pattern which will be visible when the light is switched on. I will try a full honeycomb at less than 10% density, but a linear pattern aligned or diagonal with the right angles might also be pleasing.<br/> Print the edges also with .2mm z resolution, 2 shells and some 10-20% infill. The holder has to bear some more weight, go for 3 shells and 30% or more infill.<br/> If transparent material is used, a visually pleasing infill without orientation like gyroid should be used.</p> <p><strong>Assembly</strong><br/> Start assembling all the corners.<br/> One colour of A surfaces are special cases. 3 go with the special A edge with the hole, the other 3 get the special B edge in a later step.</p> <p>To ease assembly, you will need 6 rather strong (1-2kg holding force) magnets, best diam. 15-20mm. Put each surface piece in the construction helper and use a magnet in the pocket of the outside of the helper (can even be glued in) and another one directly on the surface piece (see picture for reference). With this, everything is fixed in place to be glued or welded.</p> <p>Working on similarly (use the helper), add the special "corner C holder" to the corner piece with the hole (Corner A hole).<br/> Mount the IKEA Hemma to the hemma holder, put the cord through the hole on the A corner, optionally glue/weld the holder to C corners. (Note: this might be a tight fit, as i could only guess the mesurements of the IKEA Hemma. The distance between the top of the ring and the hole in the corner piece is ~65mm.)</p> <p>Weld/glue all other C corners to the pieces consitsing of A surfaces. Put aside the same coloured as lamp holder, together with the 3 special B corners, this will not be glued/welded to the rest so its still possible to exchange the bulb.</p> <p>Now comes the nifty part: Put together the rest. Use the pictures or your imagination which corners connect what. Don't mess up the colours. Around an A surface corner go all other colours. At an F corner, all colours meet. Again, use pictures for reference.</p> <p>Take the set aside last A corner piece, either glue/weld the B corners without guidance to the surfaces and hope to get the angle good enough. Or hang the lamp, put the long pegs of the B corners through the corresponding holes. Now, with angular help, glue/weld the short pegs to the remaining corner.<br/> This corner can be removed to put in or change the light bulb.</p> <p>I designed this model in Fusion 360, this is the link to it (colouring in the browser does not work):<br/> <a href="https://a360.co/2ZIcnqb">https://a360.co/2ZIcnqb</a></p>
With this file you will be able to print Cube Fourfold Lamp for IKEA Hemma with your 3D printer. Click on the button and save the file on your computer to work, edit or customize your design. You can also find more 3D designs for printers on Cube Fourfold Lamp for IKEA Hemma.
