CTC Z-Axis-Stabilizer
thingiverse
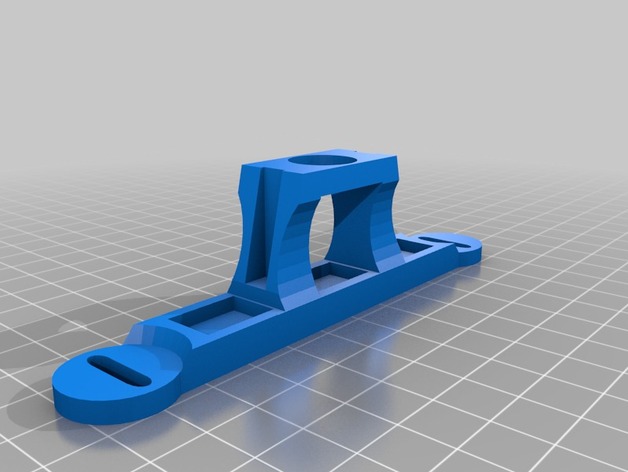
First trial to stabilize the Z-axis thread shaft of the CTC printer. The Z-axis is stabilized by lateral plain bearings, but wobbles very strongly and reduces X and Y positioning accuracy. This solution may also be usable for identical Makerbot and FlashForge printers. Best results are achieved when combined with better Z-axis brackets, like this one: http://www.thingiverse.com/thing:497923. This design was made using Tinkercad. You can edit it online at https://tinkercad.com/things/dXkjVFjrSjw. Instructions: To print, use the following settings: With support Layer 0.2 mm or less Infill 60-100% Before installation, check that the ball bearing fits well into its hole. To mount, move the platform down, and first install the blank stabilizer without a bearing. Leave the screws loose, then move the platform to the top position. Adjust the stabilizer to center the axis in the bearing hole. Next, press in the bearing (5 x 14 x 5 F605 ZZ; see important note below). Check for smooth movement of the platform by manually moving it up and down. Be sure there is no collision between the stabilizer and the platform case. Pull the screws while the platform is at the top position. Important Note: The Z-Axis of CTC's may differ. In my case, the Z-Axis has a pivot or spigot with 5 mm diameter on the top. As a result, I require an F605 ZZ bearing. Others may have an 8 mm end-to-end Z-Axis, requiring an F608 ZZ bearing instead. Measure the top of the Z-Axis previously to ensure you get the correct bearing.
With this file you will be able to print CTC Z-Axis-Stabilizer with your 3D printer. Click on the button and save the file on your computer to work, edit or customize your design. You can also find more 3D designs for printers on CTC Z-Axis-Stabilizer.